1998 Mercury Tracer Owner Guide 1st Printing - Page 161
1998 Mercury Tracer Manual
Page 161 highlights
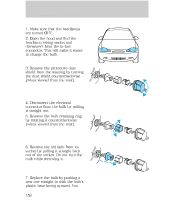
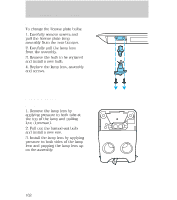
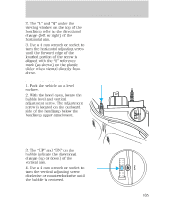
Maintenance and care Wagon 1. Open trunk/liftgate to expose the tail lamp assembly. Remove the two screws from the front of the lamp. 2. The tail lamp has hidden fasteners which can be disengaged by hitting the lamp, with the side of your hand, toward the side of the vehicle. 3. Remove the socket that contains the burned-out bulb by rotating it counterclockwise, then pulling it out of the lamp assembly. 4. Pull the burned-out bulb from the socket and install the new bulb. 5. Push the socket into the lamp, then secure it by rotating it clockwise. 6. Position the tail lamp on the vehicle and gently tap the lens to engage the clips. Install the screws. 161
-
 1
1 -
2
-
3
-
4
-
5
-
6
-
7
-
8
-
9
-
10
-
11
-
12
-
13
-
14
-
15
-
16
-
17
-
18
-
19
-
20
-
21
-
22
-
23
-
24
-
25
-
26
-
27
-
28
-
29
-
30
-
31
-
32
-
33
-
34
-
35
-
36
-
37
-
38
-
39
-
40
-
41
-
42
-
43
-
44
-
45
-
46
-
47
-
48
-
49
-
50
-
51
-
52
-
53
-
54
-
55
-
56
-
57
-
58
-
59
-
60
-
61
-
62
-
63
-
64
-
65
-
66
-
67
-
68
-
69
-
70
-
71
-
72
-
73
-
74
-
75
-
76
-
77
-
78
-
79
-
80
-
81
-
82
-
83
-
84
-
85
-
86
-
87
-
88
-
89
-
90
-
91
-
92
-
93
-
94
-
95
-
96
-
97
-
98
-
99
-
100
-
101
-
102
-
103
-
104
-
105
-
106
-
107
-
108
-
109
-
110
-
111
-
112
-
113
-
114
-
115
-
116
-
117
-
118
-
119
-
120
-
121
-
122
-
123
-
124
-
125
-
126
-
127
-
128
-
129
-
130
-
131
-
132
-
133
-
134
-
135
-
136
-
137
-
138
-
139
-
140
-
141
-
142
-
143
-
144
-
145
-
146
-
147
-
148
-
149
-
150
-
151
-
152
-
153
-
154
-
155
-
 156
156 -
 157
157 -
 158
158 -
 159
159 -
 160
160 -
 161
161 -
 162
162 -
 163
163 -
 164
164 -
 165
165 -
 166
166 -
167
-
168
-
169
-
170
-
171
-
172
-
173
-
174
-
175
-
176
-
177
-
178
-
179
-
180
-
181
-
182
-
183
-
184
 |
 |

Wagon
1. Open trunk/liftgate to expose
the tail lamp assembly. Remove the
two screws from the front of the
lamp.
2. The tail lamp has hidden
fasteners which can be disengaged
by hitting the lamp, with the side
of your hand, toward the side of
the vehicle.
3. Remove the socket that contains
the burned-out bulb by rotating it
counterclockwise, then pulling it
out of the lamp assembly.
4. Pull the burned-out bulb from
the socket and install the new
bulb.
5. Push the socket into the lamp,
then secure it by rotating it
clockwise.
6. Position the tail lamp on the
vehicle and gently tap the lens to
engage the clips. Install the
screws.
Maintenance and care
161