2003 Mercury Mountaineer Quick Reference Guide 2nd Printing - Page 2
2003 Mercury Mountaineer Manual

Page 2 highlights
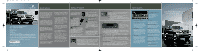
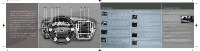
03Mountaineer QRG_11_02.QXD 10/27/03 11:04 AM Page 7 2 3 4 5 6 7 8 9 10 11 Interior Features 2 HEADLAMP CONTROLS This control is located to the lower left of your instrument panel. The first position to your right controls your parking lamps and the second position controls your headlamps. If your vehicle is equipped with fog lights, pull the control switch out one position to aid your visibility in fog, snow or rain. Autolamp (if equipped) automatically activates/deactivates your headlamps as necessary. To use autolamp, rotate the control counter-clockwise; to deactivate, rotate the control clockwise to the OFF position. Message Center Features 6 7 AUDIO SYSTEM (Please see reverse side for more details.) The luxurious Mountaineer was designed to enhance the way you live and help you handle your driving environment. It comes with many sophisticated features - you'll find some are intuitive, others may be new to you. Take a few minutes to use this Quick Reference Guide with the accompanying CD-ROM. Insert the CD into any audio CD player; find the numbered call-outs on the instrument panel portion of this guide, then select the corresponding number on the CD audio track for a fast, convenient introduction to Mountaineer. For details, place the CD into your computer (the CD jacket will tell you if your computer meets the minimum configuration requirements) - or consult your Owner's Guide. MESSAGE CENTER With the ignition in the ON position, the message center (located on your instrument cluster) displays important vehicle information through a constant monitor of vehicle systems. SPEED CONTROL Make sure you're traveling at or above 30 mph and press ON. To set a higher speed, press and hold SET + ; release when you've reached the desired speed. To set a lower speed, press and hold COAST or CST - ; release when you've slowed to the desired speed. To return to a previously set speed, press RES (you must be traveling above 30 mph). To disengage, depress the brake pedal or press the OFF button. TRIP ODOMETER This system registers the miles of individual journeys. On the standard instrument cluster, press and release the SELECT/RESET button to toggle between the odometer and trip odometer display. Press and hold the button to reset. On the optional instrument cluster, press and release the TRIP/RESET button to toggle between the odometer and trip odometer display. Press and hold the button to reset. 3 PARKING BRAKE RELEASE Pull the release lever to release the parking brake. Driving with the parking brake on will cause the brakes to wear out quickly and reduce fuel economy. The parking brake is not recommended to stop a moving vehicle. However, if the normal brakes fail, the parking brake can be used to stop your vehicle in an emergency. Since the parking break applies only the rear brakes, the vehicle's stopping distance will increase greatly and the handling of your vehicle will be adversely affected. 8 SERVICE ENGINE SOON WARNING LIGHT This light is located on the upper right of your instrument cluster. It illuminates when you start your engine; however, if it stays on, it may indicate your fuel cap isn't securely tightened, your vehicle is out of fuel or fuel quality is poor, or another condition requiring attention exists. COMPASS Driving past broadcast antenna, large buildings, bridges, power lines and the like can throw off compass readings. In most cases, the compass will automatically return to normal function within a few days. If it doesn't, see your Owner's Guide for instructions on adjusting the system by hand. DISTANCE TO EMPTY 4 ANTI-LOCK BRAKES ABS provides enhanced security by detecting wheel lockup in hard braking situations. The light (located on the lower left of your instrument cluster) will illuminate when you start your engine; however, if it stays on, continues to flash or fails to illuminate, see your dealership's service department immediately. (Sometimes your wheels may accumulate brake dust. Clean them with Detail Wash, available from your authorized Ford, Lincoln or Mercury dealer.) 9 CLIMATE CONTROL SYSTEM (Please see reverse side for more details.) Gives you an estimate of how far you can drive with your remaining fuel under normal driving conditions. 10 CLOCK To set the hour, press and hold the CLK control and press SEEK; press the left arrow to decrease the hours, the right arrow to increase. To set the minutes, press and hold CLK control and press TUNE; press the left arrow to decrease minutes, the right arrow to increase minutes. AVERAGE FUEL ECONOMY Keep track of your fuel economy. Remember to press the RESET control after setting the speed control for accurate highway fuel economy readings. LANGUAGE This can be changed by pressing and holding RESET to cycle through the choices. Press RESET again to set your language choice. 5 TURN SIGNALS AND WINDSHIELD WIPER WASHERS Push the stalk down to activate your left turn signal, up to activate the right turn signal. To use your windshield wiper washers: For a single swipe, push the end of the stalk briefly. Push and hold for three swipes with wash. Push and hold for a longer wash (up to ten seconds). The bars of varying length are for intermittent wipers. When in this position rotate the control upward for fast intervals and downward for slow intervals. Rotate the windshield wiper control to choose low or high speed intervals. SYSTEMS CHECK 11 WINDSHIELD DEFROSTING/DEFOGGING To defrost/defog your windshield, select defrost. To defrost your rear window, press the rear defroster control (located on your instrument panel); press again to turn it off. (Defrost turns off automatically after 10 minutes; if you need more defrost time, press again.) If the outside temperature is about 43°F or higher, the air conditioner will dehumidify your interior automatically. This will review the condition of fuel level, washer fluid level, oil life, engine temperature, oil pressure, tire pressure (if equipped), brake fluid levels and your charging system. For each of the monitored systems, the message center will indicate either an OK message or a warning message for three seconds. System warnings alert you to possible problems or malfunctions.
-
 1
1 -
 2
2
 |
 |
