2004 Mercury Grand Marquis Quick Reference Guide 2nd Printing - Page 2
2004 Mercury Grand Marquis Manual

Page 2 highlights
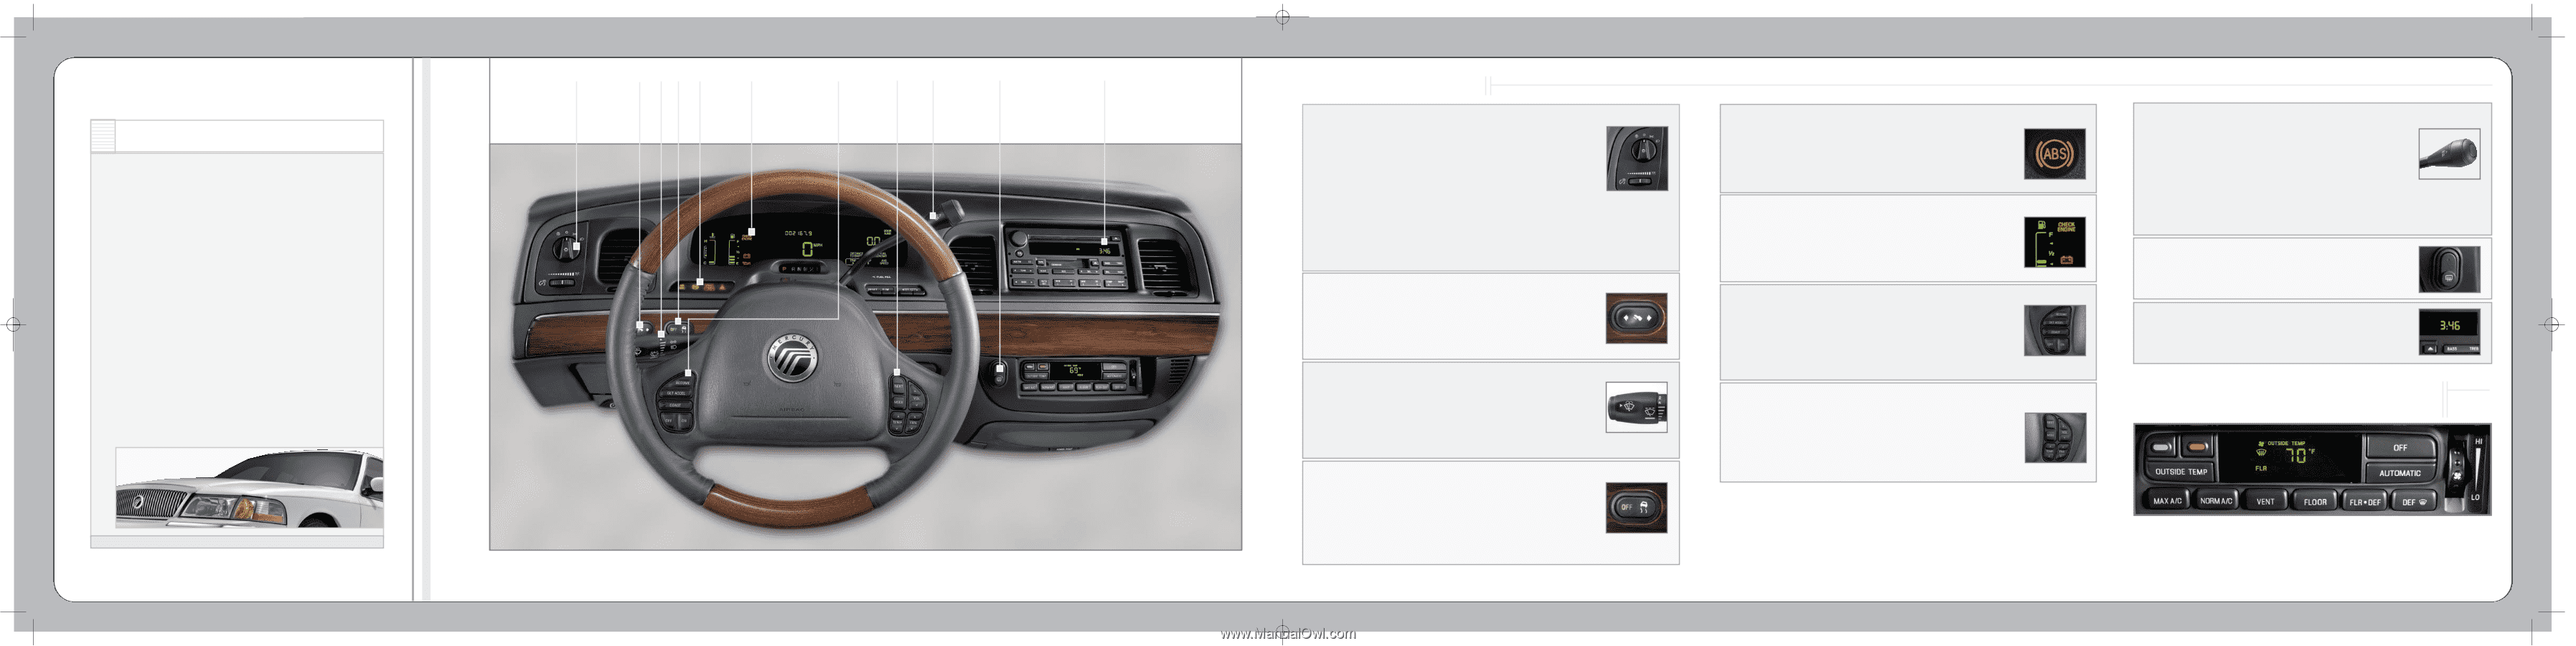
21605 Grand Marquis QRG 10/3/03 10:54 AM Page 7 1 2 3 4 5 6 7 8 9 10 11 INTERIOR FEATURES 1| HEADLAMP CONTROL 5| ANTI-LOCK BRAKES ABS provides enhanced security by detecting wheel lockup in hard braking situations.The light will illuminate when you start your engine; however, if it stays on, continues to flash or fails to illuminate, see your dealership's service department immediately. (Wheels sometimes accumulate brake dust. Clean them with Detail Wash, available from your authorized Ford, Lincoln or Mercury dealer.) 9| OVERDRIVE The normal driving position for the best fuel economy with your automatic transmission is Overdrive. It will increase your fuel economy when cruising at a constant speed for an extended period of time. Overdrive: Overdrive "On" ("Off" switch not depressed) is the normal driving position for this automatic overdrive transaxle. To deactivate overdrive: If your vehicle is equipped with a columnshift transmission, press the Transmission Control Switch located on the end of the gearshift lever. 2004 GRAND MARQUIS Thank you for choosing Mercury Grand Marquis. This luxurious sedan will give you and your passengers room to stretch out, whether your trips take you around the corner or across the country. En route, you're sure to appreciate responsive V8 power, rear-wheel drive performance and the added confidence of advanced safety features. Your new Grand Marquis also has many sophisticated features designed for your comfort, convenience and security. This guide will help you get acquainted with them. (For a comprehensive review of all vehicle features, please take time to review your Owner's Guide.) We wish you and yours many pleasant miles. Headlamps:The first position clockwise will illuminate the parking lamps; the second position will illuminate the headlamps. Autolamps:Turn the control counterclockwise to have the light-sensitive system automatically control your headlamps. High Beams: Your high beam controls are located in your turn signal stalk. Push it forward to activate your high beams; pull it towards you to deactivate. Daytime Running Lamps (If equipped):To turn your highbeam headlamps on with reduced output, initiate high beams while key is in ON position, parking brake is released and headlamp is in the OFF or parking lamps position. Dimmer:To adjust the brightness of your instrument panel, rotate the dimmer control to the left or right. 6| CHECK ENGINE It's normal for warning and control lights to illuminate when you start your engine. If the light remains on, have your vehicle serviced at your first available opportunity. If the light is flashing, it indicates engine misfire, which could damage your catalytic converter. Drive cautiously (avoiding heavy acceleration and deceleration) and have your vehicle serviced as soon as possible. 10| REAR WINDOW DEFROSTER Push to clear the rear window of thin ice and fog. The defroster turns off automatically after 10 minutes, or when the ignition is turned OFF. 2| ADJUSTABLE PEDALS (If equipped) Your accelerator and brake pedals can be adjusted within approximately 3" of original placement to provide you with an extra measure of driving confidence. Stop your vehicle, put the gearshift lever in P (Park) and press the rocker control to adjust the pedals towards you or away from you; adjust until you find the position that offers the greatest comfort and control. 7| SPEED CONTROL To engage your speed control, make sure you're traveling at or above 30 mph and press "ON." To set a speed, press SET ACCEL. To set a higher speed, press and hold SET ACCEL; release when you've reached the desired speed. To set a decreased speed, press and hold COAST; release when you've slowed to the desired speed. To return to a previously set speed, press RES ("resume" - you must be traveling above 30 mph). To disengage, depress the brake pedal or press "OFF" . 11| CLOCK Press the RDS control until SELECT HOUR or SELECT MINS is displayed. Use the left arrow of the SEL control to decrease hours/minutes, or the right arrow of the SEL control to increase hours/minutes. 3| TURN SIGNAL AND WINDSHIELD WIPER/WASHER Push the stalk down to activate your left turn signal; up to activate the right turn signal. Rotate the windshield wiper control forward or backward to the desired interval - low- or high-speed position.The bars of varying length indicate the timing of your intermittent wipers.When in the intermittent position, rotate the control forward for fast intervals; backward for slow intervals. Push the end of the stalk to activate the washer. For a longer wash cycle, push and hold. 8| STEERING WHEEL, RADIO AND CLIMATE CONTROLS (If equipped) Radio control features: Press VOL up or down to adjust the volume. Press MODE to select AM, FM1, FM2,TAPE or CD (if equipped). In radio mode, press NEXT to select a preset station from memory. In tape or CD mode, press NEXT to listen to the next selection or track. Climate control features: Press TEMP up or down to adjust the temperature; press FAN up or down to adjust fan speed. Electronic Automatic Temperature Control System (If equipped) 4| TRACTION CONTROL™ (If equipped) The Traction Control™ system allows your vehicle to make better use of available traction on slippery surfaces, especially snow and ice covered roads. If you get stuck in snow, try switching the system off by pressing the control button, then cautiously applying the gas. (Turning the traction control system off may help free the vehicle by allowing the tires to spin freely; applying too much gas may worsen the situation.) Press AUTOMATIC and use the temperature controls to select the temperature you prefer. This system will then heat or cool to achieve that temperature, determining fan speed, airflow location and choosing between use of outside or recirculated air. If unusual conditions exist, the manual overrides allow you to select airflow locations and fan speed.To return to automatic control, press AUTOMATIC. Press OUTSIDE TEMP to display the outside temperature.Please consult your Owner's Guide for details.
-
 1
1 -
 2
2
 |
 |