2004 Mercury Marauder Quick Reference Guide 2nd Printing - Page 2
2004 Mercury Marauder Manual
Page 2 highlights
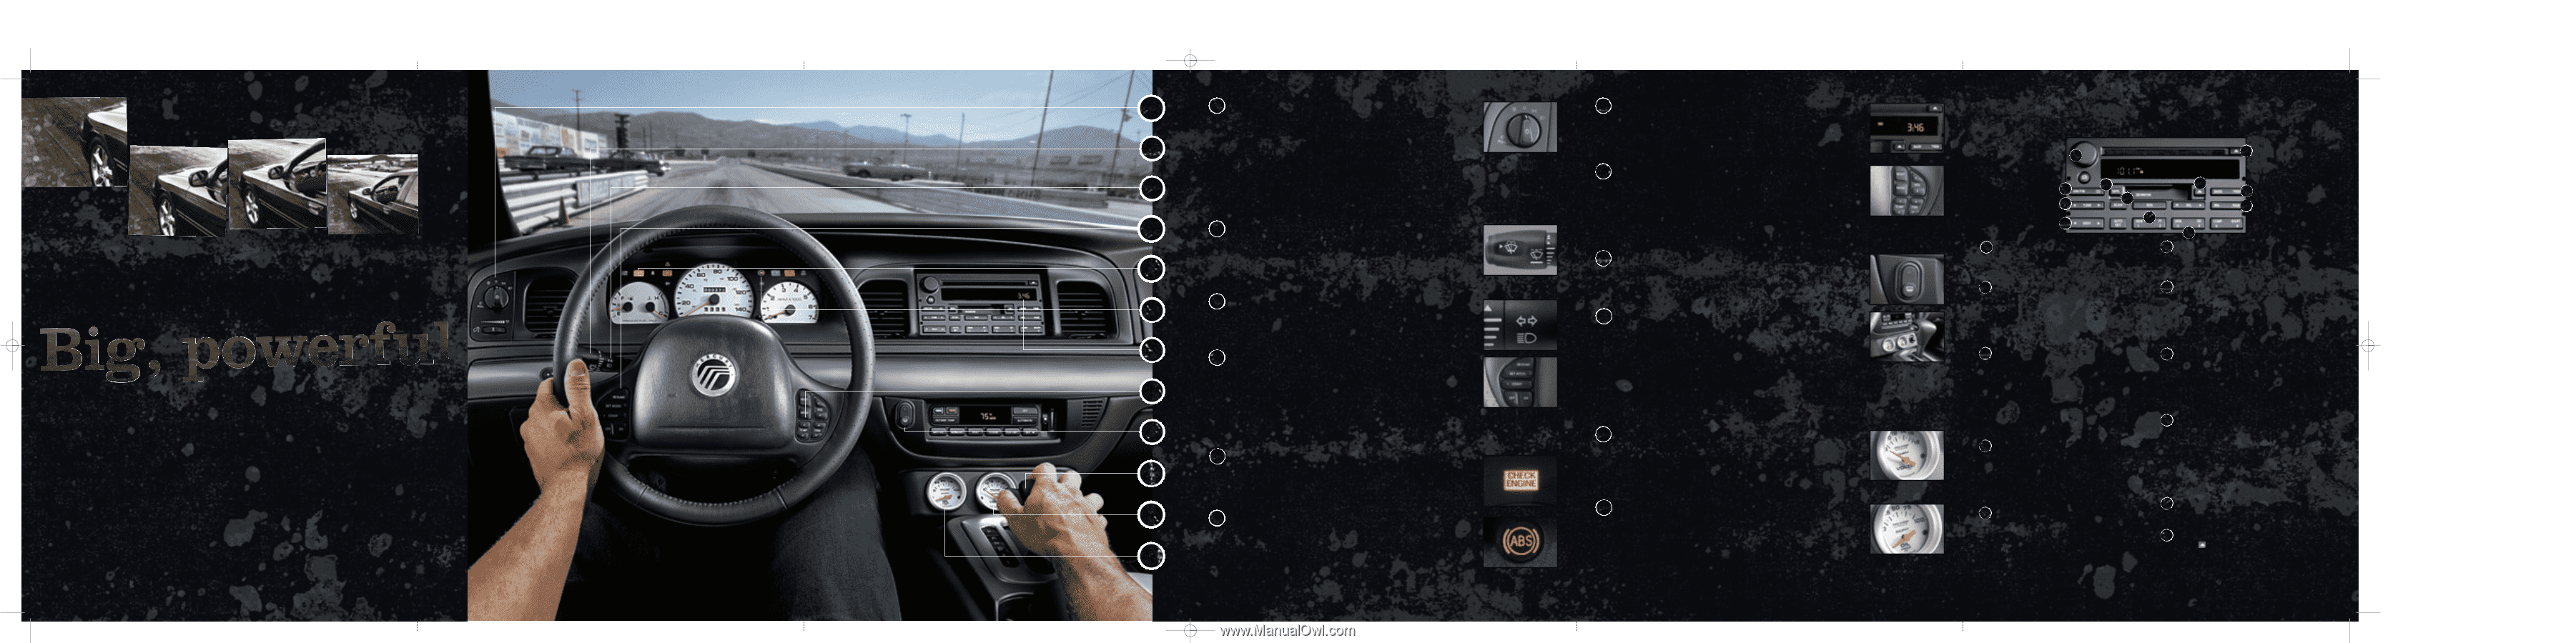
21606_Marauder_QRG_091603 10/27/03 7:15 AM Page 7 2 3 4 5 Big, powerful and aggressive - the Mercury Marauder 2 Headlamp Controls Headlamps: The first position clockwise will illuminate the 8 Clock Controls Audiophile System Premium AM/FM Stereo/Cassette/Single CD Audio System/Subwoofer with Internal Amplifier A K parking lamps; the second position will illuminate the headlamps. Autolamps: Turn the control counterclockwise to have the lightsensitive system automatically control your headlamps. Daytime Running Lamps (if equipped): Turns the lowbeam headlamps on with reduced output. To activate, the key must be in the ON position, the parking brake is released and the headlamp is in the OFF or parking lamps position. Foglamps: Pull the headlamp control toward you to turn them on. (Foglamps can be used with the headlamp control in the parking lamp, low beam or autolamp positions.) Dimmer: To adjust the brightness of your instrument panel, rotate the dimmer control to the left or right. Press the RDS control until SELECT HOUR or SELECT MINS is displayed. Use the left arrow of the SEL control to decrease hours/minutes, or the right arrow of the SEL control to increase hours/minutes. 9 Steering Wheel Radio and Climate Controls Radio Control Features: Press VOL up or down to adjust the D E C A B G J I K F H 3 Windshield Wiper/Washer Controls was designed for the individual who doesn't follow the crowd. It was created for the enthusiast who demands the performance of an 6 7 8 9 10 1 1 1 2 1 3 Rotate the windshield wiper control to the desired interval, lowor high-speed position. The bars of varying length are for intermittent wipers. When in this position, rotate the control upward for fast intervals and downward for slow intervals. Push the end of the stalk to activate the washer. Push and hold for a longer wash cycle. volume. Press MODE to select AM, FM1, FM2, TAPE or CD. In radio mode, press NEXT to select a preset station from memory. In tape or CD mode, press NEXT to listen to the next selection or track. Climate Control Features: Press TEMP up or down to adjust the temperature; press FAN up or down to adjust fan speed. 10 Rear Window Defroster Press to clear the rear window of thin ice and fog. The defroster turns off automatically after a predetermined amount of time, or when the ignition is turned off. Volume / Power Control Press the control to turn the audio system on or off. Turn the control to raise or lower the volume. B To choose Tape or CD Bass + Treble Control Press BASS or TREB; press the left SEL arrow to decrease the level of BASS or TREB; the right SEL arrow to increase the level. G Scan Function F 4 Turn Signal and High Beams Controls 1 1 exhilarating all-aluminum 4.6L DOHC 32-valve V8, someone who knows how to handle 302 horses and 318 ft. lbs. of torque, someone who can appreciate the satin aluminum instrument cluster and racing-style instrumentation, someone who refuses to sacrifice five-passenger luxury, comfort and convenience. Push the stalk down to activate your left turn signal; up to activate the right turn signal. To use your high beams, push the turn signal stalk forward; pull toward you to deactivate. Overdrive / Drive Overdrive: The normal driving position for the best fuel 5 Speed Control Someone who wants it all. "It was designed for someone like you." We know you're anxious to get out there and experience your new Marauder, so we've created this Quick Reference Guide to acquaint you with the features you'll use most. To use this guide with the audio component of the accompanying into any audio To engage your speed control, make sure you're traveling at or above 30 mph and press ON. To set a speed press SET ACCEL. To set a higher speed, press and hold SET ACCEL; release when you've reached the desired speed. To set a lower speed, press and hold COAST; release when you've slowed to the desired speed. To return to a previously set speed, press RESUME (you must be traveling above 30 mph). To disengage, depress the brake pedal or press OFF. economy is Overdrive with this automatic transmission. It will increase your fuel economy when cruising at a constant speed for an extended period of time. Drive: Note however, Drive provides more engine braking than Overdrive and is useful when driving with a heavy load, towing a trailer up or down steep hills, or any time you want additional engine braking. To activate Drive, press the control switch on the gearshift lever with the gearshift in the Drive position. Your transmission will operate in gears one through three. To return to Overdrive, press the transmission control switch. The O/D OFF indicator will no longer be illuminated. With a tape already in place, choose TAPE to begin tape play while in radio or CD mode. With a CD already in place, choose CD to begin CD play while in radio or tape mode. The first track of the CD will begin playing. C The SCAN function works in radio, tape or CD modes. Press SCAN to hear a brief sampling of all listenable stations in radio mode, or to sample all selections in tape or CD modes. Press SCAN again to stop at the desired selection. H Balance + Fade 12 Voltmeter Gauge Seek Function The SEEK function control works in radio, tape and CD modes. In radio mode, press the left arrow to find the next listenable station down the frequency band; the right arrow to find the next listenable station up the frequency band. In tape or CD mode, press the left arrow for the previous selection or track; the right arrow for the next selection or track. D AM/FM Selection Press BAL and use the left SEL arrow to shift the sound to the left speakers; the right SEL arrow to shift sound to the right speakers. Press FADE and the right SEL arrow to shift sound to the front speakers; the left SEL arrow to shift sound to the rear. Radio Station Memory Preset These controls can be used to select up to six preset AM stations and twelve FM stations (six in FM1 and six in FM2). Choose the frequency band with the AM/FM select control; select a station - press and hold the memory preset control until the sound returns. Your selection will be held in the memory. Fast Forward + Rewind To fast-forward a CD or tape, press FF; to rewind, press REW. J K Eject I 6 Check Engine Warning Light CD-ROM, insert the CD CD player; find the numbered call-outs on the instrument panel portion of this guide, then select the corresponding number on the CD audio track. For an in-depth interactive This light will inform you if there is a problem with your engine. It's normal for the light to illuminate briefly when you start your engine. If the light stays on or flashes, there could be a problem. Have your vehicle serviced as soon as possible. This gauge measures your vehicle's battery charging voltage. If it consistently indicates less than 13.0 volts or more than 15.0 volts during normal operation, have your vehicle's electrical system checked. The AM/FM select control works in radio, tape and CD modes. In radio mode, use this control to switch between AM, FM1 or FM2 memory preset stations. In tape or CD mode, use this control to stop and begin playing the radio. Tune Adjust To move to the next frequency down the radio band, press the left arrow. To move through all the frequencies quickly, press and hold the left arrow. Press the right arrow to move up the band to the next station; hold the arrow to move quickly through the other frequencies. E 13 7 Engine Oil Pressure Gauge Anti-lock Brakes introduction to your new vehicle, place the CD into your computer. (The CD jacket will tell you if your computer meets the minimum configuration requirements.) For detailed information, please consult your Owner's Guide. ABS provides enhanced security by detecting the onset of wheel lockup during brake applications. The light will illuminate momentarily when you start your engine; however, if it fails to illuminate, stays on or continues to flash, see your nearest dealership's service department immediately. This gauge indicates your Marauder's engine oil pressure. If the indicator drops below the normal operating range of 50-57 psi or the minimum low pressure (6 psi) when your engine is running, shut off the engine and check the oil level. Add oil if necessary. Don't operate your vehicle with the oil pressure below normal ranges (50-57 psi) or your engine may be severely damaged. Press to stop and eject a tape or CD. For more detailed information on the functions of this audio system, please see your Owner's Guide.
-
 1
1 -
 2
2
 |
 |