2007 Mercury Milan Quick Reference Guide 1st Printing - Page 2
2007 Mercury Milan Manual
Page 2 highlights
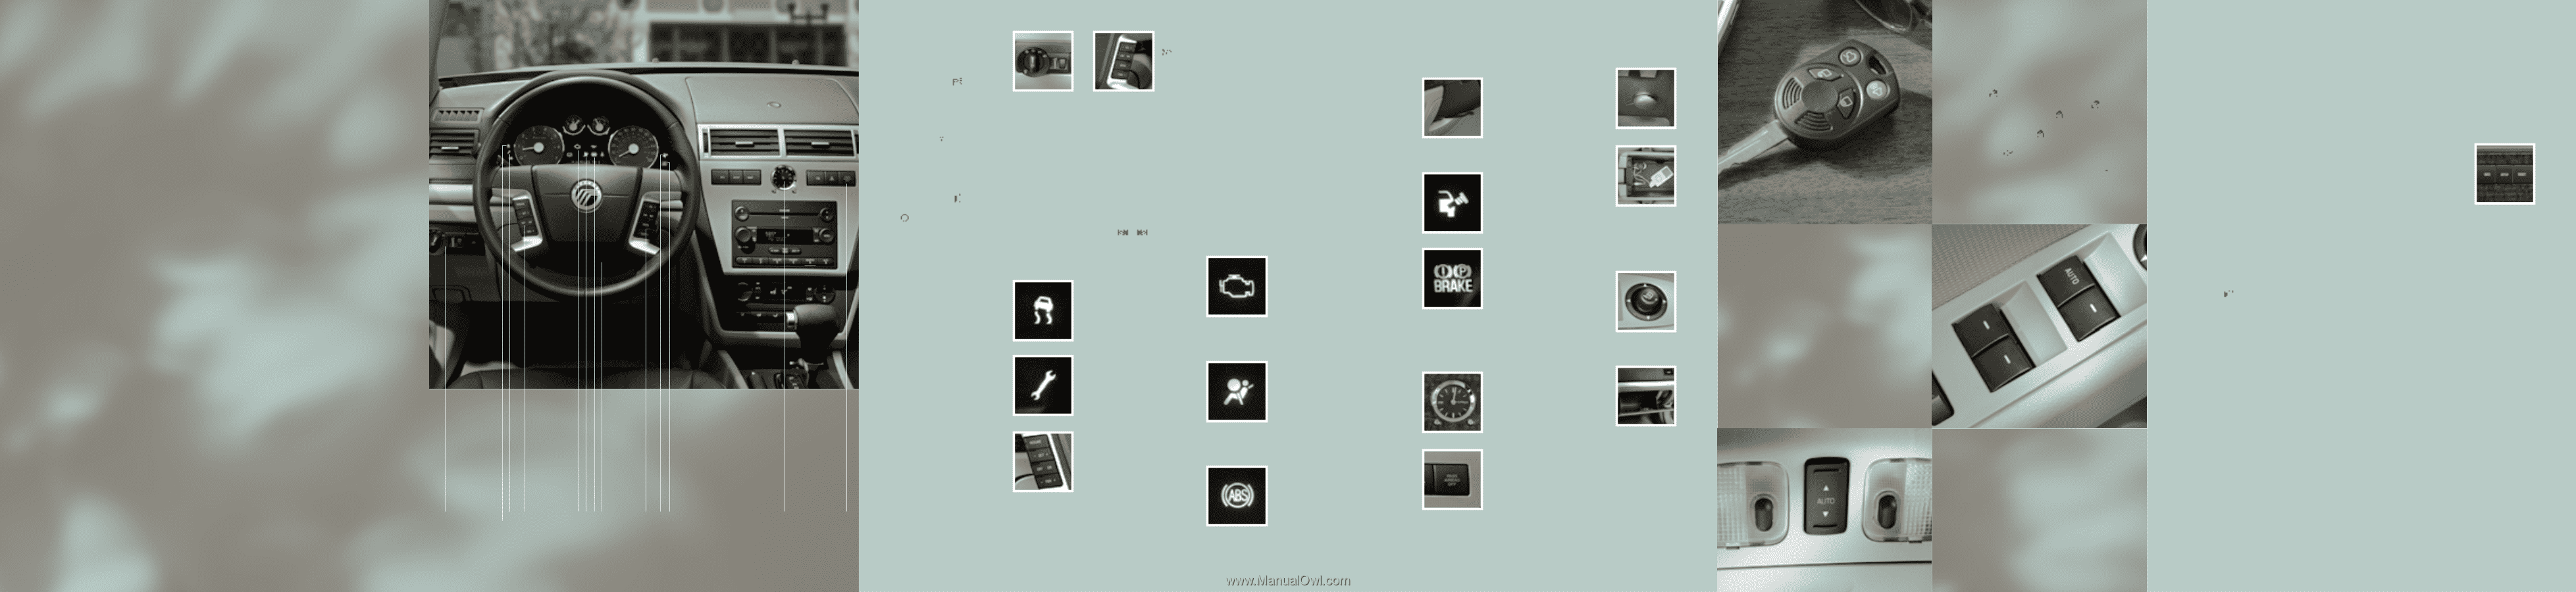
Crisp, tapered lines accentuate the bold stance of this sleek and modern sedan. Inside, available leather seating and satin aluminum finish accents create a comfortable yet stylish interior. The available Duratec V6 engine provides a head-turning combination of power and efficiency that will take you anywhere you want to go in style. Mercury Milan is the perfect combination of sophistication and practicality. We invite you to explore this easy-to-use Quick Reference Guide to acquaint you with some of the features of your Mercury Milan. For more detailed information, refer to your Owner's Guide. INSTRUMENT PANEL 1 Headlamps, Foglamps (if equipped), and Panel Dimmer Control Turn the control one position to the right to turn on the parking lamps , instrument panel lamps, license plate lamps and tail lamps. Turn the control to the second position on the right to turn on the headlamps . Turn the control one position to the left to activate the autolamp feature (if equipped), which automatically turns the exterior lamps on and off, based on available daylight. The system also keeps the lights on for a short time after the ignition is turned off. Pull the control out to activate the fog lamps. The fog lamp indicator light will illuminate. The fog lamps will not operate when the control is turned off or when the high beams are on. Use the panel dimmer control to adjust the level of brightness on the instrument panel during parking lamp and headlamp operation. Move the control to the full upright position, past the detent, to turn on the interior lamps. 2 Traction Control™ Light (if equipped) This icon illuminates when the Traction Control™ is active. If the light remains on, have the system serviced immediately by an authorized dealer. 3 Throttle Control / Transmission Light This icon illuminates when a powertrain or AWD fault has been detected. Contact an authorized dealer as soon as possible. 4 Steering Wheel Controls (if equipped) Your steering wheel controls allow you to set and adjust vehicle speed, as well as make adjustments in your audio and climate control systems. The appearance of your vehicle's speed control switches may vary according to your option package. To set the speed control, ensure that the vehicle speed is at least 30 mph. Press and release ON. Accelerate to the desired speed. Press and release SET (+). The speed control indicator light will illuminate in the cluster. Remove your foot from the accelerator. Once set, press and release SET (-) or (+) to decrease or increase the speed in small increments. Or, press and hold until you reach the desired speed. To disengage speed control but not erase the previous set speed, press the brake pedal or clutch pedal (if equipped). To disengage and erase the speed, press OFF. Press - TEMP + to decrease/increase the cabin temperature. Press - FAN + to decrease/increase fan speed. Press - VOL + to decrease/increase audio volume. Press MEDIA to select AM, FM1, FM2 or CD. Press to access the previous/next preset radio station or CD track. 5 Check Engine Light The Check Engine light illuminates briefly when the ignition is turned on. If the light remains on or flashes after the engine is started, the On Board Diagnostics System (OBD-II) has detected a malfunction. Drive in a moderate fashion and have your vehicle serviced immediately by an authorized dealer. 6 Airbag Readiness Light The airbag readiness light illuminates briefly when the ignition is turned on. If this light remains on or continues to flash after the engine is started, have the system serviced immediately by your authorized dealer. A chime will also sound if a malfunction in the supplemental restraint system is detected. 7 Anti-lock Brake System (ABS) Warning Light (if equipped) The ABS light illuminates briefly when the ignition is turned on. If the ABS light remains on or flashes after the engine is started, have the system serviced immediately by your authorized dealer. Normal braking (less ABS) will still be functional unless the brake warning light is also illuminated. Note: It is normal to feel a pedal pulsation or hear a slight noise when the ABS system is activated. 8 Tilt / Telescopic Steering Wheel Lever Push the lever down to unlock the steering column. Move the steering wheel up or down and in or out to find the desired position. While holding the steering wheel in place, pull the lever up to lock the steering column. 9 Check Fuel Cap Light This icon illuminates when the fuel cap may not be properly installed. If you continue to drive with this light illuminated, the Check Engine Indicator light may come on. 10 Brake System Warning Light The brake system warning light illuminates briefly when the ignition is turned on. This light will remain on when the parking brake is applied and the ignition is on. If this light remains on after releasing the parking brake, this indicates a low brake fluid level or a brake system malfunction. Have the brake system inspected immediately by an authorized dealer. 11 In-Dash Clock Press + to advance the time. Press - to reverse the time. signifying the passenger airbag is not engaged. For further information on the front passenger sensing system, refer to your Owner's Guide. Auxiliary Power Point The auxiliary power point is located inside the center console utility compartment. Note: Do not use the power point over the capacity of 12VDC / 180W. Auxiliary Input Jack (if equipped) Your vehicle is equipped with an Auxiliary Input Jack (AIJ) located inside the console bin. This allows you to plug and play auxiliary audio devices. Press AUX repeatedly on your audio system to access. When LINE IN appears in the display, plug in your auxiliary audio device. For more detailed information, please refer to your Owner's Guide. Power Outside Mirrors Rotate the control clockwise to adjust the right mirror. Rotate the control counterclockwise to adjust the left mirror. Move the control in the direction you wish to tilt the mirror. Return the control to the center position to lock the mirrors in place. Glove box CD Storage Your vehicle is equipped with a special area for your CD storage. It is located inside the glove box, to the right of the main bin. Integrated Keyhead / Keyfob Transmitter (IKT) and Remote Entry System Features Your vehicle comes equipped with two specially programmed Integrated Keyhead Transmitters (IKTs). IKTs are both a programmed ignition key and a remote keyless entry transmitter. Handle the IKT carefully when starting the car to avoid accidentally pressing any of the remote entry buttons. Press once to unlock the driver's door. The interior lamps will illuminate. Press twice to unlock all the doors. Press once to lock all the doors and activate the perimeter alarm system (if equipped). Press twice to confirm all the doors and trunk are closed. Press and hold for 1.5 seconds to activate the panic alarm. (A short press and release can be used to deactivate the panic alarm.) Press twice within 3 seconds to open the trunk. Ensure that you keep the IKT adhesive security label in a safe place for future reference. Additional Features Auto Dimming Rear View Mirror (if equipped) The rear view mirror will automatically darken when the mirror detects bright lights behind the vehicle to help minimize glare. Rear Seat Release Both rear seats can be folded down for additional cargo space. Pull the release handle located inside the trunk to fold down the seat. Securilock™ The Securilock™ passive anti-theft system is an engine immobilization system. This system is designed to help prevent the engine from being started unless a coded Integrated Keyhead Transmitter (IKT) programmed to your vehicle is used. Using the wrong type of coded key may lead to a "no start" condition. The anti-theft indicator in the instrument cluster will flash to indicate the Securilock system is functioning as a theft deterrent when the ignition is turned off. Autolock/Auto-unlock (if equipped) Autolock automatically locks all vehicle doors when all the doors are closed, the ignition is in the RUN position, you shift into any gear that puts the vehicle into motion, and the vehicle is moving above 12 mph (20 km/h). Auto-unlock automatically unlocks all the doors when the vehicle has been traveling above 12 mph (20 km/h), comes to a complete stop, and the driver door is opened within 10 minutes of the ignition being turned off. Note: For instructions on disabling autolock, please refer to your Owner's Guide or see your authorized dealer. BeltMinder® The BeltMinder® is a supplemental warning system which intermittently chimes to alert the driver and passenger if their safety belts are not fastened. For further information, please refer to your Owner's Guide. Message Center The message center displays important vehicle information through a constant monitoring of vehicle systems. The message center displays features such as trip odometer, compass (if equipped), distance to empty, average fuel economy, and a language selector. The message center also provides vehicle system checks and will notify you of potential vehicle problems with a display of system warnings. INFO: Press to scroll through the following displays: Odometer, Trip Odometer A or B, Distance to Empty, Average Fuel Economy, Average Speed, Compass (if equipped), and Trip Elapsed Time 1 or 2. RESET: Press to select and reset functions shown in the Info (Information) and Setup Menu. SETUP: Press to scroll through: System Check, Units (English/Metric), and Language (English, Spanish, or French). For further information, please refer to your Owner's Guide. Visors Your vehicle may have a slide on rod feature that provides additional sunlight coverage. Rotate the visor towards the side window and extend it rearward. Note: The visor must be retracted before moving it back. Power Windows Push down (to the first detent) and hold the switch to open. Pull up (to the first detent) and hold the switch to close. One touch down: This function allows the driver's window to open fully without holding the control down. Push the switch completely down to the second detent and release quickly. The window will then fully open. Momentarily press the switch to any position to stop the window operation. Accessory Delay: With accessory delay, the window switches, audio system, and moonroof (if equipped) may be used for up to 10 minutes after the ignition switch is turned to the 1 (LOCK) (OFF) position or until any door is opened. 1 23 4 56 78 4 9 10 11 12 12 Passenger Airbag Off Your vehicle has a safety feature which automatically knows when to engage or disengage the passenger airbag. When the system senses no weight or light to medium weight (such as a heavy binder or suitcase), in the front passenger seat, the PASS AIRBAG OFF indicator lamp will illuminate, Moon Roof (if equipped) The moon roof is equipped with a one-touch, express opening, closing, and venting feature. To open the moon roof, press and release the rear portion of the control. To close the moon roof, press and release the front portion of the control. To stop motion at any time during the one-touch operation, press the control a second time.
-
 1
1 -
 2
2
 |
 |