1997 Nissan Maxima Owner's Manual - Page 87
1997 Nissan Maxima Manual
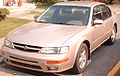
Page 87 highlights
than 2 seconds. (For example, in the diagram ch2 is to be memorized. The radio mutes when the select button is pushed.) 3. The indicator "ch2" will then come on and the sound will resume. Memorizing is now complete. 4. Other buttons can be set in the same manner. If the battery cable is disconnected, or if the fuse blows, the radio memory will be cancelled. In that case, reset the desired stations. HA1078 Cassette tape operation Turn the ignition key to "ACC" or "ON", then carefully insert the cassette tape into the tape door. The cassette tape will automatically pull into the player. Do not force the cassette tape into the tape door. This could cause player damage. The cassette tape will automatically change directions to play the other side when the first side is completed. ¼ To maintain good quality sound, NISSAN recommends that you use cassette tapes of 60 minutes or shorter in length. ¼ Cassette tapes should be removed from the player when not in use. Store cassettes in their protective cases and away from direct sunlight, heat, moisture and magnetic sources. Direct sunlight can cause the cassette to become deformed. The use of deformed Adjusting tone quality Push then turn the BASS and TREB (TREBLE) control knob to obtain the most pleasant sound. Adjusting speaker sound balance Push then pull the BAL (BALANCE) control knob to adjust the volume between the right and left speakers. FADER volume control Push then pull the FADER control knob to adjust the volume between the front and rear speakers. 3-14
-
 1
1 -
2
-
3
-
4
-
5
-
6
-
7
-
8
-
9
-
10
-
11
-
12
-
13
-
14
-
15
-
16
-
17
-
18
-
19
-
20
-
21
-
22
-
23
-
24
-
25
-
26
-
27
-
28
-
29
-
30
-
31
-
32
-
33
-
34
-
35
-
36
-
37
-
38
-
39
-
40
-
41
-
42
-
43
-
44
-
45
-
46
-
47
-
48
-
49
-
50
-
51
-
52
-
53
-
54
-
55
-
56
-
57
-
58
-
59
-
60
-
61
-
62
-
63
-
64
-
65
-
66
-
67
-
68
-
69
-
70
-
71
-
72
-
73
-
74
-
75
-
76
-
77
-
78
-
79
-
80
-
81
-
 82
82 -
 83
83 -
 84
84 -
 85
85 -
 86
86 -
 87
87 -
 88
88 -
 89
89 -
 90
90 -
 91
91 -
 92
92 -
93
-
94
-
95
-
96
-
97
-
98
-
99
-
100
-
101
-
102
-
103
-
104
-
105
-
106
-
107
-
108
-
109
-
110
-
111
-
112
-
113
-
114
-
115
-
116
-
117
-
118
-
119
-
120
-
121
-
122
-
123
-
124
-
125
-
126
-
127
-
128
-
129
-
130
-
131
-
132
-
133
-
134
-
135
-
136
-
137
-
138
-
139
-
140
-
141
-
142
-
143
-
144
-
145
-
146
-
147
-
148
-
149
-
150
-
151
-
152
-
153
-
154
-
155
-
156
-
157
-
158
-
159
-
160
-
161
-
162
-
163
-
164
-
165
-
166
-
167
-
168
-
169
-
170
-
171
-
172
-
173
-
174
-
175
-
176
-
177
-
178
-
179
-
180
-
181
-
182
-
183
-
184
-
185
-
186
-
187
-
188
-
189
-
190
-
191
-
192
-
193
-
194
-
195
-
196
-
197
-
198
-
199
-
200
-
201
-
202
-
203
-
204
-
205
-
206
-
207
-
208
-
209
-
210
-
211
-
212
-
213
-
214
-
215
 |
 |
