2000 Oldsmobile Alero Owner's Manual - Page 144
2000 Oldsmobile Alero Manual

Page 144 highlights
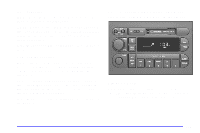
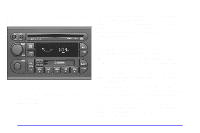
RCL: Press this button briefly to recall the station being played or to display the clock. To change what is normally shown on the display (station or time), press the RCL button until you see the display you want, then hold the RCL button until the display flashes. If you press the button when the ignition is off, the clock will show for a few seconds. Finding a Station AM FM: Press this button to switch between AM, FM1 and FM2. The display shows your selection. TUNE: Press this knob lightly so it extends. Turn it to choose radio stations. Push the knob back into its stored position when you're not using it. SEEK: Press the up or down arrow to go to the next higher or lower station and stay there. The sound will mute while seeking. SCAN: Press this button and release it to listen to stations for a few seconds. The radio will go to a station, stop for a few seconds, then go on to the next station. Press the button again to stop scanning. The sound will mute while scanning, and SCAN will appear on the display. If you press SCAN for more than two seconds, the radio will change to P SCAN mode. P SCAN will appear on the display. PUSHBUTTONS: The five numbered pushbuttons let you return to your favorite stations. You can set up to 15 stations (five AM, five FM1 and five FM2). Just: 1. Turn the radio on. 2. Press AM FM to select the band. 3. Tune in the desired station. 4. Press TONE to select the equalization that best suits the type of station selected. 5. Press and hold one of the five numbered buttons. The sound will mute. When it returns, release the button. Whenever you press that numbered button, the station you set will return and the tone that you selected will also be automatically selected for that button. 6. Repeat the steps for each pushbutton. P SCAN: Press SCAN for more than two seconds, and P SCAN will appear on the display. The radio will go to the first preset station stored on your pushbuttons, stop for a few seconds, then go on to the next preset station. Press SCAN again to stop scanning. 3-10
-
 1
1 -
2
-
3
-
4
-
5
-
6
-
7
-
8
-
9
-
10
-
11
-
12
-
13
-
14
-
15
-
16
-
17
-
18
-
19
-
20
-
21
-
22
-
23
-
24
-
25
-
26
-
27
-
28
-
29
-
30
-
31
-
32
-
33
-
34
-
35
-
36
-
37
-
38
-
39
-
40
-
41
-
42
-
43
-
44
-
45
-
46
-
47
-
48
-
49
-
50
-
51
-
52
-
53
-
54
-
55
-
56
-
57
-
58
-
59
-
60
-
61
-
62
-
63
-
64
-
65
-
66
-
67
-
68
-
69
-
70
-
71
-
72
-
73
-
74
-
75
-
76
-
77
-
78
-
79
-
80
-
81
-
82
-
83
-
84
-
85
-
86
-
87
-
88
-
89
-
90
-
91
-
92
-
93
-
94
-
95
-
96
-
97
-
98
-
99
-
100
-
101
-
102
-
103
-
104
-
105
-
106
-
107
-
108
-
109
-
110
-
111
-
112
-
113
-
114
-
115
-
116
-
117
-
118
-
119
-
120
-
121
-
122
-
123
-
124
-
125
-
126
-
127
-
128
-
129
-
130
-
131
-
132
-
133
-
134
-
135
-
136
-
137
-
138
-
 139
139 -
 140
140 -
 141
141 -
 142
142 -
 143
143 -
 144
144 -
 145
145 -
 146
146 -
 147
147 -
 148
148 -
 149
149 -
150
-
151
-
152
-
153
-
154
-
155
-
156
-
157
-
158
-
159
-
160
-
161
-
162
-
163
-
164
-
165
-
166
-
167
-
168
-
169
-
170
-
171
-
172
-
173
-
174
-
175
-
176
-
177
-
178
-
179
-
180
-
181
-
182
-
183
-
184
-
185
-
186
-
187
-
188
-
189
-
190
-
191
-
192
-
193
-
194
-
195
-
196
-
197
-
198
-
199
-
200
-
201
-
202
-
203
-
204
-
205
-
206
-
207
-
208
-
209
-
210
-
211
-
212
-
213
-
214
-
215
-
216
-
217
-
218
-
219
-
220
-
221
-
222
-
223
-
224
-
225
-
226
-
227
-
228
-
229
-
230
-
231
-
232
-
233
-
234
-
235
-
236
-
237
-
238
-
239
-
240
-
241
-
242
-
243
-
244
-
245
-
246
-
247
-
248
-
249
-
250
-
251
-
252
-
253
-
254
-
255
-
256
-
257
-
258
-
259
-
260
-
261
-
262
-
263
-
264
-
265
-
266
-
267
-
268
-
269
-
270
-
271
-
272
-
273
-
274
-
275
-
276
-
277
-
278
-
279
-
280
-
281
-
282
-
283
-
284
-
285
-
286
-
287
-
288
-
289
-
290
-
291
-
292
-
293
-
294
-
295
-
296
-
297
-
298
-
299
-
300
-
301
-
302
-
303
-
304
-
305
-
306
-
307
-
308
-
309
-
310
-
311
-
312
-
313
-
314
-
315
-
316
-
317
-
318
-
319
-
320
-
321
-
322
-
323
-
324
-
325
-
326
-
327
 |
 |
