1995 Pontiac Grand Prix Owner's Manual - Page 247
1995 Pontiac Grand Prix Manual

Page 247 highlights
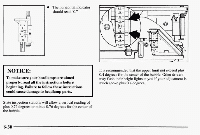
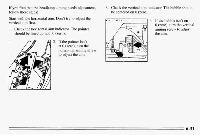
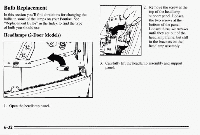
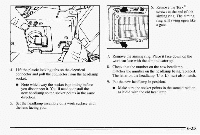
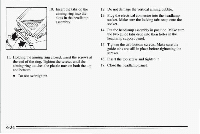
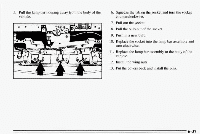
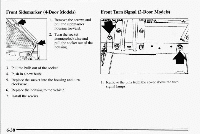
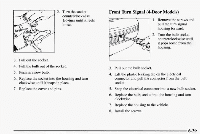
10. Insert the tabs on the aiming ring into the 12. Do not damage thevertical aiming bubble. 13. Plug the electrical connector into the headlamp socket. Makesure the locking tabs snap ontothe socket. 14. Put the headlamp assembly in position. Make sure the two guide tabs drop their holes in the into headlamp support panel. 15. Tighten the two bottom screws. Make sure the guide tabs are still in place before tightening the screws. 11. Holding the aiming ring closed, insert the screws at the end of the ring. Tighten -the screws until the aiming ring touches the plastic nuts on both the top and bottom. 0 16. Insert the top screw andtighten it. 17. Close the headlamp panel. Da not overtighten. 6-34
-
 1
1 -
2
-
3
-
4
-
5
-
6
-
7
-
8
-
9
-
10
-
11
-
12
-
13
-
14
-
15
-
16
-
17
-
18
-
19
-
20
-
21
-
22
-
23
-
24
-
25
-
26
-
27
-
28
-
29
-
30
-
31
-
32
-
33
-
34
-
35
-
36
-
37
-
38
-
39
-
40
-
41
-
42
-
43
-
44
-
45
-
46
-
47
-
48
-
49
-
50
-
51
-
52
-
53
-
54
-
55
-
56
-
57
-
58
-
59
-
60
-
61
-
62
-
63
-
64
-
65
-
66
-
67
-
68
-
69
-
70
-
71
-
72
-
73
-
74
-
75
-
76
-
77
-
78
-
79
-
80
-
81
-
82
-
83
-
84
-
85
-
86
-
87
-
88
-
89
-
90
-
91
-
92
-
93
-
94
-
95
-
96
-
97
-
98
-
99
-
100
-
101
-
102
-
103
-
104
-
105
-
106
-
107
-
108
-
109
-
110
-
111
-
112
-
113
-
114
-
115
-
116
-
117
-
118
-
119
-
120
-
121
-
122
-
123
-
124
-
125
-
126
-
127
-
128
-
129
-
130
-
131
-
132
-
133
-
134
-
135
-
136
-
137
-
138
-
139
-
140
-
141
-
142
-
143
-
144
-
145
-
146
-
147
-
148
-
149
-
150
-
151
-
152
-
153
-
154
-
155
-
156
-
157
-
158
-
159
-
160
-
161
-
162
-
163
-
164
-
165
-
166
-
167
-
168
-
169
-
170
-
171
-
172
-
173
-
174
-
175
-
176
-
177
-
178
-
179
-
180
-
181
-
182
-
183
-
184
-
185
-
186
-
187
-
188
-
189
-
190
-
191
-
192
-
193
-
194
-
195
-
196
-
197
-
198
-
199
-
200
-
201
-
202
-
203
-
204
-
205
-
206
-
207
-
208
-
209
-
210
-
211
-
212
-
213
-
214
-
215
-
216
-
217
-
218
-
219
-
220
-
221
-
222
-
223
-
224
-
225
-
226
-
227
-
228
-
229
-
230
-
231
-
232
-
233
-
234
-
235
-
236
-
237
-
238
-
239
-
240
-
241
-
 242
242 -
 243
243 -
 244
244 -
 245
245 -
 246
246 -
 247
247 -
 248
248 -
 249
249 -
 250
250 -
 251
251 -
 252
252 -
253
-
254
-
255
-
256
-
257
-
258
-
259
-
260
-
261
-
262
-
263
-
264
-
265
-
266
-
267
-
268
-
269
-
270
-
271
-
272
-
273
-
274
-
275
-
276
-
277
-
278
-
279
-
280
-
281
-
282
-
283
-
284
-
285
-
286
-
287
-
288
-
289
-
290
-
291
-
292
-
293
-
294
-
295
-
296
-
297
-
298
-
299
-
300
-
301
-
302
-
303
-
304
-
305
-
306
-
307
-
308
-
309
-
310
-
311
-
312
-
313
-
314
-
315
-
316
-
317
-
318
-
319
-
320
-
321
-
322
-
323
-
324
-
325
-
326
-
327
-
328
-
329
-
330
-
331
-
332
-
333
-
334
-
335
-
336
-
337
-
338
-
339
-
340
-
341
-
342
-
343
-
344
-
345
-
346
-
347
-
348
-
349
-
350
-
351
-
352
-
353
-
354
 |
 |

10.
Insert the tabs
on
the
aiming
ring into the
11. Holding
the
aiming
ring closed, insert the screws
at
the
end of the ring.
Tighten
-the
screws
until
the
aiming
ring
touches the plastic nuts on
both
the
top
and
bottom.
0
Da
not overtighten.
12.
Do
not
damage
the vertical aiming
bubble.
13.
Plug
the electrical connector into the
headlamp
socket.
Makesure the locking tabs
snap
onto
the
socket.
14.
Put
the
headlamp
assembly
in
position. Make
sure
the
two
guide
tabs
drop
into their holes in the
headlamp
support
panel.
guide tabs are still in place
before
tightening
the
screws.
15.
Tighten
the
two
bottom
screws. Make sure the
16.
Insert the
top
screw
andtighten it.
17. Close the
headlamp
panel.
6-34