2012 Volvo XC70 Owner's Manual - Page 308
2012 Volvo XC70 Manual

Page 308 highlights
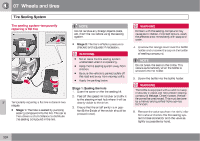
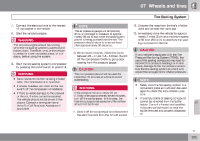
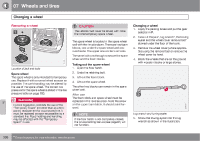
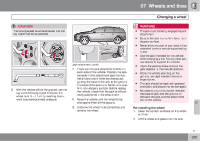
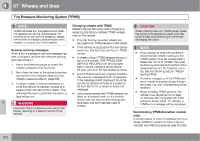
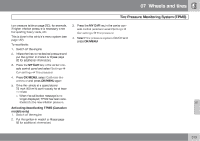
07 Wheels and tires Changing a wheel Removing a wheel CAUTION The vehicle must never be driven with more than one temporary spare wheel. Changing a wheel 1. Apply the parking brake and put the gear selector in P. 2. Take out the jack*, lug wrench*, the towing eyelet and the wheel cover removal tool* stowed under the floor of the trunk. 3. Remove the wheel cover (where applicable) using the removal tool or remove the wheel cover by hand. 4. Block the wheels that are on the ground with wooden blocks or large stones. The spare wheel is located in the spare wheel well with the rim side down. There are two foam blocks, one under the spare wheel and one over/inside. The upper one contains all tools. The same bolt runs through to secure the spare wheel and the foam blocks. G017464 Taking out the spare wheel 1. Open the floor hatch. 2. Undo the retaining bolt. 3. Lift out the foam block. 4. Lift out the spare wheel. The other two blocks can remain in the spare wheel well. Location of jack and tools Spare wheel The spare wheel is only intended for temporary use. Replace it with a normal wheel as soon as possible. The car's handling may be altered by the use of the spare wheel. The correct tire pressure for the spare wheel is stated in the tire pressure table on page 293. After use The foam block and spare wheel must be replaced in the reverse order. Note the arrow on the upper foam block. It should point forward. 07 WARNING Current legislation prohibits the use of the "Temporary Spare" tire other than as a temporary replacement for a punctured tire. It must be replaced as soon as possible by a standard tire. Road holding and handling may be affected with the "Temporary Spare" in use. NOTE If the floor hatch is not completely closed, the private locking feature (see page 61) will not function. Lug wrench and towing eyelet 5. Screw the towing eyelet into the lug wrench as shown in the illustration. 308 * Option/accessory, for more information, see Introduction.
-
 1
1 -
2
-
3
-
4
-
5
-
6
-
7
-
8
-
9
-
10
-
11
-
12
-
13
-
14
-
15
-
16
-
17
-
18
-
19
-
20
-
21
-
22
-
23
-
24
-
25
-
26
-
27
-
28
-
29
-
30
-
31
-
32
-
33
-
34
-
35
-
36
-
37
-
38
-
39
-
40
-
41
-
42
-
43
-
44
-
45
-
46
-
47
-
48
-
49
-
50
-
51
-
52
-
53
-
54
-
55
-
56
-
57
-
58
-
59
-
60
-
61
-
62
-
63
-
64
-
65
-
66
-
67
-
68
-
69
-
70
-
71
-
72
-
73
-
74
-
75
-
76
-
77
-
78
-
79
-
80
-
81
-
82
-
83
-
84
-
85
-
86
-
87
-
88
-
89
-
90
-
91
-
92
-
93
-
94
-
95
-
96
-
97
-
98
-
99
-
100
-
101
-
102
-
103
-
104
-
105
-
106
-
107
-
108
-
109
-
110
-
111
-
112
-
113
-
114
-
115
-
116
-
117
-
118
-
119
-
120
-
121
-
122
-
123
-
124
-
125
-
126
-
127
-
128
-
129
-
130
-
131
-
132
-
133
-
134
-
135
-
136
-
137
-
138
-
139
-
140
-
141
-
142
-
143
-
144
-
145
-
146
-
147
-
148
-
149
-
150
-
151
-
152
-
153
-
154
-
155
-
156
-
157
-
158
-
159
-
160
-
161
-
162
-
163
-
164
-
165
-
166
-
167
-
168
-
169
-
170
-
171
-
172
-
173
-
174
-
175
-
176
-
177
-
178
-
179
-
180
-
181
-
182
-
183
-
184
-
185
-
186
-
187
-
188
-
189
-
190
-
191
-
192
-
193
-
194
-
195
-
196
-
197
-
198
-
199
-
200
-
201
-
202
-
203
-
204
-
205
-
206
-
207
-
208
-
209
-
210
-
211
-
212
-
213
-
214
-
215
-
216
-
217
-
218
-
219
-
220
-
221
-
222
-
223
-
224
-
225
-
226
-
227
-
228
-
229
-
230
-
231
-
232
-
233
-
234
-
235
-
236
-
237
-
238
-
239
-
240
-
241
-
242
-
243
-
244
-
245
-
246
-
247
-
248
-
249
-
250
-
251
-
252
-
253
-
254
-
255
-
256
-
257
-
258
-
259
-
260
-
261
-
262
-
263
-
264
-
265
-
266
-
267
-
268
-
269
-
270
-
271
-
272
-
273
-
274
-
275
-
276
-
277
-
278
-
279
-
280
-
281
-
282
-
283
-
284
-
285
-
286
-
287
-
288
-
289
-
290
-
291
-
292
-
293
-
294
-
295
-
296
-
297
-
298
-
299
-
300
-
301
-
302
-
 303
303 -
 304
304 -
 305
305 -
 306
306 -
 307
307 -
 308
308 -
 309
309 -
 310
310 -
 311
311 -
 312
312 -
 313
313 -
314
-
315
-
316
-
317
-
318
-
319
-
320
-
321
-
322
-
323
-
324
-
325
-
326
-
327
-
328
-
329
-
330
-
331
-
332
-
333
-
334
-
335
-
336
-
337
-
338
-
339
-
340
-
341
-
342
-
343
-
344
-
345
-
346
-
347
-
348
-
349
-
350
-
351
-
352
-
353
-
354
-
355
-
356
-
357
-
358
-
359
-
360
-
361
-
362
-
363
-
364
-
365
-
366
-
367
-
368
-
369
-
370
-
371
-
372
-
373
-
374
-
375
-
376
 |
 |
