2008 Yamaha Motorsports V Star 1300 Owners Manual - Page 22
2008 Yamaha Motorsports V Star 1300 Manual

Page 22 highlights
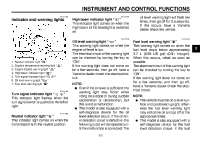
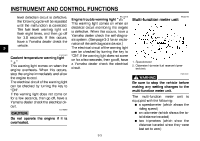
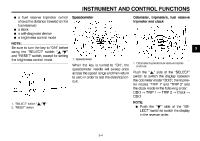
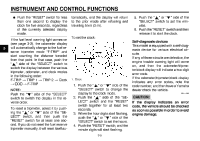
INSTRUMENT AND CONTROL FUNCTIONS G Push the "RESET" switch for less than one second to display the clock for five seconds, regardless of the currently selected display mode. tomatically, and the display will return to the prior mode after refueling and traveling 5 km (3 mi). 5. Push the " " or " " side of the "SELECT" switch to set the minutes. 6. Push the "RESET" switch and then release it to start the clock. Self-diagnosis devices This model is equipped with a self-diagnosis device for various electrical circuits. If any of those circuits are defective, the engine trouble warning light will come on, and then the odometer/tripmeter/clock display will indicate a two-digit error code. If the odometer/tripmeter/clock display indicates any error codes, note the code number, and then have a Yamaha dealer check the vehicle. ECA11590 3 If the fuel level warning light comes on (see page 3-2), the odometer display will automatically change to the fuel reserve tripmeter mode "F-TRIP" and start counting the distance traveled from that point. In that case, push the " " side of the "SELECT" switch to switch the display between the various tripmeter, odometer, and clock modes in the following order: F-TRIP → TRIP 1 → TRIP 2 → Clock → ODO → F-TRIP NOTE: Push the " " side of the "SELECT" switch to switch the display in the reverse order. To reset a tripmeter, select it by pushing the " " or " " side of the "SELECT" switch, and then push the "RESET" switch for at least one second. If you do not reset the fuel reserve tripmeter manually, it will reset itself au- To set the clock: 1. Clock 1. Push the " " or " " side of the "SELECT" switch to change the display to the clock mode. 2. Push the " " side of the "SELECT" switch and the "RESET" switch together for at least two seconds. 3. When the hour digits start flashing, push the " " or " " side of the "SELECT" switch to set the hours. 4. Push the "RESET" switch, and the minute digits will start flashing. 3-5 CAUTION: If the display indicates an error code, the vehicle should be checked as soon as possible in order to avoid engine damage.
-
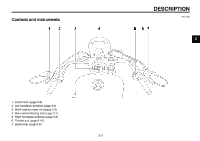
 1
1 -
2
-
3
-
4
-
5
-
6
-
7
-
8
-
9
-
10
-
11
-
12
-
13
-
14
-
15
-
16
-
 17
17 -
 18
18 -
 19
19 -
 20
20 -
 21
21 -
 22
22 -
 23
23 -
 24
24 -
 25
25 -
 26
26 -
 27
27 -
28
-
29
-
30
-
31
-
32
-
33
-
34
-
35
-
36
-
37
-
38
-
39
-
40
-
41
-
42
-
43
-
44
-
45
-
46
-
47
-
48
-
49
-
50
-
51
-
52
-
53
-
54
-
55
-
56
-
57
-
58
-
59
-
60
-
61
-
62
-
63
-
64
-
65
-
66
-
67
-
68
-
69
-
70
-
71
-
72
-
73
-
74
-
75
-
76
-
77
-
78
-
79
-
80
-
81
-
82
-
83
-
84
-
85
-
86
-
87
-
88
-
89
-
90
-
91
-
92
-
93
-
94
-
95
-
96
-
97
-
98
 |
 |