2008 Yamaha Motorsports Vino 125 Owners Manual - Page 45
2008 Yamaha Motorsports Vino 125 Manual

Page 45 highlights
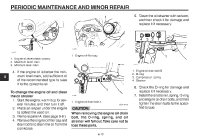
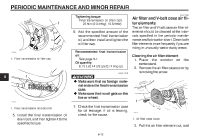
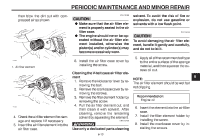
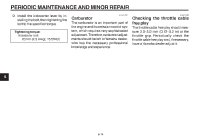
Engine oil and oil strainer PERIODIC MAINTENANCE AND MINOR REPAIR in the owner's tool kit. To check the spark plug 1. Check that the porcelain insulator around the center electrode of the spark plug is a medium-to-light tan (the ideal color when the vehicle is ridden normally). NOTE: If the spark plug shows a distinctly different color, the engine could be operating improperly. Do not attempt to diagnose such problems yourself. Instead, have a Yamaha dealer check the vehicle. 2. Check the spark plug for electrode erosion and excessive carbon or other deposits, and replace it if necessary. Specified spark plug: CR7E (NGK) Spark plug gap: 0.7~0.8 mm (0.028~0.031 in) EAUT1180 Engine oil and oil strainer The engine oil level should be checked before each ride. In addition, the oil must be changed and the oil strainer cleaned at the intervals specified in the periodic maintenance and lubrication chart. To check the engine oil level 1. Place the vehicle on the center stand. NOTE Make sure that the vehicle is positioned straight up when checking the oil level. A slight tilt to the side can result in a false reading. 2. Start the engine, warm it up for several minutes, and then turn it off. 3. Wait a few minutes until the oil settles, and then check the oil level through the check window located at the bottom-left side of the crankcase. NOTE: The engine oil should be between the minimum and maximum level marks. 1 2 3 4 5 6 7 8 9 2. Clean the surface of the spark plug gasket and its mating surface, and then wipe off any grime from the spark plug threads. 3. Install the spark plug with the spark plug wrench, and then tighten it to the specified torque. Tightening torque: Spark plug: 13 Nm (1.3 m•kgf, 9.4 ft•lbf) NOTE: If a torque wrench is not available when installing a spark plug, a good estimate of the correct torque is 1/41/2 turn past finger tight. However, the spark plug should be tightened to the specified torque as soon as possible. 4. Install the spark plug cap. 5. Install the panel. To install the spark plug 1. Measure the spark plug gap with a wire thickness gauge and, if necessary, adjust the gap to specification. 6-9
-
 1
1 -
2
-
3
-
4
-
5
-
6
-
7
-
8
-
9
-
10
-
11
-
12
-
13
-
14
-
15
-
16
-
17
-
18
-
19
-
20
-
21
-
22
-
23
-
24
-
25
-
26
-
27
-
28
-
29
-
30
-
31
-
32
-
33
-
34
-
35
-
36
-
37
-
38
-
39
-
 40
40 -
 41
41 -
 42
42 -
 43
43 -
 44
44 -
 45
45 -
 46
46 -
 47
47 -
 48
48 -
 49
49 -
 50
50 -
51
-
52
-
53
-
54
-
55
-
56
-
57
-
58
-
59
-
60
-
61
-
62
-
63
-
64
-
65
-
66
-
67
-
68
-
69
-
70
-
71
-
72
-
73
-
74
-
75
-
76
-
77
-
78
-
79
-
80
-
81
-
82
-
83
-
84
-
85
-
86
-
87
-
88
 |
 |