2009 Yamaha Motorsports Apex LTX Owners Manual - Page 77
2009 Yamaha Motorsports Apex LTX Manual

Page 77 highlights
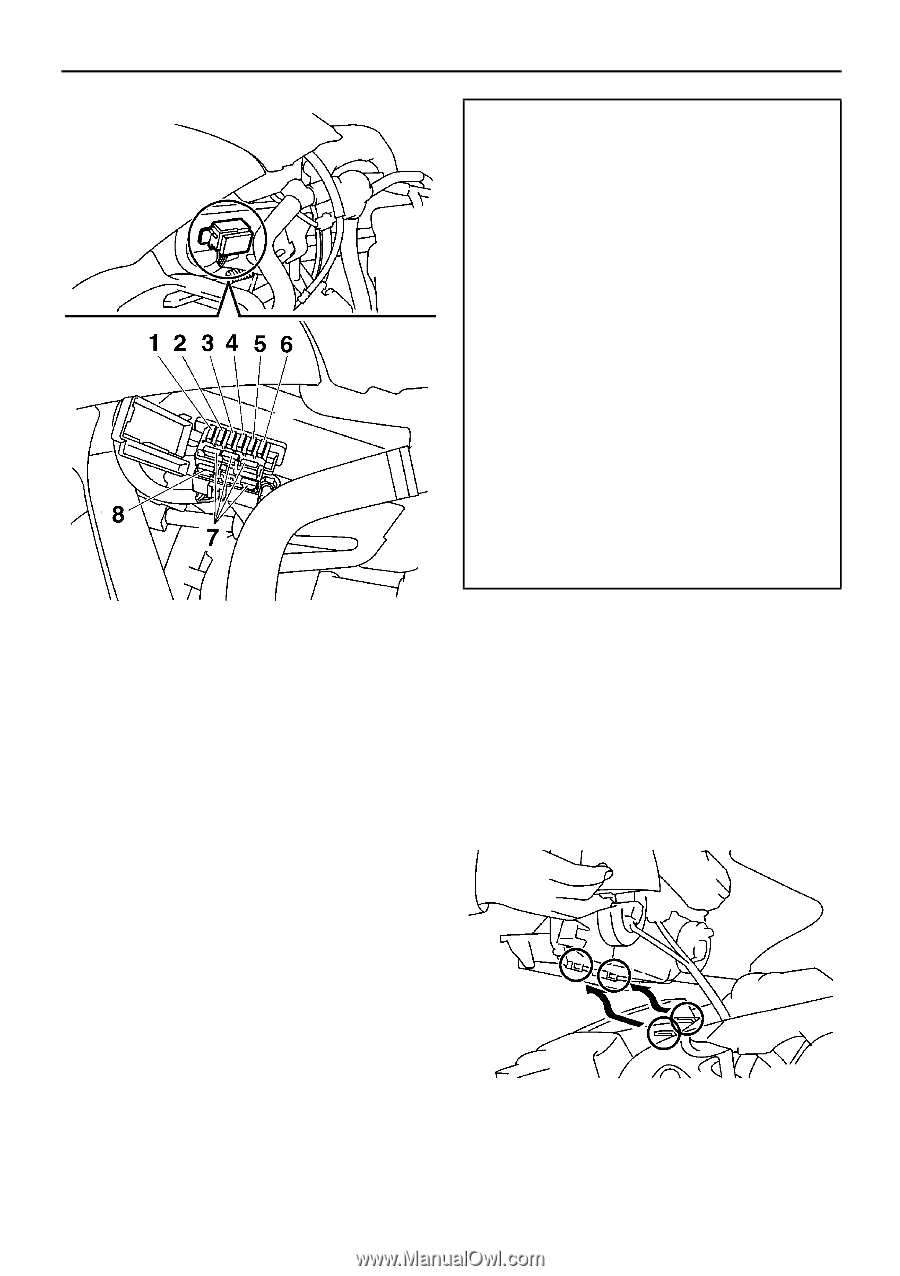
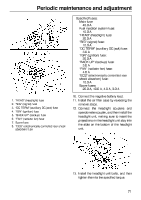
Periodic maintenance and adjustment Specified fuses: Main fuse: 40.0 A Fuel injection system fuse: 10.0 A "HEAD" (headlight) fuse: 20.0 A "SIG" (signal) fuse: 10.0 A "DC TERM" (auxiliary DC jack) fuse: 3.0 A "IGN" (ignition) fuse: 20.0 A "BACK UP" (backup) fuse: 3.0 A "FAN" (radiator fan) fuse: 4.0 A "ECS" (electronically controlled rear shock absorber) fuse: 10.0 A Spare fuses: 20.0 A, 10.0 A, 4.0 A, 3.0 A 10. Connect the negative battery lead. 11. Install the air filter case by reversing the removal steps. 12. Connect the headlight couplers and speedometer coupler, and then install the headlight unit, making sure to insert the projections on the headlight unit stay into the slots on the bottom of the headlight unit. 1. 2. 3. 4. 5. 6. 7. 8. "HEAD" (headlight) fuse "SIG" (signal) fuse "DC TERM" (auxiliary DC jack) fuse "IGN" (ignition) fuse "BACK UP" (backup) fuse "FAN" (radiator fan) fuse Spare fuse "ECS" (electronically controlled rear shock absorber) fuse 13. Install the headlight unit bolts, and then tighten them to the specified torque. 71
-
 1
1 -
2
-
3
-
4
-
5
-
6
-
7
-
8
-
9
-
10
-
11
-
12
-
13
-
14
-
15
-
16
-
17
-
18
-
19
-
20
-
21
-
22
-
23
-
24
-
25
-
26
-
27
-
28
-
29
-
30
-
31
-
32
-
33
-
34
-
35
-
36
-
37
-
38
-
39
-
40
-
41
-
42
-
43
-
44
-
45
-
46
-
47
-
48
-
49
-
50
-
51
-
52
-
53
-
54
-
55
-
56
-
57
-
58
-
59
-
60
-
61
-
62
-
63
-
64
-
65
-
66
-
67
-
68
-
69
-
70
-
71
-
 72
72 -
 73
73 -
 74
74 -
 75
75 -
 76
76 -
 77
77 -
 78
78 -
 79
79 -
 80
80 -
 81
81 -
 82
82 -
83
-
84
-
85
-
86
-
87
-
88
-
89
-
90
-
91
-
92
-
93
-
94
-
95
-
96
 |
 |