2009 Yamaha Motorsports FX Nytro MTX Owners Manual - Page 58
2009 Yamaha Motorsports FX Nytro MTX Manual

Page 58 highlights
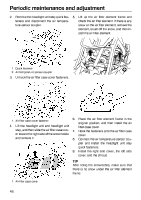
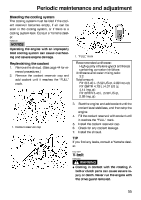
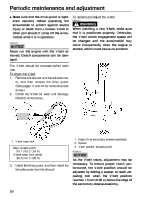
Periodic maintenance and adjustment 1. Engine oil drain bolt (oil tank) 1. Oil filter cartridge 8. 9. Place an oil pan under the engine to collect the used oil. Remove the engine oil drain bolt to drain the oil from the crankcase. TIP An oil filter wrench is available at a Yamaha dealer. 11. Apply a thin coat of engine oil to the Oring of the new oil filter cartridge. 12. Install the new oil filter cartridge with an oil filter wrench, and then tighten it to the specified torque. Tightening torque: Oil filter cartridge: 17 Nm (1.7 m·kgf, 12 ft·lbf) 13. Install the engine oil drain bolts, and then tighten them to the specified torques. Tightening torques: Engine oil drain bolt (crankcase): 10 Nm (1.0 m·kgf, 7.2 ft·lbf) Engine oil drain bolt (oil tank): 16 Nm (1.6 m·kgf, 11 ft·lbf) 14. Add 2.0 L (2.11 US qt, 1.76 Imp.qt) of the recommended engine oil to the oil tank, and then install and tighten the oil filler cap and the cylinder head cap. 15. Start the engine, warm it up for several minutes, and then turn it off. 16. Add sufficient oil of the recommended type to raise it to the "H" level mark on the dipstick. (See above for the checking procedure.) NOTICE: When adding the en- 1. Engine oil drain bolt (crankcase) 2. " " mark TIP G G G A " " mark is stamped on the crankcase near the engine oil drain bolt. Dispose of used oil according to local regulations. Skip steps 10-12 if the oil filter cartridge is not being replaced. 10. Remove the oil filter cartridge with an oil filter wrench. 52
-
 1
1 -
2
-
3
-
4
-
5
-
6
-
7
-
8
-
9
-
10
-
11
-
12
-
13
-
14
-
15
-
16
-
17
-
18
-
19
-
20
-
21
-
22
-
23
-
24
-
25
-
26
-
27
-
28
-
29
-
30
-
31
-
32
-
33
-
34
-
35
-
36
-
37
-
38
-
39
-
40
-
41
-
42
-
43
-
44
-
45
-
46
-
47
-
48
-
49
-
50
-
51
-
52
-
 53
53 -
 54
54 -
 55
55 -
 56
56 -
 57
57 -
 58
58 -
 59
59 -
 60
60 -
 61
61 -
 62
62 -
 63
63 -
64
-
65
-
66
-
67
-
68
-
69
-
70
-
71
-
72
-
73
-
74
-
75
-
76
-
77
-
78
-
79
-
80
-
81
-
82
-
83
-
84
-
85
-
86
-
87
-
88
-
89
-
90
-
91
-
92
 |
 |
