2009 Yamaha Motorsports FX Nytro RTX SE Owners Manual - Page 16
2009 Yamaha Motorsports FX Nytro RTX SE Manual

Page 16 highlights
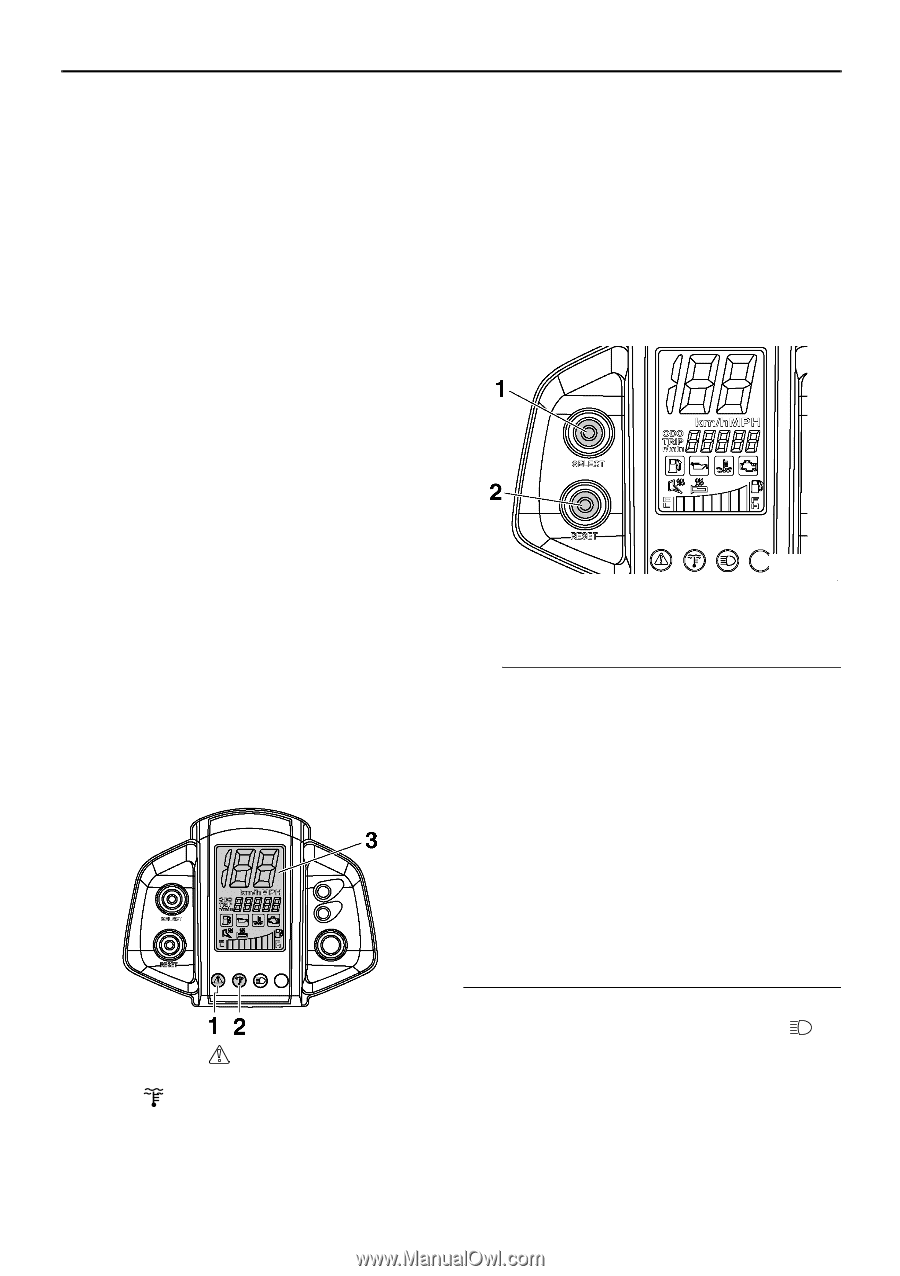
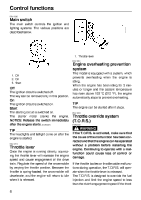
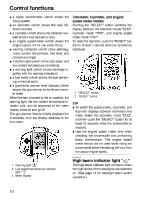
Control functions a digital speedometer (which shows the riding speed) G an odometer (which shows the total distance traveled) G a tripmeter (which shows the distance traveled since it was last set to zero) G an engine speed meter (which shows the engine speed; not for use while riding) G warning indicators (which show self-diagnosis, coolant temperature, fuel level, and oil level warnings) G indicator lights (which show high beam and low coolant temperature conditions) G a warning light (which shows warnings together with the warning indicators) G a fuel meter (which shows the fuel remaining in the fuel tank) G a grip/thumb warmer level indicator (which shows the grip warmer or the thumb warmer level) When the key is turned to the on position, the warning light, the low coolant temperature indicator light, and all segments of the meter display come on and go off. The grip warmer level is initially displayed for 5 seconds, then the display switches to the fuel meter. G Odometer, tripmeter, and engine speed meter modes Pushing the "SELECT" button switches the display between the odometer mode "ODO", tripmeter mode "TRIP", and engine speed meter mode "r/min". To reset the tripmeter, push the "RESET" button for at least 1 second while the tripmeter is displayed. 1. "SELECT" button 2. "RESET" button TIP G G To switch the speedometer, odometer, and tripmeter displays between kilometers and miles, select the odometer mode "ODO", and then push the "SELECT" button for at least 10 seconds while the snowmobile is stopped. Use the engine speed meter only when checking the snowmobile and performing basic maintenance. The engine speed meter should not be used while riding the snowmobile since the reading will vary from the actual engine speed. ESU10410 High beam indicator light " 1. Warning light " " 2. Low coolant temperature indicator light " " 3. Meter display " The high beam indicator light comes on when the high beams of the headlights are switched on. (See page 14 for headlight beam switch operation.) 10
-
 1
1 -
2
-
3
-
4
-
5
-
6
-
7
-
8
-
9
-
10
-
 11
11 -
 12
12 -
 13
13 -
 14
14 -
 15
15 -
 16
16 -
 17
17 -
 18
18 -
 19
19 -
 20
20 -
 21
21 -
22
-
23
-
24
-
25
-
26
-
27
-
28
-
29
-
30
-
31
-
32
-
33
-
34
-
35
-
36
-
37
-
38
-
39
-
40
-
41
-
42
-
43
-
44
-
45
-
46
-
47
-
48
-
49
-
50
-
51
-
52
-
53
-
54
-
55
-
56
-
57
-
58
-
59
-
60
-
61
-
62
-
63
-
64
-
65
-
66
-
67
-
68
-
69
-
70
-
71
-
72
-
73
-
74
-
75
-
76
-
77
-
78
-
79
-
80
-
81
-
82
-
83
-
84
-
85
-
86
-
87
-
88
-
89
-
90
-
91
-
92
 |
 |