2010 Yamaha Motorsports Royal Star Venture S Owners Manual - Page 82
2010 Yamaha Motorsports Royal Star Venture S Manual

Page 82 highlights
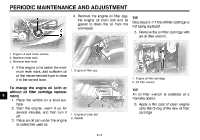
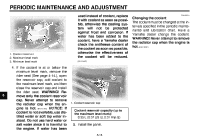
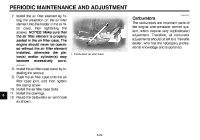
PERIODIC MAINTENANCE AND ADJUSTMENT 10. Start the engine, and then let it idle for several minutes while checking it for oil leakage. If oil is leaking, immediately turn the engine off and check for the cause. TIP After the engine is started, the engine oil level warning light should go off if the oil level is sufficient. ECA10401 EAU20026 Final gear oil The final gear case must be checked for oil leakage before each ride. If any leakage is found, have a Yamaha dealer check and repair the vehicle. In addition, the final gear oil level must be checked and the oil changed as follows at the intervals specified in the periodic maintenance and lubrication chart. EWA10370 2. Remove the final gear oil filler bolt and its gasket, and then check the oil level in the final gear case. TIP The oil level should be at the brim of the filler hole. NOTICE If the oil level warning light flickers or remains on even if the oil level is correct, immediately turn the engine off and have a Yamaha dealer check the vehicle. 11. Turn the engine off, wait a few minutes until the oil settles, and then check the oil level and correct it if necessary. G G WARNING Make sure that no foreign material enters the final gear case. Make sure that no oil gets on the tire or wheel. 1 1 2 3 1. Final gear oil filler bolt 2. Gasket 3. Correct oil level 8 To check the final gear oil level 1. Place the vehicle on a level surface and hold it in an upright position. TIP Make sure that the vehicle is positioned straight up when checking the oil level. A slight tilt to the side can result in a false reading. 3. If the oil is below the brim of the filler hole, add sufficient oil of the recommended type to raise it to the correct level. 4. Check the gasket for damage, and replace it if necessary. 5. Install the final gear oil filler bolt and its gasket, and then tighten the bolt to the specified torque. 8-16
-
 1
1 -
2
-
3
-
4
-
5
-
6
-
7
-
8
-
9
-
10
-
11
-
12
-
13
-
14
-
15
-
16
-
17
-
18
-
19
-
20
-
21
-
22
-
23
-
24
-
25
-
26
-
27
-
28
-
29
-
30
-
31
-
32
-
33
-
34
-
35
-
36
-
37
-
38
-
39
-
40
-
41
-
42
-
43
-
44
-
45
-
46
-
47
-
48
-
49
-
50
-
51
-
52
-
53
-
54
-
55
-
56
-
57
-
58
-
59
-
60
-
61
-
62
-
63
-
64
-
65
-
66
-
67
-
68
-
69
-
70
-
71
-
72
-
73
-
74
-
75
-
76
-
 77
77 -
 78
78 -
 79
79 -
 80
80 -
 81
81 -
 82
82 -
 83
83 -
 84
84 -
 85
85 -
 86
86 -
 87
87 -
88
-
89
-
90
-
91
-
92
-
93
-
94
-
95
-
96
-
97
-
98
-
99
-
100
-
101
-
102
-
103
-
104
-
105
-
106
-
107
-
108
-
109
-
110
-
111
-
112
-
113
-
114
-
115
-
116
-
117
-
118
-
119
-
120
-
121
-
122
-
123
-
124
-
125
-
126
 |
 |