2011 Yamaha Motorsports V Star 250 Owners Manual - Page 61
2011 Yamaha Motorsports V Star 250 Manual

Page 61 highlights
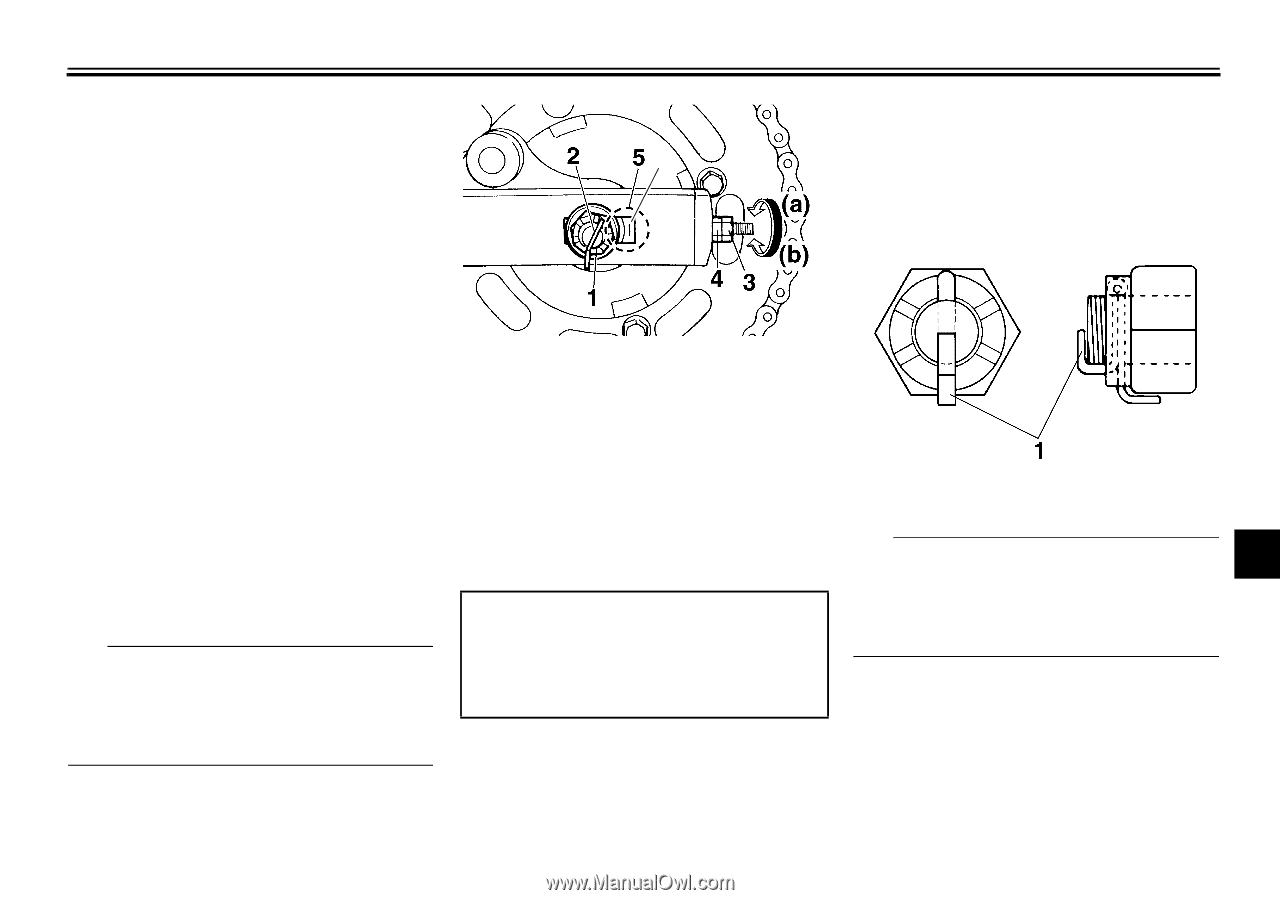
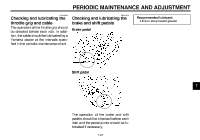
PERIODIC MAINTENANCE AND ADJUSTMENT 2. Remove the cotter pin from the axle nut, and then loosen the axle nut. 3. Loosen the drive chain puller locknut at each end of the swingarm. 4. To tighten the drive chain, turn the drive chain slack adjusting nut at each end of the swingarm in direction (a). To loosen the drive chain, turn the adjusting nut at each end of the swingarm in direction (b), and then push the rear wheel forward. NOTICE: Improper drive chain slack will overload the engine as well as other vital parts of the motorcycle and can lead to chain slippage or breakage. To prevent this from occurring, keep the drive chain slack within the specified limits. [ECA10571] TIP Using the alignment marks on each side of the swingarm, make sure that both drive chain pullers are in the same position for proper wheel alignment. 6 6. Insert a new cotter pin into the axle nut, and then bend its ends as shown. WARNING! Always use a new cotter pin for the axle nut. [EWA10701] 1. 2. 3. 4. 5. 6. Axle nut Axle nut cotter pin Drive chain puller locknut Drive chain slack adjusting nut Alignment marks Drive chain puller 1. Cotter pin 5. Tighten the locknuts, and then tighten the axle nut to the specified torques. Tightening torques: Drive chain puller locknut: 16 Nm (1.6 m·kgf, 12 ft·lbf) Axle nut: 105 Nm (10.5 m·kgf, 76 ft·lbf) TIP Make sure that two notches in the axle nut are aligned with the hole through the wheel axle, otherwise further tighten the axle nut until they are. 7. Adjust the brake pedal free play. (See page 7-21.) 7 7-25
-
 1
1 -
2
-
3
-
4
-
5
-
6
-
7
-
8
-
9
-
10
-
11
-
12
-
13
-
14
-
15
-
16
-
17
-
18
-
19
-
20
-
21
-
22
-
23
-
24
-
25
-
26
-
27
-
28
-
29
-
30
-
31
-
32
-
33
-
34
-
35
-
36
-
37
-
38
-
39
-
40
-
41
-
42
-
43
-
44
-
45
-
46
-
47
-
48
-
49
-
50
-
51
-
52
-
53
-
54
-
55
-
 56
56 -
 57
57 -
 58
58 -
 59
59 -
 60
60 -
 61
61 -
 62
62 -
 63
63 -
 64
64 -
 65
65 -
 66
66 -
67
-
68
-
69
-
70
-
71
-
72
-
73
-
74
-
75
-
76
-
77
-
78
-
79
-
80
-
81
-
82
-
83
-
84
-
85
-
86
-
87
-
88
-
89
-
90
-
91
-
92
-
93
-
94
-
95
-
96
-
97
-
98
 |
 |