3M M170 User Guide - Page 15
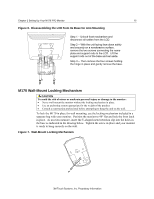
M170 Wall-Mount Locking Mechanism
 |
UPC - 511287708188
View all 3M M170 manuals
Add to My Manuals
Save this manual to your list of manuals |
Page 15 highlights
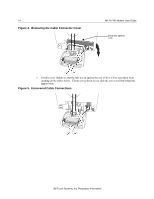
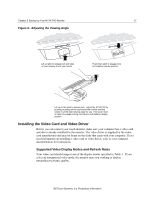
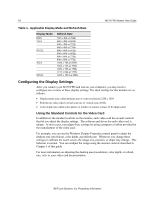
Chapter 2 Setting Up Your M170 FPD Monitor 15 Figure 6. Disassembling the LCD from Its Base for Arm Mounting Step 1 - Unlock front mechanism and disconnect all cables from the LCD. Step 2 -- With the unit laying face down safely and securely on a nonabrasive surface, remove the two screws connecting the name plate and support rods to the LCD. Lift the support rods out of the base and set aside. Step 3 -- Then remove the four screws holding the hinge in place and gently remove the base. M170 Wall-Mount Locking Mechanism CAUTION To avoid the risk of minor or moderate personal injury or damage to the monitor: • Never wall-mount the monitor without the locking mechanism in place. • Use an anchoring system appropriate for the weight of the product. • Consult a construction professional before attempting to hang the unit on the wall. To lock the M170 in place for wall mounting, use the locking mechanism included in a separate bag with your monitor. Position the monitor to 90° flat and lock the front latch in place. As an extra measure, insert the U-shaped metal retention clip into the holes in the base as indicated in the drawing below. Tighten the screw in place and your monitor is ready to hang securely on the wall. Figure 7. Wall-Mount Locking Mechanism 3M Touch Systems, Inc. Proprietary Information
-
 1
1 -
2
-
3
-
4
-
5
-
6
-
7
-
8
-
9
-
 10
10 -
 11
11 -
 12
12 -
 13
13 -
 14
14 -
 15
15 -
 16
16 -
 17
17 -
 18
18 -
 19
19 -
 20
20 -
21
-
22
-
23
-
24
-
25
-
26
-
27
-
28
-
29
-
30
-
31
-
32
-
33
 |
 |
