3Ware 9550SXU-4LP-SGL Quick Installation Guide - Page 13
Installing a Serial ATA RAID Controller, To connect SATA cables to the controller - bbu
 |
UPC - 693494980042
View all 3Ware 9550SXU-4LP-SGL manuals
Add to My Manuals
Save this manual to your list of manuals |
Page 13 highlights
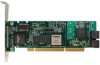
Installing a Serial ATA RAID Controller Installing a Serial ATA RAID Controller Note: The illustrations in this section show a 9550SX-8LP. If you have a different model of controller, the location of the ports will be slightly different, but the steps are very similar. For location of the ports on all boards, see the illustrations on page 6 through page 8. Note: If you have a Battery Backup Unit (BBU), install it on the controller before proceeding. For details, see "Chapter 2. Installing the Battery Backup Unit". To connect SATA cables to the controller Note: If you have a multilane controller, turn to page 13. 1 Take out the SATA cables provided with the 3ware SATA RAID controller. One edge of each SATA cable connector is keyed so that it can only be inserted in one direction. This helps to ensure proper orientation and installation 2 Decide to which port you want to connect the first cable. www.3ware.com 9
-
 1
1 -
2
-
3
-
4
-
5
-
6
-
7
-
 8
8 -
 9
9 -
 10
10 -
 11
11 -
 12
12 -
 13
13 -
 14
14 -
 15
15 -
 16
16 -
 17
17 -
 18
18 -
19
-
20
-
21
-
22
-
23
-
24
-
25
-
26
-
27
-
28
-
29
-
30
-
31
-
32
-
33
-
34
-
35
-
36
-
37
-
38
-
39
-
40
 |
 |
