AIWA CSD-A120 Operating Instructions - Page 7
Specifications
 |
View all AIWA CSD-A120 manuals
Add to My Manuals
Save this manual to your list of manuals |
Page 7 highlights
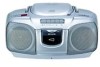
Specifications Tuner section Frequency range, antenna - FM: 87.5 - 108.0 MHz Rod antenna, AM: 530 - 1,710 kHz Ferrite bar antenna Deck section Track format - 4 tracks, 2 channels / Frequency range - Normal tape: 50 - 8,000 Hz (EIAJ) / Recording system - AC bias / Erasing system - Magnet erase / Heads - Recording/playback head (1), Erasure head (1) CD player section Disc - Compact disc / Scanning method - Noncontact optical scanner (semiconductor laser) General Speaker - 100 mm cone type (2) / Output - Headphones jack (stereo mini-jack) / Power output - 1.5 W + 1.5 W (EIAJ 8 ohms, T.H.D. 10% DC) / Power requirements - DC 12 V using eight size D (R20) batteries, AC 120 V, 60 Hz / Power consumption - 11 W / Dimensions (W × H × D) - 370 × 193 × 219 mm (14 5/8 × 7 5/8 × 8 5/8 in.) / Weight - 2.35 kg (5 lbs. 3 oz.) (excluding batteries) / Accessory - AC cord (1) Specifications and external appearance are subject to change without notice. Maintenance To clean the cabinet Use a soft cloth lightly moistened with mild detergent solution. Do not use strong solvents such as alcohol, benzine or thinner. To clean the heads When the tape heads are dirty; - high frequency sound is not emitted - the sound is not adequately high - the sound is off-balance - the tape cannot be erased - the tape cannot be recorded on After every 10 hours of use, clean the tape heads with a head cleaning cassette. Use separately sold dry-type or wet-type cleaning cassette. Refer to the instructions of the cleaning cassette for details. To clean the lens Use a cotton swab slightly moistened with cleaning fluid. Wipe gently from the center to the edge. Lens COPYRIGHT Please check the copyright laws relating to En recordings from disc, radio or external tape for the country in which the machine is being used. If an erroneous display or malfunction occurs Disconnect the AC cord and remove all the batteries to turn off the display. Leave the unit for a while and turn the power back on. ENGLISH 7
-
 1
1 -
 2
2 -
 3
3 -
 4
4 -
 5
5 -
 6
6 -
 7
7 -
 8
8
 |
 |
