AIWA CT-X409 Operating Instructions
AIWA CT-X409 Manual
 |
View all AIWA CT-X409 manuals
Add to My Manuals
Save this manual to your list of manuals |
AIWA CT-X409 manual content summary:
- AIWA CT-X409 | Operating Instructions - Page 1
, record the model number and serial number (you will find them ontheright side of yourset) inthespace provided below. Please referto them when you contact your AIWA dealer in case of difficulty. Model No. ICT - AIWA CT-X409 | Operating Instructions - Page 2
this AIWAproduct. To optimize the performance of this unit, please read through this manual carefully. In addition to this operating instructions manual, be sure to refer to the separate installation and connections manuals as well. PRECAUTIONS q This unit is designed to be operated on a 12-volt - AIWA CT-X409 | Operating Instructions - Page 3
PLAYBACK ...10 SOUND ADJUSTMENTS . . .11 CONNECTING A PORTABLE CD/MD PLAYER OR OTHER EQUIPMENT 12 MAINTENANCE ...13 SPECIFICATIONS ... .. 13 This unit can be operated using the AIWA RC-SW1 or RC-CD1 remote control (sold separately). ENGLISH 2 - AIWA CT-X409 | Operating Instructions - Page 4
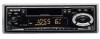
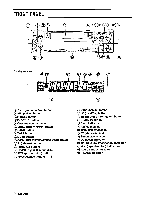
FRONTPANEL Display window @+/- (audio control) button @ SEL (select) button @ H-BASS button @EJECT h button @ Cassette compartment @ DIRECTION ++/~ button @ BAND button @TAPE button @ MUTE button @ A.ME (auto memory/preset scan) button @~ (release) button @TUNE 7/A buttons @CD/MD IN - AIWA CT-X409 | Operating Instructions - Page 5
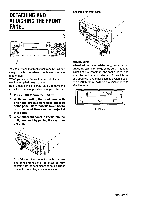
carrying case. Before detaching the front panel, remove the cassette to prevent possible damage to the unit. 1 Press PWR to turn the unit off. 2 While supporting the front panel with one hand, press & to release one side of the panel. Care must be taken not to drop the panel. It may - AIWA CT-X409 | Operating Instructions - Page 6
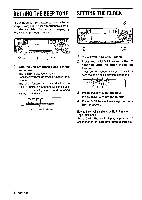
SETTING THE BEEP TONE The unit is preset at the factory to beep each time you press any button on the front panel except it, A, + and >. You can stop beeping by following the procedure below. SETTING THE CLOCK 3 1 With the unit off, press 1 and 4 at the came time. The "BEEP indication appears. - AIWA CT-X409 | Operating Instructions - Page 7
RADIO OPERATION 2 BAND TAPE CD/MD IN 1 T 1 Press PWR to turn the unit on. The radio frequency appears. 2 Press BAND to select the band from among FM1, FM2, FM3 snd AM. The band indicators appear cyclically in order. (FM1, FM2 and FM3 share the same frequency range.) Band indicator Frequency - AIWA CT-X409 | Operating Instructions - Page 8
PRESETTING STATIONS 12 You can manually preset stations that have not been selected by auto memory. 2 1 Press BAND to select a desired band from among FM1, FM2, FM3 and AM. L J 2 Press and - AIWA CT-X409 | Operating Instructions - Page 9
1 2 1 Press BAND to select a desired band fromamong FM1, FM2, FM3 and AM. 2 Press the desired preset station button. The number of the pressed preset station button is displayed next to the frequency indication. Active tuning reception control (ATRC) This unit automatically suppresses FM noise - AIWA CT-X409 | Operating Instructions - Page 10
MY INFORMATION S WITCH 4f7 6f8 4 Press SEL. Radio indication flashes. Band indicator 59 5 Press BAND to select the band. 6 Tune in the station that you wish to preset with TUNE Y or TUNE A. 7 Press SEL. Timer indication flashes. 8 Set the time you wish the unit to turn off. Press TUNE Y to set - AIWA CT-X409 | Operating Instructions - Page 11
TAPE PLAYBACK 2 1 ~ Insert acassette tostart playback. If a cassette is already inserted, press TAPE to starl playback. Playback starts in the direction that the unit played back previously. : /:( /:(/: I F z Adjust the volume with +/-. Press the following buttons to operate tape transport. - AIWA CT-X409 | Operating Instructions - Page 12
the front panel. Switching modes When the unit is in Radio mode, cassette switches the unit to Tape automatically. inserting a Play mode To prevent tape problems Before inserting a cassette into the unit, make sure that there is no slack in the tape. If necessary, take up the slack by inserting - AIWA CT-X409 | Operating Instructions - Page 13
CD/MD IN to listen connected equipment. The "CD indication appears. to the q For further information on the connected equipment, refer to the operating instructions for the equipment. Note Be sure to press CD/MD IN after you connect a porlableCD/MD player, etc. totheCD/MD IN jack to listen using - AIWA CT-X409 | Operating Instructions - Page 14
MAINTENANCE SPECIFICATIONS Cleaning the front panel When the front panel is soiled, wipe the surface of the panel with a dry and soft cloth. Cleaning the tape head Use a cleaning cassette to clean the playback head and capstans approximately once a month. If the playback head is dirty, the high - AIWA CT-X409 | Operating Instructions - Page 15
- AIWA CT-X409 | Operating Instructions - Page 16
AlWA. Para utilizar este aparato en Ias mejores condiciones posibles, lea cuidadosamente Ias instrucciones de este manual. Ademas de este manual de instrucciones, lea tambien Ios manuales de instalacion y de conexiones que vienen por separado. PRECAUCIONES q Este aparato fue diseilado para funcionar - AIWA CT-X409 | Operating Instructions - Page 17
COMf)ACTOS/MINIDISCOS PORTATIL U OTRO EQUIPO ...12 MANTENIMIENTO ...13 ESPECIFICACIONES ...13 Puede hater funcionar este aparato con el control remoto RC-SW1, RC-CD1 de AIWA (vendido por separado). ESPANOL 2 - AIWA CT-X409 | Operating Instructions - Page 18
PANELDELANTERO Visualizador @8 ) @ Boton +/- (control de audio) @ Boton SEL (seleccion) @ Boton H-BASS @ Boton EJECT 4 (expulsion) @ Compartimiento de cassettes @ Botones DIRECTION ++/W ~ Boton BAND @ Boton TAPE @ Boton MUTE @ Boton A.ME (memoria automatic/ exploration de estaciones programedas) @ - AIWA CT-X409 | Operating Instructions - Page 19
DESMONTAJE E INSTALACION DEL PANEL DELANTERO 2 Instalacion dei panel deiantero I i Se puede desmontar el panel delantero de aparato y Ilevarlo consigo cuando se deja el coche estacionado sin vigilancia. Cuando se Ileve el panel delantero dp su coche ahilice la cij de transport. Antes de soltarel - AIWA CT-X409 | Operating Instructions - Page 20
AJUSTE DEL TONO DEL TIMBRE Este aparato se ajusto en fabrica para que suene un timbre cada vez que presione uno de Ios botones en el panel delantero excepto ~, A, * y ~. Se puede cancelar el timbre con el siguiente procedimiento. Con el aparato desconectado, presione simulti%eamente 1 y 4. - AIWA CT-X409 | Operating Instructions - Page 21
FUNCIONAMIENTO RADIO DE LA 2 i 3 1 Presione PWR para conectarel aparato. Aparece la frecuencia de la radio. 2 Preaione BAND para seleccionar la banda de entre FM1, FM2, FM3 y AM. Aparecen Ios indicadores de banda en ese orden yen ciclo. (FM1, FM2 y FM3comparten la misma gama de frecuencias.) - AIWA CT-X409 | Operating Instructions - Page 22
PROGRAMACION DE LAS ESTACIONES 12 Se pueden programar manualmente Ias estaciones que no han podido ser programadas automaticamente. 2 1 Presione BAND para seleccionar una banda deseada entre FM1, FM2, FM3 y '*3 2 Mantenqa presionado A.ME durante mas de-2 "segundos para activar la funcion de - AIWA CT-X409 | Operating Instructions - Page 23
INTERRUPTOR DE INFORMATION PROPIA Se puede activar la radio con el temporizador de un programadiario de la radio. El aparatoconecta y desconecta automaticamente el modo de radio a la hors programada. 2 I Presione BAND para seleccionar la banda deseada entre FM1, FM2, FM3 y AM. 2 Presione el boton - AIWA CT-X409 | Operating Instructions - Page 24
INTERRUPTOR DEliVFORMACION PROPIA 4(7 6[8 BAND TAPE 59 4 Presione SEL. Destella la indication de la radio. Indicador de banda 5 Presione BAND para seleccionar la banda. 6 Sintonice la estacion que desea programar con TUNE T o TUNE A. 7 Presione SEL. Destella la indication del temporizador. 8 - AIWA CT-X409 | Operating Instructions - Page 25
REPRODUCTION CINTA 2 1 DE LA Presione Ios siguientes botones para controlarel movimiento de la cinta. Para IPresione este boton 1 Coloque unacassette paraempezara reproducer. Si ya habia una cassette colocada, presione TAPE para empezar a reproducer. La reproduction empieza en el sentido en - AIWA CT-X409 | Operating Instructions - Page 26
REPRODUCTION DE LA CIIVTA Antes de girar la Have de encendido a OFF Nose olvide de expulsar la cassette del aparato antes de girar la Have de encendido a OFF. De 10 contrario el aparato puede daharse al soltar el panel delantero. Conmutacion de modos Cuando el aparato esta en el modo de radio y se - AIWA CT-X409 | Operating Instructions - Page 27
4 Presione CD/MD IN para escuchar el equipo conectado. Aparece la indication "CD. q Para mas detalles sobre el equipo conectado, lea el manual de instrucciones del equipo. Nota Asegurese de presionar CD/MD IN despues de conectar un tocadiscos de discos compactos/ minidiscos portatil, etc. en la - AIWA CT-X409 | Operating Instructions - Page 28
MANTENIMIENTO ESPECIFICACIONES Limpieza del panel delantero Cuando el panel delantero esta sucio, Iimpie la superficie del panel con un paiio suave y seco. Limpieza de Ias cabezas de cintas Utilice una cassette de Iimpieza para Iimpiar la cabeza de reproduction y Ios cabrestantes aproximadamente - AIWA CT-X409 | Operating Instructions - Page 29
- AIWA CT-X409 | Operating Instructions - Page 30
Bienvenue Nous vous remercions d'avoir choisi ce produit AlWA. Pour optimiserses performances, veuillez hre attenhvement ce mode d'emploi. Outre ce mode d'emplol, veulllez~galement vous referer aux manuels d'installation et de connexion separes. PRECAUTIONS qCet appareil est congu pour fonctionner - AIWA CT-X409 | Operating Instructions - Page 31
CD/MD PORTABLE OU DUN AUTRE APPAREIL .........12 MAINTENANCE ...13 SPECIFICATIONS ...13 Cet appareil peut se contr61er avec une telecommande RC-SW1 ou RC-CD1 AIWA (vendue separement). FRAN~AIS 2 - AIWA CT-X409 | Operating Instructions - Page 32
PANNEAUAVANT Feni2!re d'affichage b8 @) Touche +/- (contrijle audio) @ ToucfIe SEL (selection) @ Touche H-BASS @Touche EJECT 4 @ Logement de cassette @Touche DIRECTION 44/* @ Touche BAND @)Touche TAPE @Touche MUTE @TouchQ A-ME (m~merkation automatique/balayage de prereglage) @ Touche ~ (liberation - AIWA CT-X409 | Operating Instructions - Page 33
DETACHEMENTET FIXATION DU PANNEAU AVANT 2 Fixation du panneau avant 1 II est possible de detacher Ie panneau avant de I'appareil et de I'emporter quand on Iaisse la voiture saris surveillance. Utiliser Ie sac de transport fourni pour transporter Ie panneau avant hors de la voiture. Avant de - AIWA CT-X409 | Operating Instructions - Page 34
REGLAGE DE LA TONALITE BIP Cet appareil est preregle A I'usine pour emettre un bip a chaque pression d'une touche sur Ie panneau avant, sauf ~, 4, ++ et W. Le bip peut &re supprime de la maniere suivante. REGLAGE DE L'HORLOGE 3 ~ L'appareil hors tension, presser simultanement 1 et 4. L'indication - AIWA CT-X409 | Operating Instructions - Page 35
FUNCIONAMIENTO RADIO DE LA 2 1 3 ~ PresionePWRpara conectarelaparato. Aparece la frecuencia de la radio. z Presione BAND para seleccionar la banda de entre FM1, FM2, FM3 y AM. Aparecen Ios indicadores de banda en ese orden y en ciclo. (FM1, FM2 y FM3 comparten la misma gama de frecuencias.) - AIWA CT-X409 | Operating Instructions - Page 36
PREREGLAGEDES STATIONS 12 II est possible de preregler manuellement des stations qui n'ont pas ete selectionnees pour la memorisation automatique. 2 1 Preseer BAND pour selectionner la bande souhaitee parmi FM1, FM2, FM3 et AM. 2 Presser et maintenir enfonce A,ME pendant plus de 2 secondea pour - AIWA CT-X409 | Operating Instructions - Page 37
1 2 1 Presser BAND pour selectionner la bande souhaitee parmi FM1, FM2, FM3 et AM. 2 Presser la touche de station prereglee souhaitee. Le numero de la touche de station prereglee s'affichera a cbte de I'indication de frequence. Contr61e actif de la reception d'accord (ATRC) Cet appareil supprime - AIWA CT-X409 | Operating Instructions - Page 38
F(NVC?WAIMES lNFORM/lT/OIVS 4{7 6{8 BAND TAPE 4 Presser SEL. L'indication radio clignote. lndicateur de bande 59 5 Preseer BAND pour selectionner la bande. 6 Accorder la station qu'on souhaite preregler avec TUNE V ou TUNE A. 7 Presser SEL. L'indication de la minuterie clignote. 8 Regier l' - AIWA CT-X409 | Operating Instructions - Page 39
LECTURE DE CASSETTE 2 1 I Inserer une cassette pour demarrer la lecture. Si une cassette est deja inseree, presser TAPE pour demarrer la lecture. La lecture demarre clans la direction clans Iaquelle I'appareil a Iu precedemment. 2 Ajuster Ie volume avec +/-. Presser Ies touches suivantes pour - AIWA CT-X409 | Operating Instructions - Page 40
Commutation de modes Quandl'appareil esten mode radio, I'insertion d'une cassette commute automatiquement I'appareil au mode lecture de cassette. Pour r%iter Ies problemes de bande Avant d'inserer une cassette clans I'appareil, v~rifier que la bande est bien tendue. Si necessaire, eliminer Ie mou de - AIWA CT-X409 | Operating Instructions - Page 41
II est possible dapprecier une musique avec des graves renforces. H-BASS Presser H-BASS pour obtenir des graves puissants. L'indicateur" r-6A!3s" s'allume. La fonction est activee/desactivee a chaque pression de H-BASS. RACCORDEMENT D'UN LECTEUR DE CD/MD PORTABLE OU D'UN AUTRE APPAREIL Cet appareil - AIWA CT-X409 | Operating Instructions - Page 42
MAINTENANCE SPECIFICATIONS Nettoyagedu panneau avant Quand la surface du panneau avant est sale, I'essuyer avec un chiffon doux et sec. Nettoyagede la tr2tede lecture Utiliser une cassette de nettoyage pour nettoyer la t&e de lecture et Ies cabestans environ une fois par mois. Si la tete de - AIWA CT-X409 | Operating Instructions - Page 43
- AIWA CT-X409 | Operating Instructions - Page 44
8Z-KTG-903-01 981 OO9ATM-OX Printed in China AIWA CO,,LTD.
-
 1
1 -
 2
2 -
 3
3 -
 4
4 -
 5
5 -
 6
6 -
 7
7 -
8
-
9
-
10
-
11
-
12
-
13
-
14
-
15
-
16
-
17
-
18
-
19
-
20
-
21
-
22
-
23
-
24
-
25
-
26
-
27
-
28
-
29
-
30
-
31
-
32
-
33
-
34
-
35
-
36
-
37
-
38
-
39
-
40
-
41
-
42
-
43
-
44
 |
 |
CFX409,“
STEREO CAR CASSEITE
RECEIVER
RADIO-CASSETTE ESTEREOFONICO PARA AUTOMOVIL
OWNER’S
RECORD
For your convenience,
record the model number
and
serial
number
(you will find them ontheright
side of
yourset)
inthespace
provided
below.
Please referto
them when you contact
your AIWA
dealer
in case of
difficulty.
Model
No. ICT-X409
Serial No. ~