AIWA CT-X409 Operating Instructions - Page 7
Radio, Operation
 |
View all AIWA CT-X409 manuals
Add to My Manuals
Save this manual to your list of manuals |
Page 7 highlights
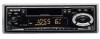
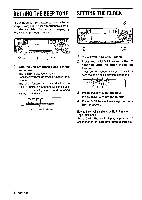
RADIO OPERATION 2 BAND TAPE CD/MD IN 1 T 1 Press PWR to turn the unit on. The radio frequency appears. 2 Press BAND to select the band from among FM1, FM2, FM3 snd AM. The band indicators appear cyclically in order. (FM1, FM2 and FM3 share the same frequency range.) Band indicator Frequency indication 1 3 Press (more than 2 seconds) either TUNE YorTUNE Atotuneinthedesired station. The unit star@ scanning and tunes in a station automatically (seek tuning). Press TUNE 7 to decrease and TUNE A to increase the frequency. Press the button again to cancel seek tuning. Repeat the procedure until the desired station is tuned in. Note If you press (less than 0.5 second at a time) either TUNE Y or TUNE A, the frequency decreases or increases step by step. 4 Adjust the volume with +/-. PWR TUNEV/A LO To turn the unit off Press PWR. Note The unit turns on in the last selected mode when you turned off the unit with the exceptions of pressing the following buttons. q Pressing TAPE turns on the unit in Tape Play mode. q Pressing BAND turns on the unit in Radio mode. q Pressing CD/MD IN turns on the unit in CD/MD IN mode. Switching modes When the unit is in Radio mode, inserting a cassette switches the unit to Tape Play mode automatically. LO (local/DX) button You can use Local mode when you wish to tune in only strong stations during seek tuning. In Radlio mode, press LO to select Local mode. The "LO indicator lights up. q Press LO to deactivate Local mode and switch to DX (distance) mode. qThe "ST" (stereo) indicator lights up when the tuned-in station is broadcasting in stereo and the reception is good. ENGLISH 6
-
 1
1 -
 2
2 -
 3
3 -
 4
4 -
 5
5 -
 6
6 -
 7
7 -
 8
8 -
 9
9 -
 10
10 -
 11
11 -
 12
12 -
13
-
14
-
15
-
16
-
17
-
18
-
19
-
20
-
21
-
22
-
23
-
24
-
25
-
26
-
27
-
28
-
29
-
30
-
31
-
32
-
33
-
34
-
35
-
36
-
37
-
38
-
39
-
40
-
41
-
42
-
43
-
44
 |
 |
