AOC i2369Vm User's manual_i2369V - Page 40
Driver - refresh rate
 |
View all AOC i2369Vm manuals
Add to My Manuals
Save this manual to your list of manuals |
Page 40 highlights
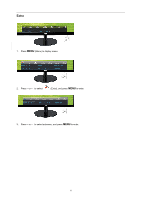
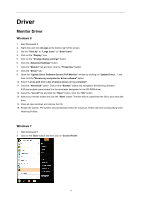
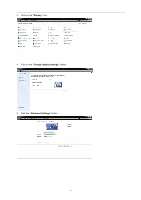
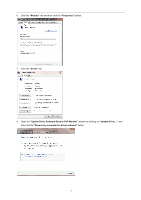
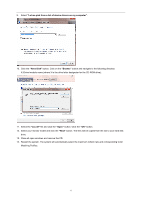
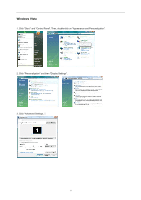
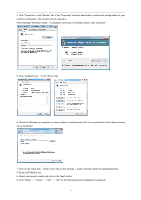
Driver Monitor Driver Windows 8 1. Start Windows® 8 2. Right click and click All apps at the bottom-right of the screen. 3. Set the "View by" to "Large icons" or "Small icons". 4. Click on the "Display" icon. 5. Click on the "Change display settings" button. 6. Click the "Advanced Settings" button. 7. Click the "Monitor" tab and then click the "Properties" button. 8. Click the "Driver" tab. 9. Open the "Update Driver Software-Generic PnP Monitor" window by clicking on "Update Driver... " and then click the "Browse my computer for driver software" button. 10. Select "Let me pick from a list of device drivers on my computer". 11. Click the "Have Disk" button. Click on the "Browse" button and navigate to the following directory: X:\Driver\module name (where X is the drive letter designator for the CD-ROM drive). 12. Select the "xxx.inf" file and click the "Open" button. Click the "OK" button. 13. Select your monitor model and click the "Next" button. The files will be copied from the CD to your hard disk drive. 14. Close all open windows and remove the CD. 15. Restart the system. The system will automatically select the maximum refresh rate and corresponding Color Matching Profiles. Windows 7 1. Start Windows® 7 2. Click on the 'Start' button and then click on 'Control Panel'. 40
-
 1
1 -
2
-
3
-
4
-
5
-
6
-
7
-
8
-
9
-
10
-
11
-
12
-
13
-
14
-
15
-
16
-
17
-
18
-
19
-
20
-
21
-
22
-
23
-
24
-
25
-
26
-
27
-
28
-
29
-
30
-
31
-
32
-
33
-
34
-
 35
35 -
 36
36 -
 37
37 -
 38
38 -
 39
39 -
 40
40 -
 41
41 -
 42
42 -
 43
43 -
 44
44 -
 45
45 -
46
-
47
-
48
-
49
-
50
-
51
-
52
-
53
-
54
-
55
-
56
-
57
-
58
-
59
-
60
-
61
-
62
-
63
-
64
-
65
-
66
-
67
-
68
-
69
-
70
-
71
-
72
 |
 |