ASRock 2Core1333-2.66G User Manual - Page 13
CPU Installation
 |
View all ASRock 2Core1333-2.66G manuals
Add to My Manuals
Save this manual to your list of manuals |
Page 13 highlights
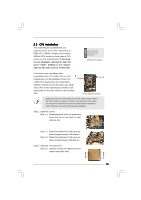
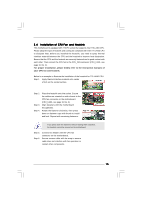
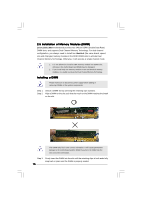
2.3 CPU Installation This motherboard is bundled with one selected Dual Core CPU operating at FSB1333 / 2.66GHz. Please do not remove ASRock CPU stickers on both sides of CPU socket on this motherboard. If the stickers are damaged, removed or bear the word "VOID", ASRock is not responsible for the after service of this CPU. ASRock CPU Sticker In the future, you may adopt other compatible Intel 775-LAND CPU on this motherboard. For the installation of Intel 775LAND CPU, please follow the steps below. ASRock reminds you that as long as you adopt other CPU on this motherboard, we will not be responsible for the after service of the bundled CPU. 775-Pin Socket Overview Before you insert the 775-LAND CPU into the socket, please check if the CPU surface is unclean or if there is any bent pin on the socket. Do not force to insert the CPU into the socket if above situation is found. Otherwise, the CPU will be seriously damaged. Step 1. Open the socket: Step 1-1. Disengaging the lever by depressing down and out on the hook to clear retention tab. Step 1-2. Rotate the load lever to fully open position at approximately 135 degrees. Step 1-3. Rotate the load plate to fully open position at approximately 100 degrees. Step 2. Insert the 775-LAND CPU: Step 2-1. Hold the CPU by the edges where are marked with black lines. black line black line 13
-
 1
1 -
2
-
3
-
4
-
5
-
6
-
7
-
 8
8 -
 9
9 -
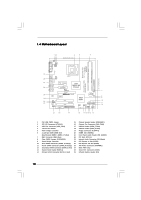 10
10 -
 11
11 -
 12
12 -
 13
13 -
 14
14 -
 15
15 -
 16
16 -
 17
17 -
 18
18 -
19
-
20
-
21
-
22
-
23
-
24
-
25
-
26
-
27
-
28
-
29
-
30
-
31
-
32
-
33
-
34
-
35
-
36
-
37
-
38
-
39
-
40
-
41
-
42
 |
 |