ASRock 4Core1600-GLAN Quick Installation Guide
ASRock 4Core1600-GLAN Manual
 |
View all ASRock 4Core1600-GLAN manuals
Add to My Manuals
Save this manual to your list of manuals |
ASRock 4Core1600-GLAN manual content summary:
- ASRock 4Core1600-GLAN | Quick Installation Guide - Page 1
for backup purpose, without written consent of ASRock Inc. Products and corporate names appearing in this guide may or may not be registered trademarks or ASRock Website: http://www.asrock.com Published April 2008 Copyright©2008 ASRock INC. All rights reserved. 1 ASRock 4Core1600-GLAN Motherboard - ASRock 4Core1600-GLAN | Quick Installation Guide - Page 2
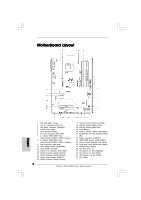
Header (HDMI_SPDIF1) 25 Internal Audio Connector: CD1 (Black) 26 Front Panel Audio Header (HD_AUDIO1) 27 WiFi/E Header (WIFI/E) 28 PCI Slots (PCI1 - 3) 29 PCI Express x1 Slot (PCIE3/DE) 30 PCI Express x1 Slot (PCIE2) 31 PCI Express x16 Slot (PCIE1) 32 FD Jumper 2 ASRock 4Core1600-GLAN Motherboard - ASRock 4Core1600-GLAN | Quick Installation Guide - Page 3
" on the system tray. Set "Speaker Configuration" to "Quadraphonic" or "Stereo". Click "Device advanced settings", choose "Make front and rear output devices playbacks two different audio streams simultaneously", and click "ok". Then reboot your system. 3 ASRock 4Core1600-GLAN Motherboard English - ASRock 4Core1600-GLAN | Quick Installation Guide - Page 4
information about the model you are using. www.asrock.com/support/index.asp 1.1 Package Contents ASRock 4Core1600-GLAN Motherboard (ATX Form Factor: 12.0-in x 8.6-in, 30.5 cm x 21.8 cm) ASRock 4Core1600-GLAN Quick Installation Guide ASRock 4Core1600-GLAN Support CD One 80-conductor Ultra ATA 66/100 - ASRock 4Core1600-GLAN | Quick Installation Guide - Page 5
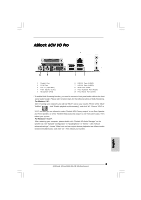
- Supports Wake-On-LAN ASRock 6CH I/O Pro - 1 x PS/2 Mouse Port - 1 x PS/2 Keyboard Port - 1 x Serial Port: COM1 - 1 x Parallel Port (ECP/EPP Support) - 4 x Ready-to-Use USB 2.0 Ports - 1 x RJ-45 LAN Port - HD Audio Jack: Line in/Front Speaker/Microphone English 5 ASRock 4Core1600-GLAN Motherboard - ASRock 4Core1600-GLAN | Quick Installation Guide - Page 6
overclocking tools. Overclocking may affect your system stability, or even cause damage to the components and devices of your system. It should be done at your own risk and expense. We are not responsible for possible damage caused by overclocking. English 6 ASRock 4Core1600-GLAN Motherboard - ASRock 4Core1600-GLAN | Quick Installation Guide - Page 7
to overclock the CPU you adopt from FSB800 to FSB1066, you need to adjust the jumpers as well. Please refer to page 15 for proper jumper settings. 2. About the setting of "Hyper Threading Technology", please check page 30 of "User Manual" in the support CD. 3. This motherboard supports Untied - ASRock 4Core1600-GLAN | Quick Installation Guide - Page 8
DX9.0 with WDDM Driver with 128bit VGA memory (Premium) with 64bit VGA memory (Basic) * After June 1, 2007, all Windows® VistaTM systems are required to meet above minimum hardware requirements in order to qualify for Windows® VistaTM Premium 2007 logo. English 8 ASRock 4Core1600-GLAN Motherboard - ASRock 4Core1600-GLAN | Quick Installation Guide - Page 9
you insert the 775-LAND CPU into the socket, please check if the CPU surface is unclean or if there is any bent pin on the socket. Do not force to insert the CPU into the socket if above situation is found. Otherwise, the CPU will be seriously damaged. 9 ASRock 4Core1600-GLAN Motherboard English - ASRock 4Core1600-GLAN | Quick Installation Guide - Page 10
100 degrees. Step 2. Insert the 775-LAND CPU: Step 2-1. Hold the CPU by the edges where are marked with support the load plate edge, engage PnP cap with right hand thumb and peel the cap from the socket while pressing on center of PnP cap to assist in removal. 10 ASRock 4Core1600-GLAN Motherboard - ASRock 4Core1600-GLAN | Quick Installation Guide - Page 11
, the heatsink cannot be secured on the motherboard. Step 5. Step 6. Connect fan header with the CPU fan connector on the motherboard. Secure excess cable with tie-wrap to ensure cable does not interfere with fan operation or contact other components. 11 ASRock 4Core1600-GLAN Motherboard English - ASRock 4Core1600-GLAN | Quick Installation Guide - Page 12
Installation of Memory Modules (DIMM) 4Core1600-GLAN motherboard provides four 240-pin DDR2 (Double Data Rate 2) DIMM slots, and supports Dual Channel Memory Technology. For module into DDR2 slot; otherwise, this motherboard and DIMM may be damaged. English 12 ASRock 4Core1600-GLAN Motherboard - ASRock 4Core1600-GLAN | Quick Installation Guide - Page 13
will cause permanent damage to the motherboard and the DIMM if you force the DIMM into the slot at incorrect orientation. Step 3. Firmly insert the DIMM into the slot until the retaining clips at both ends fully snap back in place and the DIMM is properly seated. 13 ASRock 4Core1600-GLAN Motherboard - ASRock 4Core1600-GLAN | Quick Installation Guide - Page 14
such as Gigabit LAN card, SATA2 card and ASRock PCIE_DE card. If you want to use ASRock DeskExpress function on this motherboard, please install ASRock PCIE_DE card on PCIE3/DE slot. Installing an Step 4. Fasten the card to the chassis with screws. 14 ASRock 4Core1600-GLAN Motherboard English - ASRock 4Core1600-GLAN | Quick Installation Guide - Page 15
Note2: If you want to overclock the FSB800-CPU you adopt to FSB1066 on this motherboard, you need to adjust the jumpers. Please short pin2, pin3 for FD jumper. Otherwise, the CPU may not work properly on this motherboard. Please refer to below jumper settings. 15 ASRock 4Core1600-GLAN Motherboard - ASRock 4Core1600-GLAN | Quick Installation Guide - Page 16
motherboard connect the black end to the IDE devices 80-conductor ATA 66/100 cable Note: Please refer to the instruction SATAII_3 (Port2) These four Serial ATAII (SATAII) connectors support SATA data cables for internal storage devices. The current SATAII ASRock 4Core1600-GLAN Motherboard English - ASRock 4Core1600-GLAN | Quick Installation Guide - Page 17
This connector allows you CD1 to receive stereo audio input from sound sources such as a CD-ROM, DVD-ROM, TV tuner card, or MPEG card. This is an interface for front panel audio cable that allows convenient connection and control of audio devices. English 17 ASRock 4Core1600-GLAN Motherboard - ASRock 4Core1600-GLAN | Quick Installation Guide - Page 18
the chassis speaker to this header. Please connect a chassis fan cable to this connector and match the black wire to the ground pin. Please connect a CPU fan cable to this connector and match the black wire to the ground pin. 18 ASRock 4Core1600-GLAN Motherboard - ASRock 4Core1600-GLAN | Quick Installation Guide - Page 19
header. Please connect the black end (A) of HDMI_SPDIF cable to the HDMI_SPDIF header on the motherboard. Then connect the white end (B or C) of HDMI_SPDIF cable to the HDMI_SPDIF connector of HDMI VGA card. B. white end (2-pin) C. white end (3-pin) English 19 ASRock 4Core1600-GLAN Motherboard - ASRock 4Core1600-GLAN | Quick Installation Guide - Page 20
manual for connector usage in advance. Connect the HDMI output connector on HDMI VGA card to HDMI device, such as HDTV. Please refer to the user manual of HDTV and HDMI VGA card vendor for detailed connection procedures. Install HDMI VGA card driver to your system. ASRock 4Core1600-GLAN Motherboard - ASRock 4Core1600-GLAN | Quick Installation Guide - Page 21
.hitachigst.com/hdd/support/download.htm The above examples are just for your reference. For different SATAII hard disk products of different vendors, the jumper pin setting methods may not be the same. Please visit the vendors' website for the updates. 21 ASRock 4Core1600-GLAN Motherboard English - ASRock 4Core1600-GLAN | Quick Installation Guide - Page 22
overclocking, but PCI / PCIE buses are in the fixed mode so that FSB can operate under a more stable overclocking environment. Please refer to the warning on page 6 for the possible overclocking risk before you apply Untied Overclocking Technology. 22 ASRock 4Core1600-GLAN Motherboard English - ASRock 4Core1600-GLAN | Quick Installation Guide - Page 23
detailed information about BIOS Setup, please refer to the User Manual (PDF file) contained in the Support CD. 4. Software Support CD information This motherboard supports various Microsoft® EXE" from the BIN folder in the Support CD to display the menus. 23 ASRock 4Core1600-GLAN Motherboard English - ASRock 4Core1600-GLAN | Quick Installation Guide - Page 24
ötigen, besuchen Sie bitte unsere Webseite: www.asrock.com/support/index.asp 1.1 Kartoninhalt ASRock 4Core1600-GLAN Motherboard (ATX-Formfaktor: 30.5 cm x 21.8 cm; 12.0 Zoll x 8.6 Zoll) ASRock 4Core1600-GLAN Schnellinstallationsanleitung ASRock 4Core1333-GLAN Support-CD Ein 80-adriges Ultra-ATA 66 - ASRock 4Core1600-GLAN | Quick Installation Guide - Page 25
CPU Chipsatz Speicher Hybrid Booster Erweiterungssteckplätze Audio LAN E/A-Anschlüsse an der Rückseite - ATX-Formfaktor: 30.5 cm x 21.8 cm; 12.0 Zoll x 8.6 Zoll - LGA 775 für Intel CPU - Northbridge: Intel® P31/G31 - Southbridge: Intel vorne / Mikrofon 25 ASRock 4Core1600-GLAN Motherboard Deutsch - - ASRock 4Core1600-GLAN | Quick Installation Guide - Page 26
"RAID"- und BIOS mit Unterstützung für "Plug and Play" - ACPI 1.1-Weckfunktionen - JumperFree-Modus - SMBIOS 2.3.1 Support-CD - Treiber, Dienstprogramme, Antivirussoftware (Probeversion) Hardware Monitor - Überwachung der CPU Overclocking verursacht wurden. 26 ASRock 4Core1600-GLAN Motherboard - ASRock 4Core1600-GLAN | Quick Installation Guide - Page 27
, ob der CPU-Lüfter am Motherboard richtig funktioniert, und stecken Sie bitte den Stromkabelstecker aus und dann wieder ein. Um die Wärmeableitung zu verbessern, bitte nicht vergessen, etwas Wärmeleitpaste zwischen CPU und Kühlkörper zu sprühen. Deutsch 27 ASRock 4Core1600-GLAN Motherboard - ASRock 4Core1600-GLAN | Quick Installation Guide - Page 28
Motherboards, die ihre Rechner auf die Vergabe des Windows® VistaTM Premium 2007 und BasicLogos vorbereiten möchten, finden die minimalen hardwarevoraussetzungen in der folgenden Tabelle. CPU , um Windows® VistaTM Premium 2007 logo.zu befähigen. Deutsch 28 ASRock 4Core1600-GLAN Motherboard - ASRock 4Core1600-GLAN | Quick Installation Guide - Page 29
) 775-Pin Sockel Übersicht Bevor Sie die 775-Pin CPU in den Sockel sitzen, prüfen Sie bitte, ob die CPU-Oberfläche sauber ist und keine der Kontakte verbogen sind. Setzen Sie die CPU nicht mit Gewalt in den Sockel, dies kann die CPU schwer beschädigen. Deutsch 29 ASRock 4Core1600-GLAN Motherboard - ASRock 4Core1600-GLAN | Quick Installation Guide - Page 30
775-Pin Sockel 775-Pin CPU Um die CPU ordnungsgemäß einsetzen zu können, richten Sie die zwei Orientierungskerben der CPU mit den beiden Markierungen des Sockels aus. Schritt 2-3. Drücken Sie die CPU vorsichtig in vertikaler Richtung in den Sockel. 30 ASRock 4Core1600-GLAN Motherboard - ASRock 4Core1600-GLAN | Quick Installation Guide - Page 31
Schritt 2-4. Prüfen Sie, dass die CPU ordnungsgemäß im Sockel sitzt und die Orientierungskerben einwandfrei in den entsprechenden Auskerbungen sitzen. en Sie den Ladehebel. Schritt 4-3. Sichern Sie Ladehebel und Ladeplatte mithilfe des Hebelverschlusses. 31 ASRock 4Core1600-GLAN Motherboard Deutsch - ASRock 4Core1600-GLAN | Quick Installation Guide - Page 32
ordnungsgemäß am Motherboard befestigt. Schritt 5. Schließen Sie den Lüfter an den CPULüfteranschluss des Motherboards. Schritt 6. Befestigen Sie überschüssiges Kabel mit Band, um eine Störung des Lüfters oder Kontakt mit anderen Teilen zu vermeiden. Deutsch 32 ASRock 4Core1600-GLAN Motherboard - ASRock 4Core1600-GLAN | Quick Installation Guide - Page 33
2.3 Installation der Speichermodule (DIMM) Die Motherboards 4Core1600-GLAN bieten vier 240-pol. DDR2 (Double Data Rate 2) DIMM-Steckplätze und zulässig, DDR in einen DDR2 Steckplatz zu installieren; andernfalls könnten Motherboard und DIMMs beschädigt werden. 33 ASRock 4Core1600-GLAN Motherboard - ASRock 4Core1600-GLAN | Quick Installation Guide - Page 34
tze zu zwingen, führt dies zu dauerhaften Schäden am Mainboard und am DIMM-Modul. Schritt 3: Drücken Sie die DIMM-Module fest in die Steckplätze, so dass die Halteklammern an beiden Enden des Moduls einschnappen und das DIMM-Modul fest an Ort und Stelle sitzt. 34 ASRock 4Core1600-GLAN Motherboard - ASRock 4Core1600-GLAN | Quick Installation Guide - Page 35
PCI- und PCI Express-Slots): Es stehen 3 PCI- und 3 PCI Express auf dem 4Core1600-GLAN Motherboard zur Verfügung. PCI-Slots: PCI-Slots werden zur Installation von Erweiterungskarten mit dem 32bit sich eine JumperKappe auf diesen beiden Pins. Gebrückt Offen 35 ASRock 4Core1600-GLAN Motherboard - ASRock 4Core1600-GLAN | Quick Installation Guide - Page 36
-Passwort, Datum, Zeit und die verschiedenen BIOS-Parameter. Um die Systemparameter zu löschen und 32) Standard Hinweis 1: Bei Verwendung einer FSB1600-CPU auf diesem Motherboard müssen Sie Jumper einstellen. Schließen Sie Motherboard unreparierbar beschädigt! 36 ASRock 4Core1600-GLAN Motherboard - ASRock 4Core1600-GLAN | Quick Installation Guide - Page 37
(39-pin IDE1, siehe S.2 - No. 9) Blauer Anschluss Schwarzer Anschluss zum Motherboard zur Festplatte 80-adriges ATA 66/100 Kabel Hinweis: Details entnehmen Sie bitte den Anweisungen SATAStromversorgungskabels mit dem Stromanschluss des Netzteils. 37 ASRock 4Core1600-GLAN Motherboard Deutsch - ASRock 4Core1600-GLAN | Quick Installation Guide - Page 38
. Anschluss für Audio auf Dieses Interface zu einem der Gehäusevorderseite Audio-Panel auf der Vorderseite (9-Pin HD_AUDIO1) Ihres Gehäuses, ermöglicht (siehe S.2 - No. 26) Ihnen eine bequeme Anschlussmöglichkeit und Kontrolle über Audio-Geräte. 38 ASRock 4Core1600-GLAN Motherboard - ASRock 4Core1600-GLAN | Quick Installation Guide - Page 39
97-Audioleiste angeschlossen werden. E. Rufen Sie das BIOS-Setup-Dienstprogramm auf. Wechseln Sie zu Erweiterte Einstellungen Realtek HD Audio-Manager aufzurufen. Für Windows® 2000 / XP / XP 64-Bit Betriebssystem: Klicken Sie auf "Audio-E/A", wählen an. 39 ASRock 4Core1600-GLAN Motherboard Deutsch - ASRock 4Core1600-GLAN | Quick Installation Guide - Page 40
Draht dem Erdungsstift an. Obwohl dieses Motherboard einen vierpoligen CPU-Lüfteranschluss (Quiet Fan) bietet, können auch CPU-Lüfter mit dreipoligem Anschluss angeschlossen werden; Sie den HDMI_SPDIF-Anschluss der HDMI-VGA-Karte mit diesem Anschluss. 40 ASRock 4Core1600-GLAN Motherboard Deutsch - ASRock 4Core1600-GLAN | Quick Installation Guide - Page 41
mit dem HDMI_SPDIF-Anschluss am Motherboard. Schließen Sie dann das weiße Ende (B oder C) des HDMI_SPDIF-Kabels an den HDMI_SPDIF-Anschluss der HDMI-VGA-Karte an. A. Schwarzes Ende B. Weißes Ende (zweipolig) C. Weißes Ende (dreipolig) 13 1 s 24 12 Deutsch 41 ASRock 4Core1600-GLAN Motherboard - ASRock 4Core1600-GLAN | Quick Installation Guide - Page 42
Installationshinweise HDMI (Hochauflösende Multimedia-Schnittstelle) ist eine komplett digitale Audio/ Video-Spezifikation, die eine Schnittstelle zwischen sämtlichen kompatiblen Digitalaudio-/Videoquellen schon im Vorfeld über die richtige Nutzung der Anschlüsse. 42 ASRock 4Core1600-GLAN Motherboard - ASRock 4Core1600-GLAN | Quick Installation Guide - Page 43
von HITACHI finden Sie entsprechende Details: http://www.hitachigst.com/hdd/support/download.htm Die Beispiele oben dienen lediglich Ihrer Referenz. Die Steckbrückeneinstellungen ergänzende Informationen finden Sie auf der Internetseite des Herstellers. 43 ASRock 4Core1600-GLAN Motherboard Deutsch - ASRock 4Core1600-GLAN | Quick Installation Guide - Page 44
Sie bitte die Option "Overclock Mode" (Übertaktungsmodus) im BIOS von [Auto] auf [Manual] um. Dadurch wird der CPU-FSB beim Übertakten entkoppelt vor möglichen Overclocking-Risiken auf Seite 26, bevor Sie die Untied Overclocking-Technologie anwenden. 44 ASRock 4Core1600-GLAN Motherboard Deutsch - ASRock 4Core1600-GLAN | Quick Installation Guide - Page 45
der Support-CD, um die Menüs aufzurufen. Das Setup-Programm soll es Ihnen so leicht wie möglich machen. Es ist menügesteuert, d.h. Sie können in den verschiedenen Untermenüs Ihre Auswahl treffen und die Programme werden dann automatisch installiert. 45 ASRock 4Core1600-GLAN Motherboard Deutsch - ASRock 4Core1600-GLAN | Quick Installation Guide - Page 46
au modèle que vous utilisez. www.asrock.com/support/index.asp 1.1 Contenu du paquet Carte mère ASRock 4Core1600-GLAN (Facteur de forme ATX: 12.0 pouces x 8.6 pouces, 30.5 cm x 21.8 cm) Guide d'installation rapide ASRock 4Core1600-GLAN CD de soutien ASRock 4Core1600-GLAN Un câble ruban IDE Ultra ATA - ASRock 4Core1600-GLAN | Quick Installation Guide - Page 47
-On-LAN ASRock 6CH I/O Pro - 1 x port souris PS/2 - 1 x port clavier PS/2 - 1 x port série: COM 1 - 1 x port parallèle: Support ECP/EPP - 4 x ports USB 2.0 par défaut - 1 x port RJ-45 - Prise HD Audio: Entrée Ligne / Haut-parleur frontal / Microphone 47 ASRock 4Core1600-GLAN Motherboard Français - ASRock 4Core1600-GLAN | Quick Installation Guide - Page 48
audio internes - Connecteur audio panneau avant - 2 x En-tête USB 2.0 (prendre en charge 3 ports USB 2.0 supplémentaires) (voir ATTENTION 11) - 1 x Connecteur WiFi/E (voir ATTENTION 12) BIOS - 4Mb BIOS AMI - BIOS AMI - Support causés par l'overclocking. 48 ASRock 4Core1600-GLAN Motherboard - ASRock 4Core1600-GLAN | Quick Installation Guide - Page 49
sur le connecteur SATAII, veuillez lire le «Guide d'Installation du disque dur SATAII», page 66, pour mettre votre lecteur de disque SATAII en mode SATAII. Vous pouvez également brancher le disque dur SATA directement sur le connecteur SATAII.. Français 49 ASRock 4Core1600-GLAN Motherboard - ASRock 4Core1600-GLAN | Quick Installation Guide - Page 50
bit / XP SP1; SP2/ 2000 SP4. 12. L'en-tête WiFi/E accepte la fonction WiFi+AP avec le module ASRock WiFi-802.11g ou WiFi-802.11n ; c'est un adaptateur de réseau local sans-fil (WLAN) facile d'utilisation. pour Windows® VistaTM Premium 2007 logo. Français 50 ASRock 4Core1600-GLAN Motherboard - ASRock 4Core1600-GLAN | Quick Installation Guide - Page 51
composant, placez-le sur un support antistatique ou dans son sachet d'origine. 5. Lorsque vous placez les vis dans les orifices pour vis pour fixer la carte mère sur le châssis, ne serrez pas trop les vis ! Vous risquez sinon d'endommager la carte mère. 51 ASRock 4Core1600-GLAN Motherboard Français - ASRock 4Core1600-GLAN | Quick Installation Guide - Page 52
le processeur 775 broches : Etape 2-1. Tenez le processeur par ses bords là où se trouvent des lignes noires. Etape 2-2. Orientez le paquet avec le dissipateur thermique intégré (IHS) vers le haut. Repérez la broche 1 et les deux encoches d'orientation. 52 ASRock 4Core1600-GLAN Motherboard Ligne - ASRock 4Core1600-GLAN | Quick Installation Guide - Page 53
775 broches Socket 775 broches Pour une insertion correcte, veuillez vérifier que vous faites bien correspondre les deux encoches d'orientation sur le processeur avec les deux détrompeurs du socket renvoyez la carte mère pour service après vente. Français Etape ASRock 4Core1600-GLAN Motherboard - ASRock 4Core1600-GLAN | Quick Installation Guide - Page 54
reporter aux manuels d'instructions de votre ventilateur du dissipateur thermique pour un processeur 775 broches. (Appliquez le matériau mère) Etape 2. Placez le dissipateur thermique sur le socket. Vérifiez que les câbles du ventilateur sont orient ASRock 4Core1600-GLAN Motherboard Français - ASRock 4Core1600-GLAN | Quick Installation Guide - Page 55
modules m émoire [DIMM] La carte mère 4Core1600-GLAN dispose de quatre emplacements DIMM DDR2 (Double Data Rate 2) de 240-broches, et supporte la Technologie de Mémoire à Canal Double. Pour sur le slot DDR2; la carte mère et les DIMM pourraient être endommagés. 55 ASRock 4Core1600-GLAN Motherboard - ASRock 4Core1600-GLAN | Quick Installation Guide - Page 56
jusqu'à ce que les clips de maintien situés aux deux extrémités se ferment complètement et que le module DIMM soit inséré correctement. 56 ASRock 4Core1600-GLAN Motherboard - ASRock 4Core1600-GLAN | Quick Installation Guide - Page 57
PCI Express ) Il y a 3 slots PCI et 3 slots PCI Express sur les cartes mères 4Core1600-GLAN. Slots PCI: Les slots PCI sont utilisés pour installer des cartes d'extension dotées d'une interface 2 Amp et un courant standby supérieur fourni par l'alimentation. 57 ASRock 4Core1600-GLAN Motherboard - ASRock 4Core1600-GLAN | Quick Installation Guide - Page 58
vous référer ci-dessous pour les réglages des cavaliers. Remarque 2: Si vous voulez overclocker le CPU FSB800 que vous avez choisi vers un FSB1066 sur cette carte mère, vous devez régler fil rouge du câble est bien branché sur le côté Broche1 du connecteur. 58 ASRock 4Core1600-GLAN Motherboard - ASRock 4Core1600-GLAN | Quick Installation Guide - Page 59
dur Câble ATA 66/100 80 conducteurs Note: Veuillez vous reporter aux instructions du fabricant de votre IDE périphérique pour les détails. Connecteurs -tête USB4_5 peut supporter deux ports USB 2.0, et l'en-tête USB6 peut supporter un port USB 2.0. 59 ASRock 4Core1600-GLAN Motherboard Français - ASRock 4Core1600-GLAN | Quick Installation Guide - Page 60
la détection de fiche, mais le fil de panneau sur le châssis doit prendre en charge le HDA pour fonctionner correctement. Veuillez suivre les instructions dans notre manuel et le manuel de châssis afin installer votre système. Français 60 ASRock 4Core1600-GLAN Motherboard - ASRock 4Core1600-GLAN | Quick Installation Guide - Page 61
MIC_RET et OUT_RET sont réservés au panneau audio HD. Vous n'avez pas besoin de les connecter pour le panneau audio AC'97. E. Entrer dans l'utilitaire de configuration du BIOS. Saisir les Paramètres avancés puis sé et brancher le fil noir sur la broche de terre. 61 ASRock 4Core1600-GLAN Motherboard - ASRock 4Core1600-GLAN | Quick Installation Guide - Page 62
fournissant une sortie audio SPDIF vers la carte VGA HDMI, et permettant au système de se connecter au un téléviseur numérique HDMI /un projecteur / un périphérique LCD. Veuillez brancher le connecteur HDMI_SPDIF de la carte VGA HDMI sur ce connecteur. Français 62 ASRock 4Core1600-GLAN Motherboard - ASRock 4Core1600-GLAN | Quick Installation Guide - Page 63
émité blanche (B ou C) du câble HDMI_SPDIF au connecteur HDMI_SPDIF de la carte VGA HDMI. B. extrémité blanche (2 briches) C. extrémité blanche (3 briches) Français 63 ASRock 4Core1600-GLAN Motherboard - ASRock 4Core1600-GLAN | Quick Installation Guide - Page 64
Guide de connexion du collecteur HDMI_SPDIF L'interface HDMI (interface multimédia haute définition) est une caractéristique audio/vidéo entièrement numérique qui offre une interface entre toute source audio ) (B) extrémité blanche (3 briches) (C) Français 64 ASRock 4Core1600-GLAN Motherboard - ASRock 4Core1600-GLAN | Quick Installation Guide - Page 65
carte VGA HDMI pour obtenir les procédures de connexion détaillées. Etape 5. Installez les pilotes de la carte VGA HDMI à votre système. 65 ASRock 4Core1600-GLAN Motherboard Français - ASRock 4Core1600-GLAN | Quick Installation Guide - Page 66
lire attentivement le présent guide d'installation du disque dur SATAII fonction SATAII, veuillez suivre les instructions ci-dessous avec les différents de détails. http://www.hitachigst.com/hdd/support/download.htm Les exemples donnés précédemment ne ASRock 4Core1600-GLAN Motherboard Français - ASRock 4Core1600-GLAN | Quick Installation Guide - Page 67
le jeu de puce Intel® ICH7 Southbridge qui SATA / SATAII. 2.10 Guide d'installation des pilotes Pour installer BIOS pour établir la sélection de [Auto] à [Manual]. Par conséquent, le CPU overclocking avant d'appliquer la technologie Untied Overclocking. Français 67 ASRock 4Core1600-GLAN Motherboard - ASRock 4Core1600-GLAN | Quick Installation Guide - Page 68
détaillées sur le BIOS, veuillez consulter le Guide de l'utilisateur (fichier PDF) dans le CD technique. 4. Informations sur le CD de support Cette carte mère supporte divers systèmes d'exploitation BIN et double-cliquez dessus pour afficher les menus. 68 ASRock 4Core1600-GLAN Motherboard Français - ASRock 4Core1600-GLAN | Quick Installation Guide - Page 69
CPU supportate. ASRock website http://www.asrock.com Se si necessita dell'assistenza tecnica per questa scheda madre, visitare il nostro sito per informazioni specifiche sul modello che si sta usando. www.asrock.com/support/index.asp 1.1 Contenuto della confezione Scheda madre ASRock 4Core1600-GLAN - ASRock 4Core1600-GLAN | Quick Installation Guide - Page 70
ASRock 6CH I/O Pro - 1 x porta PS/2 per mouse - 1 x porta PS/2 per tastiera - 1 x porta seriale: COM 1 - 1 x porta parallela: supporto ECP/EPP - 4 x porte USB 2.0 già integrate - 1 x Porta RJ-45 - Connettore HD Audio: ingresso linea / cassa frontale / microfono 70 ASRock 4Core1600-GLAN Motherboard - ASRock 4Core1600-GLAN | Quick Installation Guide - Page 71
BIOS - 4Mb AMI BIOS - Suppor AMI legal BIOS - Supporta "Plug and Play" - Compatibile con ACPI 1.1 wake up events - Supporta jumperfree - Supporta SMBIOS 2.3.1 CD di - Driver ritenuti responsabili per possibili danni provocati dall'overclocking. Italiano 71 ASRock 4Core1600-GLAN Motherboard - ASRock 4Core1600-GLAN | Quick Installation Guide - Page 72
overclock della CPU adottata da FSB800 a FSB1066, è necessario regolare i jumper. Per l'impostazione corretta dei jumper, fare riferimento alla pagina 81. 2. Per il settaggio della "Tecnologia Hyper-Threading", per favore controllare pagina 30 del Manuale 72 ASRock 4Core1600-GLAN Motherboard - ASRock 4Core1600-GLAN | Quick Installation Guide - Page 73
.0 con driver WDDM Con memoria VGA 128bit (Premium) Con memoria VGA 64bit (Basic) * Dopo il 1 Giugno 2007, tutti i sistemi Windows® VistaTM vengono richiesti di essere in accordo ai requisiti minimi del sistema per Windows® VistaTM Premium 2007 logo. Italiano 73 ASRock 4Core1600-GLAN Motherboard - ASRock 4Core1600-GLAN | Quick Installation Guide - Page 74
componente. 5. Nell'usare i giraviti per fissare la scheda madre al telaio non serrare eccessivamente le viti! Altrimenti si rischia di danneggiare la scheda madre. 74 ASRock 4Core1600-GLAN Motherboard Italiano - ASRock 4Core1600-GLAN | Quick Installation Guide - Page 75
gradi la leva di carico per aprirla completamente. Fase 1-3. Ruotare di circa 100 gradi la piastra di carico per aprirla completamente. Fase 2. Inserire la CPU 775-Pin: Fase 2-1. Tenere la CPU dai bordi segnati con linee nere. Linea nera Linea nera Italiano 75 ASRock 4Core1600-GLAN Motherboard - ASRock 4Core1600-GLAN | Quick Installation Guide - Page 76
di orientamento Pin1 Dente di Tacca di allineamento orientamento Tacca di allineamento CPU da 775-Pin Socket da 775-Pin Per il corretto inserimento, verificare di far combaciare i due denti la leva di carico mentre si preme leggermente sulla piastra di carico. ASRock 4Core1600-GLAN Motherboard - ASRock 4Core1600-GLAN | Quick Installation Guide - Page 77
della ventola al connettore ventola della CPU sulla scheda madre. Fase 6. fissare il cavo in eccesso con fascette per assicurare che il cavo non interferisca con il funzionamento della ventola o che venga a contatto con gli altri componenti. 77 ASRock 4Core1600-GLAN Motherboard Italiano - ASRock 4Core1600-GLAN | Quick Installation Guide - Page 78
2.3 Installazione dei moduli di memoria (DIMM) La scheda madre 4Core1600-GLAN fornisce quattro alloggiamenti DIMM DDR2 (Double Data Rate 2) a 240 pin, e supporta la tecnologia DDR nello slot DDR2, altrimenti si possono danneggiare questa scheda madre e la DIMM. 78 ASRock 4Core1600-GLAN Motherboard - ASRock 4Core1600-GLAN | Quick Installation Guide - Page 79
DIMM nello slot fino a far scattare completamente in posizione i fermagli di ritegno alle due estremità e fino ad installare correttamente la DIMM nella sua sede. 79 ASRock 4Core1600-GLAN Motherboard - ASRock 4Core1600-GLAN | Quick Installation Guide - Page 80
PCI Express) Esistono 3 slot PCI e 3 slot PCI Express su entrambe le schede madri 4Core1600-GLAN. Slot PCI: Sono utilizzati per installare schede di espansione con Interfaccia PCI a 32-bit. settare a +5VSB (standby) e abilitare PS/2 o USB wake up events. ASRock 4Core1600-GLAN Motherboard Italiano - ASRock 4Core1600-GLAN | Quick Installation Guide - Page 81
desidera eseguire l'overclock della CPU FSB800 adottata a FSB1066, è necessario regolare i jumper FSB800-CPU. Ridurre pin2, pin3 per jumper FD. In caso contrario la CPU potrebbe non funzionare striscia rossa sia inserito nel lato Pin1 del connettore. 81 ASRock 4Core1600-GLAN Motherboard Italiano - ASRock 4Core1600-GLAN | Quick Installation Guide - Page 82
sul pannello I/O, sono presenti due terminali USB 2.0 sulla scheda madre. Il terminale USB4_5 supporta due porte USB 2.0, mentre il terminale USB6 supporta una porta USB 2.0. ASRock 4Core1600-GLAN Motherboard Italiano - ASRock 4Core1600-GLAN | Quick Installation Guide - Page 83
un pannello audio AC'97, installarlo nell'intestazione audio del pannello anteriore, come indicato di seguito: A. Collegare Mic_IN (MIC) a MIC2_L. B. Collegare Audio_R (RIN) a OUT2_R e Audio_L (LIN) ad OUT2_L. C. Collegare Ground (GND) a Ground (GND). 83 ASRock 4Core1600-GLAN Motherboard Italiano - ASRock 4Core1600-GLAN | Quick Installation Guide - Page 84
funzione di controllo della velocità della ventola. Se si intende collegare la ventola CPU a 3 piedini al connettore della ventola CPU su questa scheda madre, collegarla ai piedini 1-3. Piedini 1-3 collegati Installazione della ventola a 3 piedini 84 ASRock 4Core1600-GLAN Motherboard Italiano - ASRock 4Core1600-GLAN | Quick Installation Guide - Page 85
Header HDMI_SPDIF (3-pin HDMI_SPDIF1) (vedi p.2 Nr. 24) Header HDMI_SPDIF, con uscita audio SPDIF su scheda HDMI VGA, consente al sistema di collegare dispositivi per TV digitale A. estremità nera B. estremità bianca (2 pin) C. estremità bianca (3 pin) 85 ASRock 4Core1600-GLAN Motherboard Italiano - ASRock 4Core1600-GLAN | Quick Installation Guide - Page 86
è dotata di intestazione HDMI_SPDIF, che fornisce una uscita audio SPDIF ad una scheda HDMI VGA, e consente il manuale dell'utente di HDTV e della scheda HDMI VGA per il collegamento dettagliato. Punto 5. Installare il driver della scheda HDMI VGA nel sistema. 86 ASRock 4Core1600-GLAN Motherboard - ASRock 4Core1600-GLAN | Quick Installation Guide - Page 87
/support/download.htm Gli esempi di cui sopra sono solo per riferimento. Per dischi rigidi SATAII di diversi produttori, i metodi di impostazione dei pin del jumper possono non essere gli stessi. Visitare i siti web dei produttori per gli aggiornamenti. 87 ASRock 4Core1600-GLAN Motherboard Italiano - ASRock 4Core1600-GLAN | Quick Installation Guide - Page 88
nella modalità fissata in modo tale che l'FSB posa operare sotto un più stabile ambiente di overclocking. Fare riferimento all'avviso di pagina 71 per i possibili rischi dell'overclocking prima di applicare la tecnologia Untied Overclocking Technology. 88 ASRock 4Core1600-GLAN Motherboard Italiano - ASRock 4Core1600-GLAN | Quick Installation Guide - Page 89
di reset sullo chassis del sistema. Per informazioni più dettagliate circa il Setup del BIOS, fare riferimento al Manuale dell'Utente (PDF file) contenuto nel cd di supporto. 4. Software di supporto e e cliccare due volte per visualizzare i menù. 89 ASRock 4Core1600-GLAN Motherboard Italiano - ASRock 4Core1600-GLAN | Quick Installation Guide - Page 90
modelo específico de su placa. www.asrock.com/support/index.asp 1.1 Contenido de la caja Placa base ASRock 4Core1600-GLAN (Factor forma ATX: 30,5 cm x 21,8 cm, 12,0" x 8,6") Guía de instalación rápida de ASRock 4Core1600-GLAN CD de soporte de ASRock 4Core1600-GLAN Una cinta de datos IDE de conducci - ASRock 4Core1600-GLAN | Quick Installation Guide - Page 91
Audio LAN Entrada/Salida de Panel Trasero - Factor forma ATX: 30,5 cm x 21,8 cm, 12,0" x 8,6" - LGA 775 para Intel CPU EM64T - North Bridge: Intel® P31/G31 - South Bridge: Intel® 45 - Conexión de audio: Entrada de línea / Altavoz frontal / Micrófono 91 ASRock 4Core1600-GLAN Motherboard Español - ASRock 4Core1600-GLAN | Quick Installation Guide - Page 92
las funciones "RAID" y " Audio Interno - Conector de audio de panel frontal - 2 x Cabezal USB 2.0 (admite 3 puertos USB 2.0 adicionales) (vea ATENCIÓN 11) - 1 x cabecera WiFi/E (vea ATENCIÓN 12) BIOS - 4Mb AMI BIOS - AMI legal BIOS asrock.com Español 92 ASRock 4Core1600-GLAN Motherboard - ASRock 4Core1600-GLAN | Quick Installation Guide - Page 93
CPU de 64-bit, no existe dicha limitación. 8. Aunque esta placa base ofrece un control complete, no es recomendable forzar la velocidad. Las frecuencias de bus de la CPU distintas a las recomendadas pueden causar inestabilidad en el sistema o dañar la CPU. 93 ASRock 4Core1600-GLAN Motherboard - ASRock 4Core1600-GLAN | Quick Installation Guide - Page 94
sistema va a apagarse automaticamente. Antes de reanudar el sistema, compruebe si el ventilador de la CPU de la placa base funciona apropiadamente y desconecte el cable de alimentación, a continuación, vuelva a el logo de Windows® VistaTM Premium 2007. Español 94 ASRock 4Core1600-GLAN Motherboard - ASRock 4Core1600-GLAN | Quick Installation Guide - Page 95
775 agujas en el socket, compruebe que la superficie de la CPU se encuentra limpia y no hay ninguna aguja torcida en el socket. No introduzca la CPU en el socket por la fuerza si se produce la situación anterior. Si lo hace, puede producir daños graves en la CPU. 95 ASRock 4Core1600-GLAN Motherboard - ASRock 4Core1600-GLAN | Quick Installation Guide - Page 96
la CPU coinciden con las teclas de alineación del socket. Step 2-3. Coloque con cuidado la CPU en el socket con un movimiento totalmente vertical. Step 2-4. Compruebe que la CPU se encuentra en el socket y la orientación coincide con la indicada por las muescas. 96 ASRock 4Core1600-GLAN Motherboard - ASRock 4Core1600-GLAN | Quick Installation Guide - Page 97
CPU. A continuación se ofrece un ejemplo para ilustrar la instalación del disipador para la CPU de 775 agujas. (Aplique el material termal de interfaz) Paso 1. Aplique el material termal de interfaz en el centro del IHS de la superficie del socket. Español 97 ASRock 4Core1600-GLAN Motherboard - ASRock 4Core1600-GLAN | Quick Installation Guide - Page 98
cabezal del ventilador con el conector del ventilador de la CPU en la placa madre. Fije el cable que sobre con un lazo para asegurarse de que el cable no interfiere en el funcionamiento del ventilador y tampoco entra en contacto con otros componentes. Español 98 ASRock 4Core1600-GLAN Motherboard - ASRock 4Core1600-GLAN | Quick Installation Guide - Page 99
2.3 Instalación de Memoria La placa 4Core1600-GLAN ofrece cuatro ranuras DIMM DDR2 de 240 pines, y soporta Tecnología de Memoria de Doble Canal. Para la configuración DDR en la ranura DDR2; si lo hace, esta placa base y los módulos DIMM pueden resultar dañados. 99 ASRock 4Core1600-GLAN Motherboard - ASRock 4Core1600-GLAN | Quick Installation Guide - Page 100
de la ranura hasta que los clips de sujeción de ambos lados queden completamente introducidos en su sitio y la DIMM se haya asentado apropiadamente. 100 ASRock 4Core1600-GLAN Motherboard - ASRock 4Core1600-GLAN | Quick Installation Guide - Page 101
y PCI Express) Hay 3 ranuras PCI y 3 ranura PCI Express sobre las placas mardres 4Core1600-GLAN. Ranuras PCI: Para instalar tarjetas de expansión que tienen 32-bit Interface PCI. Ranura 2, pin 3 para habilitar +5VSB (standby) para PS/2 o USB wake up events. ASRock 4Core1600-GLAN Motherboard 101 - ASRock 4Core1600-GLAN | Quick Installation Guide - Page 102
FD (FD, puente de 3 terminales, consulte la p. 2, Nº 32) Predeterminado Nota 1: Si utiliza una CPU FSB 1600 en esta placa base, necesitará ajustar los puentes. Conecte el terminal 2 y el terminal 3 del banda roja debe quedar en el mismo lado que el contacto 1 ASRock 4Core1600-GLAN Motherboard - ASRock 4Core1600-GLAN | Quick Installation Guide - Page 103
energía de la unidad. A continuación, conecte el extremo blanco del cable de alimentación SATA a la conexión de alimentación de la fuente de alimentación. Español ASRock 4Core1600-GLAN Motherboard 103 - ASRock 4Core1600-GLAN | Quick Installation Guide - Page 104
para ASRock DeskExpress. Permite recepción de input CD1 audio de fuente sónica como CD- ROM, DVD-ROM, TV tuner, o tarjeta MPEG. Este es una interface para cable de audio de panel frontal que permite conexión y control conveniente de apparatos de Audio. 104 ASRock 4Core1600-GLAN Motherboard - ASRock 4Core1600-GLAN | Quick Installation Guide - Page 105
cabezal ortar un puerto 1. El Audio de Alta Definición soporta la favor, siga las instrucciones en nuestro manual y en el manual de chasis para instalar su sistema en la Utilidad de configuración del BIOS Entre en Configuración avanzada y, a continuaci ASRock 4Core1600-GLAN Motherboard 105 Español - ASRock 4Core1600-GLAN | Quick Installation Guide - Page 106
CPU_FAN1) (vea p.2, N. 6) 4 3 2 1 Conecte el cable del ventilador de la CPU a este conector y haga coincidir el cable negro con el conector de tierra. Aunque esta / Dispositivos LCD. Conecte el conector HDMI_SPDIF de la tarjeta VGA HDMI a esta 106 cabecera. ASRock 4Core1600-GLAN Motherboard - ASRock 4Core1600-GLAN | Quick Installation Guide - Page 107
és el extremo blanco (B o C) del cable HDMI_SPDIF en el conector HDMI_SPDIF de la tarjeta VGA HDMI. A. Extremo negro B. Extremo blanco (2 patillas) C. Extremo blanco (3 patillas) Español ASRock 4Core1600-GLAN Motherboard 107 - ASRock 4Core1600-GLAN | Quick Installation Guide - Page 108
4. Conecte el conector de salida HDMI a un dispositivo HDMI, como un HDTV. Consulte el manual del usuario del HDTV y la tarjeta VGA HDMI para conocer el procedimiento detallado de conexión. Paso 5. Instale el controlador de la tarjeta VGA HDMI en su sistema. 108 ASRock 4Core1600-GLAN Motherboard - ASRock 4Core1600-GLAN | Quick Installation Guide - Page 109
Por favor visite el sitio Web de Hitachi para detalles. http://www.hitachigst.com/hdd/support/download.htm Los ejemplos anteriores son sólo para referencia. Para diferentes productos de disco duro de los proveedores para obtener las actualizaciones. Español ASRock 4Core1600-GLAN Motherboard 109 - ASRock 4Core1600-GLAN | Quick Installation Guide - Page 110
/ Configuración RAID Esta placa base adopta el chipset Intel® ICH7 que Overclocking) no relacionado, por favor entre a la opción de "Modo de Forzado de Reloj" de la configuración de BIOS para establecer la selección de [Auto] a [Manual]. Por lo tanto, FSB de CPU ASRock 4Core1600-GLAN Motherboard - ASRock 4Core1600-GLAN | Quick Installation Guide - Page 111
información detallada sobre como configurar la BIOS, por favor refiérase al Manual del Usuario (archivo PDF) contenido en el CD. 4.Información de Software Support CD Esta placa-base soporta diversos tipos "ASSETUP.EXE" para iniciar la instalación. Español ASRock 4Core1600-GLAN Motherboard 111
-
 1
1 -
 2
2 -
 3
3 -
 4
4 -
 5
5 -
 6
6 -
 7
7 -
8
-
9
-
10
-
11
-
12
-
13
-
14
-
15
-
16
-
17
-
18
-
19
-
20
-
21
-
22
-
23
-
24
-
25
-
26
-
27
-
28
-
29
-
30
-
31
-
32
-
33
-
34
-
35
-
36
-
37
-
38
-
39
-
40
-
41
-
42
-
43
-
44
-
45
-
46
-
47
-
48
-
49
-
50
-
51
-
52
-
53
-
54
-
55
-
56
-
57
-
58
-
59
-
60
-
61
-
62
-
63
-
64
-
65
-
66
-
67
-
68
-
69
-
70
-
71
-
72
-
73
-
74
-
75
-
76
-
77
-
78
-
79
-
80
-
81
-
82
-
83
-
84
-
85
-
86
-
87
-
88
-
89
-
90
-
91
-
92
-
93
-
94
-
95
-
96
-
97
-
98
-
99
-
100
-
101
-
102
-
103
-
104
-
105
-
106
-
107
-
108
-
109
-
110
-
111
 |
 |
1
ASRock
4Core1600-GLAN
Motherboard
English
English
English
English
English
Copyright Notice:
Copyright Notice:
Copyright Notice:
Copyright Notice:
Copyright Notice:
No part of this installation guide may be reproduced, transcribed, transmitted, or trans-
lated in any language, in any form or by any means, except duplication of documen-
tation by the purchaser for backup purpose, without written consent of ASRock Inc.
Products and corporate names appearing in this guide may or may not be registered
trademarks or copyrights of their respective companies, and are used only for identifica-
tion or explanation and to the owners’ benefit, without intent to infringe.
Disclaimer:
Disclaimer:
Disclaimer:
Disclaimer:
Disclaimer:
Specifications and information contained in this guide are furnished for informational
use only and subject to change without notice, and should not be constructed as a
commitment by ASRock. ASRock assumes no responsibility for any errors or omissions
that may appear in this guide.
With respect to the contents of this guide, ASRock does not provide warranty of any kind,
either expressed or implied, including but not limited to the implied warranties or
conditions of merchantability or fitness for a particular purpose. In no event shall
ASRock, its directors, officers, employees, or agents be liable for any indirect, special,
incidental, or consequential damages (including damages for loss of profits, loss of
business, loss of data, interruption of business and the like), even if ASRock has been
advised of the possibility of such damages arising from any defect or error in the guide
or product.
This device complies with Part 15 of the FCC Rules. Operation is subject to the
following two conditions:
(1)
this device may not cause harmful interference, and
(2)
this device must accept any interference received, including interference that
may cause undesired operation.
CALIFORNIA, USA ONLY
The Lithium battery adopted on this motherboard contains Perchlorate, a toxic
substance controlled in Perchlorate Best Management Practices (BMP) regulations
passed by the California Legislature. When you discard the Lithium battery in
California, USA, please follow the related regulations in advance.
“Perchlorate Material-special handling may apply, see
www
.dtsc.ca.gov/hazardouswa
ste/perchlorate”
ASRock Website: http://www.asrock.com
Published April 2008
Copyright
©
2008 ASRock INC. All rights reserved.