ASRock 4Core1600Twins-P35D User Manual - Page 20
CrossFire, Operation Guide, 6 Expansion Slots PCI, PCI Express, and AGI Express, Slots, Installing
 |
View all ASRock 4Core1600Twins-P35D manuals
Add to My Manuals
Save this manual to your list of manuals |
Page 20 highlights
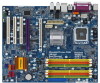
2.6 Expansion Slots (PCI, PCI Express, and AGI Express Slots) There are 3 PCI slots, 1 PCI Express slot, and 1 AGI Express slot (PCI Express x4) on this motherboard. PCI slots: PCI slots are used to install expansion cards that have the 32-bit PCI interface. PCIE slots: PCIE1 (PCIE x16 slot) is used for PCI Express cards with x16 lane width graphics cards. AGI Express slot (PCI Express x4): AGI Express slot (PCI Express x4) is used to install PCI Express expansion cards. If you plan to install only one PCI Express card on this motherboard, please install it on PCIE1 (PCIE x16 slot). Installing an expansion card Step 1. Before installing the expansion card, please make sure that the power supply is switched off or the power cord is unplugged. Please read the documentation of the expansion card and make necessary hardware settings for the card before you start the installation. Step 2. Remove the bracket facing the slot that you intend to use. Keep the screws for later use. Step 3. Align the card connector with the slot and press firmly until the card is completely seated on the slot. Step 4. Fasten the card to the chassis with screws. 2.7 CrossFireTM Operation Guide This motherboard supports CrossFireTM feature. CrossFireTM technology offers the most advantageous means available of combining multiple high performance Graphics Processing Units (GPU) in a single PC. Combining a range of different operating modes with intelligent software design and an innovative interconnect mechanism, CrossFireTM enables the highest possible level of performance and image quality in any 3D application. Currently CrossFireTM feature is supported with Windows® XP with Service Pack 2 and VistaTM OS. Please check AMD website for ATITM CrossFireTM driver updates. 20
-
 1
1 -
2
-
3
-
4
-
5
-
6
-
7
-
8
-
9
-
10
-
11
-
12
-
13
-
14
-
 15
15 -
 16
16 -
 17
17 -
 18
18 -
 19
19 -
 20
20 -
 21
21 -
 22
22 -
 23
23 -
 24
24 -
 25
25 -
26
-
27
-
28
-
29
-
30
-
31
-
32
-
33
-
34
-
35
-
36
-
37
-
38
-
39
-
40
-
41
-
42
-
43
-
44
-
45
-
46
-
47
-
48
-
49
-
50
-
51
-
52
-
53
-
54
-
55
-
56
-
57
-
58
-
59
-
60
 |
 |
