ASRock 4CoreDX90-VSTA R2.0 Quick Installation Guide - Page 18
English, Serial A, Serial ATA SA, A SATA Hard Disks Installation, A Hard Disks Installation
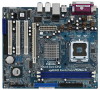 |
View all ASRock 4CoreDX90-VSTA R2.0 manuals
Add to My Manuals
Save this manual to your list of manuals |
Page 18 highlights
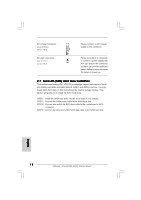
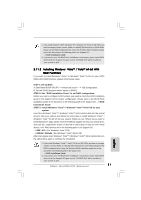
ATX Power Connector (20-pin ATXPWR1) (see p.2, No. 3) ATX 12V Connector (4-pin ATX12V1) (see p.2, No. 2) Please connect an ATX power supply to this connector. Please note that it is necessary to connect a power supply with ATX 12V plug to this connector so that it can provides sufficient power. Failing to do so will cause the failure to power up. 2.7 Serial ATA (SATA) Hard Disks Installation This motherboard adopts VIA® VT8237A southbridge chipset that supports Serial ATA (SATA) hard disks and RAID (RAID 0, RAID 1 and JBOD) functions. You may install SATA hard disks on this motherboard for internal storage devices. This section will guide you to install the SATA hard disks. STEP 1: Install the SATA hard disks into the drive bays of your chassis. STEP 2: Connect the SATA power cable to the SATA hard disk. STEP 3: Connect one end of the SATA data cable to the motherboard's SATA connector. STEP 4: Connect the other end of the SATA data cable to the SATA hard disk. English 18 ASRock 4CoreDX90-VSTA Motherboard
-
 1
1 -
2
-
3
-
4
-
5
-
6
-
7
-
8
-
9
-
10
-
11
-
12
-
 13
13 -
 14
14 -
 15
15 -
 16
16 -
 17
17 -
 18
18 -
 19
19 -
 20
20 -
 21
21 -
 22
22 -
 23
23 -
24
-
25
-
26
-
27
-
28
-
29
-
30
-
31
-
32
-
33
-
34
-
35
-
36
-
37
-
38
-
39
-
40
-
41
-
42
-
43
-
44
-
45
-
46
-
47
-
48
-
49
-
50
-
51
-
52
-
53
-
54
-
55
-
56
-
57
-
58
-
59
-
60
-
61
-
62
-
63
-
64
-
65
-
66
-
67
-
68
-
69
-
70
-
71
-
72
-
73
-
74
-
75
-
76
-
77
-
78
-
79
-
80
-
81
-
82
-
83
-
84
-
85
-
86
-
87
-
88
-
89
-
90
-
91
-
92
-
93
-
94
-
95
-
96
-
97
-
98
-
99
-
100
-
101
-
102
-
103
-
104
-
105
-
106
-
107
-
108
-
109
-
110
-
111
-
112
-
113
-
114
-
115
-
116
-
117
-
118
-
119
-
120
-
121
-
122
-
123
-
124
-
125
-
126
-
127
-
128
 |
 |
