ASRock 939Dual-SATA2 User Manual - Page 20
A SATA Hard Disks Installation - windows 7 drivers
 |
View all ASRock 939Dual-SATA2 manuals
Add to My Manuals
Save this manual to your list of manuals |
Page 20 highlights
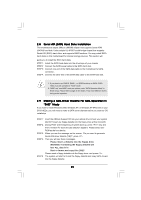
2.8 Serial ATA (SATA) Hard Disks Installation This motherboard adopts JMicron JMB360 chipset that supports Serial ATAII (SATAII) hard disk. It also adopts ULi M1567 south bridge chipset that supports Serial ATA (SATA) hard disks, and supports RAID functions. You may install SATA hard disks on this motherboard for internal storage devices. This section will guide you to install the SATA hard disks. STEP 1: Install the SATA hard disks into the drive bays of your chassis. STEP 2: Connect the SATA power cable to the SATA hard disk. STEP 3: Connect one end of the SATA data cable to the motherboard's SATA connector. STEP 4: Connect the other end of the SATA data cable to the SATA hard disk. 1. If you plan to use RAID 0, RAID 1, or JBOD functions on SATA, SATA HDDs must be operated in "RAID" mode. 2. "RAID" and "non-RAID" mode are options under "SATA Operation Mode" in BIOS setup. Please refer to page 30 for details. They need different drivers during actual operation. 2.9 Making a SATA Driver Diskette For SATA Operation in "RAID" Mode If you want to install Windows 2000, Windows XP, or Windows XP 64-bit OS on your SATA HDDs, you will need to make a SATA driver diskette before you start the OS installation. STEP 1: Insert the ASRock Support CD into your optical drive to boot your system. (Do NOT insert any floppy diskette into the floppy drive at this moment!) STEP 2: During POST at the beginning of system boot-up, press key, and then a window for boot devices selection appears. Please select CDROM as the boot device. STEP 3: When you see the message on the screen, "Do you want to generate Serial ATA driver diskette [YN]?", press . STEP 4: Then you will see these messages, Please insert a diskette into the floppy drive. WARNING! Formatting the floppy diskette will lose ALL data in it! Start to format and copy files [YN]? Please insert a floppy diskette into the floppy drive, and press . STEP 5: The system will start to format the floppy diskette and copy SATA drivers into the floppy diskette. 20
-
 1
1 -
2
-
3
-
4
-
5
-
6
-
7
-
8
-
9
-
10
-
11
-
12
-
13
-
14
-
 15
15 -
 16
16 -
 17
17 -
 18
18 -
 19
19 -
 20
20 -
 21
21 -
 22
22 -
 23
23 -
 24
24 -
 25
25 -
26
-
27
-
28
-
29
-
30
-
31
-
32
-
33
-
34
-
35
-
36
-
37
-
38
-
39
-
40
 |
 |
