ASRock CoreHT User Manual
ASRock CoreHT Manual
 |
View all ASRock CoreHT manuals
Add to My Manuals
Save this manual to your list of manuals |
ASRock CoreHT manual content summary:
- ASRock CoreHT | User Manual - Page 1
CoreHT Series User Manual Version 1.0 Published April 2011 Copyright©2011 ASRock INC. All rights reserved. 1 - ASRock CoreHT | User Manual - Page 2
or by any means, except duplication of documentation by the purchaser for backup purpose, without written consent of ASRock Inc. Products and corporate names appearing in this manual may or may not be registered trademarks or copyrights of their respective companies, and are used only for identi - ASRock CoreHT | User Manual - Page 3
modem, and network cables from the power outlets before cleaning the system. • If you encounter the following technical problems with the product, unplug the power cord and contact a qualified service technician or your retailer. • The power cord or plug is damaged. • Liquid has been spilled into the - ASRock CoreHT | User Manual - Page 4
other than those specified in the user's manual may result in hazardous laser exposure. Do not , have the optical drive serviced only by an authorized service provider. Product disposal notice used batteries according to the manufacturer's instructions. Installation Notices Do not place this - ASRock CoreHT | User Manual - Page 5
6.4 Symantec Norton AntiVirus Software free bundle (Trial version 32 6.5 THX TruStudio PRO Software free bundle 33 6.6 The best Apple charge companion - ASRock APP Charger 34 7 UEFI SETUP UTILITY 35 7.1 Introduction 35 7.1.1 UEFI Menu Bar 35 7.1.2 Navigation Keys 36 7.2 Main Screen 36 7.3 OC - ASRock CoreHT | User Manual - Page 6
Health Event Monitoring Screen 50 7.6 Boot Screen 51 7.7 Security Screen 52 7.8 Exit Screen 53 8 Software Support 54 8.1 Install Operating System 54 8.2 Support CD Information 54 8.2.1 Running Support CD 54 8.2.2 Drivers Menu 54 8.2.3 Utilities Menu 54 8.2.4 Contact Information 54 6 - ASRock CoreHT | User Manual - Page 7
design conforming to ASRock's commitment to quality and endurance. In this manual, chapter 1 and 2 contain introduction of the hardware and step-bystep guide to the hardware installation. Chapter 3 and 4 contain the configuration guide to BIOS setup and information of the Support CD. Because the - ASRock CoreHT | User Manual - Page 8
For eSATA function, Hot Plug function is supported in AHCI mode only. IDE mode does not support Hot Plug function. WARNING Please realize that there is a certain risk involved with overclocking, including adjusting the setting in the BIOS, or using the third-party overclocking tools. Overclocking - ASRock CoreHT | User Manual - Page 9
1.3 System Motherboard Components HM65-HT Design in Taipei PCIE1 RoHS EuP Ready DDR3_A1FSB800 DDR3_B1 1. Northbridge heatsink 2. J1 jumper: For second HDD SATA power cable 3. SATA connector: For second HDD SATA data cable 4. Fan connector 5. Memory socket 6. Fan connector 7. Infrared module - ASRock CoreHT | User Manual - Page 10
NOTE. 1. SATA and Power Connections SATA & Power Connections HDD ODD Connect to ODD Connect to HDD Connect to SATA Connector (11) Connect to ATX5V Power Connector (12) Connect to SATA Connector (13) 2. Fan Connection Fan connector Ground +12V Rotation Fan connector Ground +5V Rotation item - ASRock CoreHT | User Manual - Page 11
1.4 Rear Panel Connectinos 14 15 16 17 18 eSATA3 S / PDIF 3 26 25 24 23 22 21 HDMI 19 20 SONY 14. DC-In jack 15. Optical S/PDIF Out port 16. Mic In (Pink): Microphone 17. Front L/R Out (Lime): Stereo speakers or headphones 18. eSATA3 connector 19. HDMI connector 20. Display (VGA) port 21. - ASRock CoreHT | User Manual - Page 12
1.5 System Chassis 27 28 32 31 30 29 27. Optical Disc Drive 28. Power ON/OFF button with status indicator 29. Drive activity indicator 30. Headphone 31. Microphone 32. USB3.0 ports: USB devices 12 - ASRock CoreHT | User Manual - Page 13
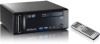
START OK BACK Information UP DOWN LEFT RIGHT SHORTCUT BUTTONS GUIDE ZOOM AV AND POWER BUTTONS POWER VOLUME CHANNEL UP/ through 9 and two other keys: ENTER and CLEAR. TELETEXT BUTTONS Media Center supports Teletext when it is available. The colored Fastext buttons on the remote control for - ASRock CoreHT | User Manual - Page 14
Chapter 2 System Quick Installation 1. Connecting USB Devices (USB2.0 Ports) 2. Connecting VGA Monitor (Display (VGA) Port) 3. Connecting the Network (LAN (RJ-45) Port) 4. Connecting HDMI Device (HDMI Port) 14 - ASRock CoreHT | User Manual - Page 15
5. Connecting eSATA Device (eSATA Port) 6. Connecting External Audio Device (Line In Port for 2/4/6 Channel; Rear Port for 8 Channel) 7. Connecting Stereo Speakers or Headphones (Front L/R Out Port) 8. Connecting Microphone (Mic In Port) 15 - ASRock CoreHT | User Manual - Page 16
9. Connecting Center / Subwoofer Speakers (Center/LEF Port) 10. Connecting Side Speakers (Side Port for 4/6/8 Channel) 11. Connecting Optical Device (Optical S/PDIF Out Port) 12. Connecting Power (DC-In Jack Port) 16 - ASRock CoreHT | User Manual - Page 17
13. Power on the System (Power Switch) 14. Connecting Headphone / Microphone / USB3.0 Devices 17 - ASRock CoreHT | User Manual - Page 18
Chapter 3 System Components Reinstallation 1. Remove the cover screws on the rear panel. Note: For safety reasons, please ensure that the power cord is disconnected before opening the case. 2. Slide the side cover toward the rear panel and pull the side cover upwards. 3. To change the storage drives - ASRock CoreHT | User Manual - Page 19
5. Unscrew the screws from the side of ODD / HDD rack, and change your required ODD / HDD. 6. Refer to above steps to place the new ODD / HDD to the chassis. Replace the side cover and fasten the screws. 19 - ASRock CoreHT | User Manual - Page 20
Chapter 4 Installing Second HDD 1. To install the second HDD, please follow above step 1 to 4, and remove the ODD and the first HDD in advance. Then fasten the screws of the second HDD to the rack. 2. Place the first HDD to the rack and fasten the screws from both side. 3. Place the ODD to the rack - ASRock CoreHT | User Manual - Page 21
4. Connect one end of SATA and power cables to the ODD and the other end to the bottom HDD. 5. Connect the other SATA and power cables to SATA2_2 and J1 connectors on the motherboard. 6. Connect the other end to the top HDD. 7. Replace the side cover and fasten the screws. 21 - ASRock CoreHT | User Manual - Page 22
Chapter 5 Driver Installation To install the drivers to your system, please insert the support CD to your optical drive first. Then, the drivers compatible to your system can be auto-detected and listed on the support CD driver page. Please follow the order from up to bottom side to install those - ASRock CoreHT | User Manual - Page 23
Chapter 6 Utility Menu The utilities meu shows the applications and other software that this product supports. 6.1 Instant Boot 6.1.1 Introduction Instant Boot, a user-friendly tool that allows you to turn on your PC in just a few seconds, provides a much more efficient - ASRock CoreHT | User Manual - Page 24
A. Install Instant Boot driver from ASRock support CD, or you may click following link to get the latest utility and BIOS: http://www.asrock.com/feature/InstantBoot/download.asp B. Execute the Instant Boot installation program under Windows®. Please follow the instructions on Instant Boot setup page - ASRock CoreHT | User Manual - Page 25
Boot driver. e. Click "Finish" to complete and exit the setup. C. After the installation is completed, you will find an ASRock Instant Boot icon on the Windows® desktop. D. Double click ASRock Instant Boot icon on the desktop, then Instant Boot main menu will pop up. E. On Instant Boot main menu, you - ASRock CoreHT | User Manual - Page 26
H. Next time when you turn on your system, you can enjoy the benefit of Instant Boot. 26 - ASRock CoreHT | User Manual - Page 27
OC profile to their own system to get the same OC settings. 6.2.2 Installation When you install all-in-one driver to your system from ASRock support CD, ASRock Extreme Tuning Utility (AXTU) will be auto-installed as well. After installation, you will find the icon - ASRock CoreHT | User Manual - Page 28
-voltage may affect your system stability, or even cause damage to your hardware devices. It should be done at your own risk and expense. ASRock is not responsible for possible damage caused by overclocking and and overvoltage. If system hangs after overclocking, please remove AC power cord and plug - ASRock CoreHT | User Manual - Page 29
OC DNA OC DNA provides a convenient way to record the OC settings and share with others. It helps you to save your overclocking record under the operating system and simplifies the complicated recording process of overclocking settings. With OC DNA, you can save your OC settings as a profile and - ASRock CoreHT | User Manual - Page 30
for anyone looking to enjoy DVDs and high-definition Discs on the PC. * The bundled PowerDVD is PowerDVD 8 DTS trial version, which only supports DVD playback with DTS function. To play back other media such as Blu-ray or Dolby disc, please download PowerDVD 9 trial version from CyberLink website - ASRock CoreHT | User Manual - Page 31
PowerDirector CyberLink PowerDirector provides cool features to ensure editing movies is fun and fast! Whether you are an advanced or entry-level video editor, PowerDirector lets you enhance your camcorder videos and produce professional home movies. PowerDirector offers a dual mode editing - ASRock CoreHT | User Manual - Page 32
6.4 Symantec Norton AntiVirus Software free bundle (Trial version) Protect your PC with Norton Internet Security, the fastest virus, spyware, Internet protection. Norton Internet Security can stop online identity theft, viruses, spyware, bots and more, stop attacks before they get on your PC, - ASRock CoreHT | User Manual - Page 33
6.5 THX TruStudio PRO Software free bundle After you install THX audio driver from our support CD, there will be a shortcut shown on the desktop. Please double-click this icon to install THX audio driver to your system. Please make sure - ASRock CoreHT | User Manual - Page 34
it makes your iPhone charged much quickly from your computer and up to 40% faster than before*. ASRock App Charger allows you to quickly charge many Apple devices simultaneously and even supports continuous charging when your PC enters into Standby mode (S1), Suspend to RAM(S3), hibernation mode (S4 - ASRock CoreHT | User Manual - Page 35
SETUP UTILITY when you start up the computer. Please press or during the Power-On-Self-Test (POST) to enter the UEFI SETUP UTILITY, otherwise, POST will continue with its test routines. If you wish to enter the UEFI SETUP UTILITY after POST, restart the system by pressing + - ASRock CoreHT | User Manual - Page 36
7.1.2 Navigation Keys Please check the following table for the function description of each navigation key. Navigation Key(s) Function Description / Moves cursor left or right to select Screens / Moves cursor up or down to select items + / - To change option for the selected items - ASRock CoreHT | User Manual - Page 37
VistaTM / 7 and want to enable this function, please set this item to [Enabled]. This item will be hidden if the current CPU does not support Intel SpeedStep technology. Please note that enabling this function may reduce CPU voltage and lead to system stability or compatibility issue with some power - ASRock CoreHT | User Manual - Page 38
condition. The default value is [Enabled]. Turbo Boost Power Limit Use this item to adjust Turbo Boost power limit. Configuration options: [Auto] and [Manual]. The default value is [Auto]. DRAM Timing Control Load XMP Setting Use this to load XMP setting. Configuration options: [Auto], [Profile 1] and - ASRock CoreHT | User Manual - Page 39
setting. The default is [Auto]. Four Activate Window (tFAW) Use this item to change Four Activate Window (tFAW) Auto/Manual setting. The default is [Auto]. Memory Power Down Mode Use this item to adjust DDR power down mode. Configuration options: [Auto], [Slow] and [Fast]. The - ASRock CoreHT | User Manual - Page 40
other complicated flash utility. Please be noted that the USB flash drive or hard drive must use FAT32/16/12 file system. If you execute ASRock Instant Flash utility, the utility will show the UEFI files and their respective information. Select the proper UEFI file to update your UEFI, and reboot - ASRock CoreHT | User Manual - Page 41
XP, VistaTM, 7, or Linux kernel version 2.4.18 or higher. This option will be hidden if the installed CPU does not support Hyper-Threading technology. Active support the Halt State (C1). The C1 state is supported through the native processor instructions HLT and MWAIT and requires no hardware support - ASRock CoreHT | User Manual - Page 42
) can utilize the additional hardware capabilities provided by Vanderpool Technology. This option will be hidden if the installed CPU does not support Intel Virtualization Technology. No-Excute Memory Protection No-Execution (NX) Memory Protection Technology is an enhancement to the IA-32 Intel - ASRock CoreHT | User Manual - Page 43
7.4.2 North Bridge Configuration VT-d Use this to enable or disable Intel® VT-d technology (Intel® Virtualization Technology for Directed I/O). The default value of this feature is [Disabled]. Onboard VGA Share Memory This allows you to set onboard VGA share memory feature. The default value is [ - ASRock CoreHT | User Manual - Page 44
7.4.3 South Bridge Configuration Restore on AC/Power Loss This allows you to set the power state after an unexpected AC/power loss. If [Power Off] is selected, the AC/power remains off when the power recovers. If [Power On] is selected, the AC/power resumes and the system starts to boot up when the - ASRock CoreHT | User Manual - Page 45
On/Off Play Use this item to enable or disable On/Off Play Technology. The default value is [Enabled]. When On/Off Play is enabled, Deep Sx will be disabled. If you want to enable Deep Sx, please disable On/Off Play first. Onboard HDMI HD Audio This allows you to enable or disable the "Onboard HDMI - ASRock CoreHT | User Manual - Page 46
SATA mode. Configuration options: [IDE Mode], [AHCI Mode] and [Disabled]. The default value is [AHCI Mode]. AHCI (Advanced Host Controller Interface) supports NCQ and other new features that will improve SATA disk performance but IDE mode does not have these advantages. SATA Controller 0 Please - ASRock CoreHT | User Manual - Page 47
7.4.5 Super IO Configuration Infrared Port Use this item to enable or disable the onboard infrared port. Infrared Port Address Use this item to set the address for the onboard infrared port. Configuration options: [2F8 / IRQ3] and [2E8 / IRQ3]. 47 - ASRock CoreHT | User Manual - Page 48
RAM Use this item to select whether to auto-detect or disable the Suspend-toRAM feature. Select [Auto] will enable this feature if the OS supports it. Check Ready Bit Use this item to enable or disable the feature Check Ready Bit. Onboard LAN Power On Use this item to enable - ASRock CoreHT | User Manual - Page 49
Use this item to enable or disable the use of rear USB 3.0 controller. Legacy USB Support Use this option to select legacy support for USB devices. There are four configuration options: [Enabled], [Auto], [Disabled] ] - USB devices are allowed to use only under UEFI setup and Windows / Linux OS. 49 - ASRock CoreHT | User Manual - Page 50
voltage. CPU Fan 1 Setting This allows you to set the CPU fan 1 speed. Configuration options: [Full On], [Automatic Mode] and [SMART FAN Manual]. The default is value [Automatic Mode]. Chassis Fan 1 Setting This allows you to set the chassis fan 1 speed. Configuration options: [Full On], [Automatic - ASRock CoreHT | User Manual - Page 51
7.6 Boot Screen In this section, it will display the available devices on your system for you to configure the boot settings and the boot priority. Setup Prompt Timeout This shows the number of seconds to wait for setup activation key. 65535(0XFFFF) means indefinite waiting. Bootup Num-Lock If this - ASRock CoreHT | User Manual - Page 52
7.7 Security Screen In this section, you may set or change the supervisor/user password for the system. For the user password, you may also clear it. 52 - ASRock CoreHT | User Manual - Page 53
7.8 Exit Screen Save Changes and Exit When you select this option, it will pop-out the following message, "Save configuration changes and exit setup?" Select [OK] to save the changes and exit the UEFI SETUP UTILITY. Discard Changes and Exit When you select this option, it will pop-out the following - ASRock CoreHT | User Manual - Page 54
Support CD Information The Support CD contains necessary drivers and useful utilities that enhance the system features. 8.2.1 Running The Support CD To begin using the support " from the BIN folder in the Support CD to display the menus. 8.2.2 Drivers software that the system supports. Click on a
-
 1
1 -
 2
2 -
 3
3 -
 4
4 -
 5
5 -
 6
6 -
 7
7 -
8
-
9
-
10
-
11
-
12
-
13
-
14
-
15
-
16
-
17
-
18
-
19
-
20
-
21
-
22
-
23
-
24
-
25
-
26
-
27
-
28
-
29
-
30
-
31
-
32
-
33
-
34
-
35
-
36
-
37
-
38
-
39
-
40
-
41
-
42
-
43
-
44
-
45
-
46
-
47
-
48
-
49
-
50
-
51
-
52
-
53
-
54
 |
 |

1
CoreHT Series
User Manual
Version 1.0
Published April 2011
Copyright©2011 ASRock INC. All rights reserved.