ASRock Fatal1ty X370 Professional Gaming RAID Installation Guide - Page 10
STEP 1: Set up UEFI, Shell>
 |
View all ASRock Fatal1ty X370 Professional Gaming manuals
Add to My Manuals
Save this manual to your list of manuals |
Page 10 highlights
STEP 1: Set up UEFI A. Enter UEFI SETUP UTILITY → Advanced screen → Storage Configuration. B. Set the "SATA Mode" option to . C. Set the "Onboard RAID 3TB+ Unlocker" option to . D. Click to save and exit. E. Click to enter boot menu and select "Built-in EFI shell". F. At the Shell> prompt, enter the command "rcadm -M -qa" and click to show RAID information. * Please refer to the step 3 of Section 1.3.2 to copy rcadm.efi file to USB flash disk or download the file from ASRock website http://download.asrock.com/drivers/AMD/SATA/BoltonRAID(v6.1.0.00117).zip. *See the Appendix section for more information on "rcadm.efi". 10
-
 1
1 -
2
-
3
-
4
-
 5
5 -
 6
6 -
 7
7 -
 8
8 -
 9
9 -
 10
10 -
 11
11 -
 12
12 -
 13
13 -
 14
14 -
 15
15 -
16
-
17
-
18
-
19
-
20
-
21
-
22
-
23
-
24
-
25
-
26
-
27
-
28
-
29
-
30
-
31
-
32
-
33
-
34
-
35
-
36
-
37
-
38
 |
 |
10
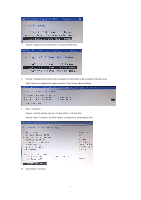
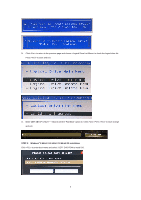
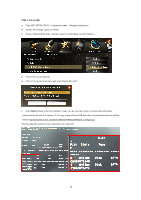
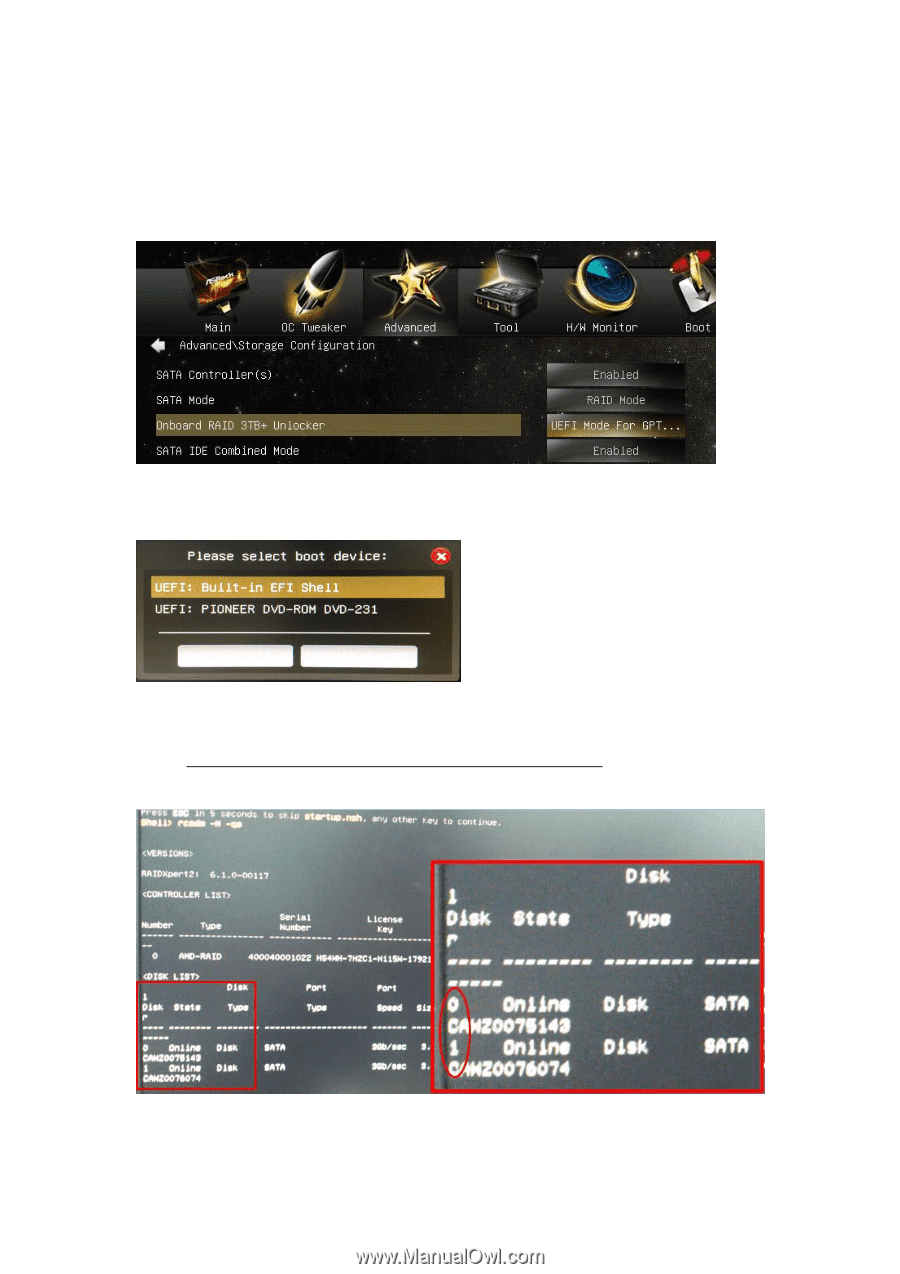
STEP 1: Set up UEFI
A.
Enter UEFI SETUP UTILITY → Advanced screen → Storage Configuration.
B.
Set the “SATA Mode” option to <RAID>.
C.
Set the “Onboard RAID 3TB+ Unlocker” option to <UEFI Mode For GPT Partition >.
D.
Click <F10> to save and exit.
E.
Click <F11> to enter boot menu and select “Built-in EFI shell”.
F.
At the
Shell>
prompt, enter the command “rcadm –M –qa” and click <Enter> to show RAID information.
* Please refer to the step 3 of Section 1.3.2 to copy rcadm.efi file to USB flash disk or download the file from ASRock
.
*See the Appendix section for more information on “rcadm.efi”.