ASRock H81M-ITX/WiFi Quick Installation Guide - Page 9
Step 8, Step 9, Step 10
 |
View all ASRock H81M-ITX/WiFi manuals
Add to My Manuals
Save this manual to your list of manuals |
Page 9 highlights
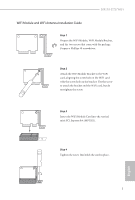
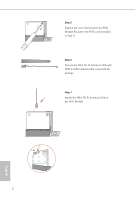
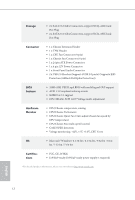
H81M-ITX/WiFi Step 8 Insert the RP-SMA Wi-Fi Antenna Connector to the antenna port on the I/O shield. Step 9 Fasten the screw nuts to secure the antenna connector. Step 10 Connect the two WiFi 2.4 GHz Antenna to the antenna connector. Turn the antenna clockwise until it is securely connected. 7 English
-
 1
1 -
2
-
3
-
 4
4 -
 5
5 -
 6
6 -
 7
7 -
 8
8 -
 9
9 -
 10
10 -
 11
11 -
 12
12 -
 13
13 -
 14
14 -
15
-
16
-
17
-
18
-
19
-
20
-
21
-
22
-
23
-
24
-
25
-
26
-
27
-
28
-
29
-
30
-
31
-
32
-
33
-
34
-
35
-
36
-
37
-
38
-
39
-
40
-
41
-
42
-
43
-
44
-
45
-
46
-
47
-
48
-
49
-
50
-
51
-
52
-
53
-
54
-
55
-
56
-
57
-
58
-
59
-
60
-
61
-
62
-
63
-
64
-
65
-
66
-
67
-
68
-
69
-
70
-
71
-
72
-
73
-
74
-
75
-
76
-
77
-
78
-
79
-
80
-
81
-
82
-
83
-
84
-
85
-
86
-
87
-
88
-
89
-
90
-
91
-
92
-
93
-
94
-
95
-
96
-
97
-
98
-
99
-
100
-
101
-
102
-
103
-
104
-
105
-
106
-
107
-
108
-
109
-
110
-
111
-
112
-
113
-
114
-
115
-
116
-
117
-
118
-
119
-
120
-
121
-
122
-
123
-
124
-
125
-
126
-
127
-
128
-
129
-
130
-
131
-
132
-
133
-
134
-
135
-
136
-
137
-
138
-
139
-
140
 |
 |

H81M-ITX/WiFi
7
English
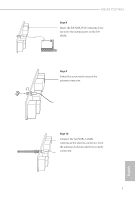
Step 8
Insert the RP-SMA Wi-Fi Antenna Con-
nector to the antenna port on the I/O
shield.
Step 9
Fasten the screw nuts to secure the
antenna connector.
Step 10
Connect the two WiFi 2.4 GHz
Antenna to the antenna connector. Turn
the antenna clockwise until it is securely
connected.