ASRock K10N780SLIX3-WiFi Quick Installation Guide - Page 18
Graphics Card Setup
 |
View all ASRock K10N780SLIX3-WiFi manuals
Add to My Manuals
Save this manual to your list of manuals |
Page 18 highlights
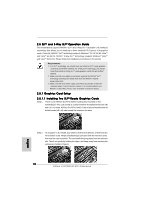
2.5 SLITM and 3-Way SLITM Operation Guide This motherboard supports NVIDIA® SLITM and 3-Way SLITM (Scalable Link Interface) technology that allows you to install up to three identical PCI Express x16 graphics cards. Currently, NVIDIA® SLITM technology supports Windows® XP, XP 64-bit, VistaTM and VistaTM 64-bit OS. NVIDIA® 3-Way SLITM technology supports Windows® VistaTM and VistaTM 64-bit OS. Please follow the installation procedures in this section. Requirements 1. For SLITM technology, you should have two identical SLITM-ready graphics cards that are NVIDIA® certified. For 3-Way SLITM technology, you should have three identical 3-Way SLITM-ready graphics cards that are NVIDIA® certified. 2. Make sure that your graphics card driver supports the NVIDIA® SLITM technology. Download the latest driver from the NVIDIA® website (www.nvidia.com). 3. Make sure that your power supply unit (PSU) can provide at least the minimum power required by your system. It is recommended to use NVIDIA® certified PSU. Please refer to NVIDIA® website for details. 2.5.1 Graphics Card Setup 2.5.1.1 Installing Two SLITM-Ready Graphics Cards Step 1. There is one ASRock SLI/XFire Switch Card factory-mounted on this motherboard. This card served as a switch between the default mode (x8 / x8) and x16 / x1 mode. ASRock SLI/XFire Switch Card is factory-mounted with its default mode (x8 / x8) side toward the retention slot base. English Step 2. To change it to SLI Mode, you need to reverse the direction of ASRock SLI/ XFire Switch Card. Please simultaneously pull open both the retention arms that hold the card in position. The card itself will spring away from the retention slot. Take it out gently by holding its edges, and keep away from touching the connectors (Golden Fingers). 18 ASRock K10N780SLIX3-WiFi Motherboard
-
 1
1 -
2
-
3
-
4
-
5
-
6
-
7
-
8
-
9
-
10
-
11
-
12
-
 13
13 -
 14
14 -
 15
15 -
 16
16 -
 17
17 -
 18
18 -
 19
19 -
 20
20 -
 21
21 -
 22
22 -
 23
23 -
24
-
25
-
26
-
27
-
28
-
29
-
30
-
31
-
32
-
33
-
34
-
35
-
36
-
37
-
38
-
39
-
40
-
41
-
42
-
43
-
44
-
45
-
46
-
47
-
48
-
49
-
50
-
51
-
52
-
53
-
54
-
55
-
56
-
57
-
58
-
59
-
60
-
61
-
62
-
63
-
64
-
65
-
66
-
67
-
68
-
69
-
70
-
71
-
72
-
73
-
74
-
75
-
76
-
77
-
78
-
79
-
80
-
81
-
82
-
83
-
84
-
85
-
86
-
87
-
88
-
89
-
90
-
91
-
92
-
93
-
94
-
95
-
96
-
97
-
98
-
99
-
100
-
101
-
102
-
103
-
104
-
105
-
106
-
107
-
108
-
109
-
110
-
111
-
112
-
113
-
114
-
115
-
116
-
117
-
118
-
119
-
120
-
121
-
122
-
123
-
124
-
125
-
126
-
127
-
128
-
129
-
130
-
131
-
132
-
133
-
134
-
135
-
136
-
137
-
138
-
139
-
140
-
141
-
142
-
143
-
144
-
145
-
146
-
147
-
148
-
149
-
150
-
151
-
152
-
153
-
154
-
155
-
156
-
157
-
158
-
159
-
160
-
161
-
162
-
163
-
164
-
165
-
166
-
167
-
168
-
169
-
170
-
171
-
172
-
173
-
174
-
175
-
176
-
177
-
178
-
179
-
180
-
181
-
182
-
183
-
184
-
185
-
186
-
187
-
188
-
189
-
190
-
191
-
192
-
193
-
194
-
195
-
196
-
197
-
198
-
199
-
200
-
201
-
202
-
203
-
204
-
205
-
206
-
207
-
208
-
209
-
210
-
211
-
212
-
213
-
214
-
215
-
216
-
217
-
218
-
219
-
220
-
221
-
222
-
223
-
224
 |
 |
