ASRock Penryn1600SLIX3-WiFi Quick Installation Guide - Page 17
Ready Graphics Cards
 |
View all ASRock Penryn1600SLIX3-WiFi manuals
Add to My Manuals
Save this manual to your list of manuals |
Page 17 highlights
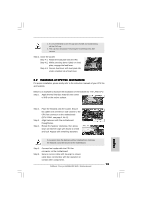
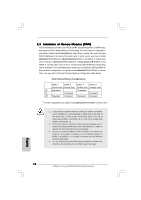
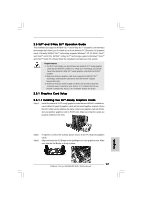
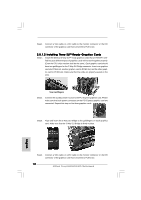
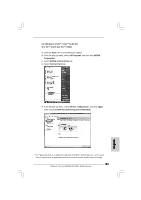
2.5 SLITM and 3-Way SLITM Operation Guide This motherboard supports NVIDIA® SLITM and 3-Way SLITM (Scalable Link Interface) technology that allows you to install up to three identical PCI Express x16 graphics cards. Currently, NVIDIA® SLITM technology supports Windows® XP, XP 64-bit, VistaTM and VistaTM 64-bit OS. NVIDIA® 3-Way SLITM technology supports Windows® VistaTM and VistaTM 64-bit OS. Please follow the installation procedures in this section. Requirements 1. For SLITM technology, you should have two identical SLITM-ready graphics cards that are NVIDIA® certified. For 3-Way SLITM technology, you should have three identical 3-Way SLITM-ready graphics cards that are NVIDIA® certified. 2. Make sure that your graphics card driver supports the NVIDIA® SLITM technology. Download the latest driver from the NVIDIA® website (www.nvidia.com). 3. Make sure that your power supply unit (PSU) can provide at least the minimum power required by your system. It is recommended to use NVIDIA® certified PSU. Please refer to NVIDIA® website for details. 2.5.1 Graphics Card Setup 2.5.1.1 Installing Two SLITM-Ready Graphics Cards Step 1. Install the identical SLITM-ready graphics cards that are NVIDIA® certified because different types of graphics cards will not work together properly. (Even the GPU chips version shall be the same.) Insert one graphics card into PCIE1 slot and another graphics card to PCIE3 slot. Make sure that the cards are properly seated on the slots. Step2. Step3. If required, connect the auxiliary power source to the PCI Express graphics cards. Align and insert the SLI Bridge to the goldfingers on each graphics card. Make sure that the SLI Bridge is firmly in place. English 17 ASRock Penryn1600SLIX3-WiFi Motherboard
-
 1
1 -
2
-
3
-
4
-
5
-
6
-
7
-
8
-
9
-
10
-
11
-
 12
12 -
 13
13 -
 14
14 -
 15
15 -
 16
16 -
 17
17 -
 18
18 -
 19
19 -
 20
20 -
 21
21 -
 22
22 -
23
-
24
-
25
-
26
-
27
-
28
-
29
-
30
-
31
-
32
-
33
-
34
-
35
-
36
-
37
-
38
-
39
-
40
-
41
-
42
-
43
-
44
-
45
-
46
-
47
-
48
-
49
-
50
-
51
-
52
-
53
-
54
-
55
-
56
-
57
-
58
-
59
-
60
-
61
-
62
-
63
-
64
-
65
-
66
-
67
-
68
-
69
-
70
-
71
-
72
-
73
-
74
-
75
-
76
-
77
-
78
-
79
-
80
-
81
-
82
-
83
-
84
-
85
-
86
-
87
-
88
-
89
-
90
-
91
-
92
-
93
-
94
-
95
-
96
-
97
-
98
-
99
-
100
-
101
-
102
-
103
-
104
-
105
-
106
-
107
-
108
-
109
-
110
-
111
-
112
-
113
-
114
-
115
-
116
-
117
-
118
-
119
-
120
-
121
-
122
-
123
-
124
-
125
-
126
-
127
-
128
-
129
-
130
-
131
-
132
-
133
-
134
-
135
-
136
-
137
-
138
-
139
-
140
-
141
-
142
-
143
-
144
-
145
-
146
-
147
-
148
-
149
-
150
-
151
-
152
-
153
-
154
-
155
-
156
-
157
-
158
-
159
-
160
-
161
-
162
-
163
-
164
-
165
-
166
-
167
-
168
-
169
-
170
-
171
-
172
-
173
-
174
-
175
-
176
-
177
-
178
-
179
-
180
-
181
-
182
-
183
-
184
-
185
-
186
-
187
-
188
-
189
-
190
-
191
-
192
-
193
-
194
-
195
-
196
-
197
-
198
-
199
-
200
-
201
-
202
-
203
-
204
-
205
-
206
-
207
-
208
-
209
-
210
-
211
-
212
-
213
-
214
-
215
-
216
-
217
-
218
-
219
-
220
-
221
-
222
-
223
-
224
-
225
-
226
-
227
-
228
-
229
-
230
-
231
-
232
-
233
-
234
-
235
-
236
-
237
-
238
-
239
 |
 |