ASRock Vision 3D 137D User Manual
ASRock Vision 3D 137D Manual
 |
View all ASRock Vision 3D 137D manuals
Add to My Manuals
Save this manual to your list of manuals |
ASRock Vision 3D 137D manual content summary:
- ASRock Vision 3D 137D | User Manual - Page 1
Vision 3D Series User Manual Version 1.0 Published September 2010 Copyright©2010 ASRock INC. All rights reserved. 1 - ASRock Vision 3D 137D | User Manual - Page 2
the purchaser for backup purpose, without written consent of ASRock Inc. Products and corporate names appearing in this manual may or may not be registered trademarks or copyrights of -special handling may apply, see www.dtsc.ca.gov/hazardouswaste/perchlorate" ASRock Website: http://www.asrock.com 2 - ASRock Vision 3D 137D | User Manual - Page 3
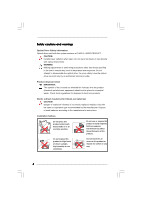
technical problems with the product, unplug the power cord and contact a qualified service technician or your retailer. • The power cord or plug is damaged. • Liquid has been spilled into the system. • The system does not function properly even if you follow the operating instructions. • The - ASRock Vision 3D 137D | User Manual - Page 4
manual may result in hazardous laser exposure. Do not attempt to disassemble the optical drive. For your safety, have the optical drive serviced only by an authorized service of used batteries according to the manufacturer's instructions. Installation Notices Do not place this product underneath - ASRock Vision 3D 137D | User Manual - Page 5
18 7 Driver Installation 19 8 UTILITY MEMU 20 8.1 Instant Boot 20 8.1.1 Introduction 20 8.1.2 Installation 21 8.2 ASRock OC Tuner 10 Blu-ray 3D OEM version ....... 29 8.5 Symantec Norton AntiVirus Software free bundle (Trial version 30 8.6 THX TruStudio PRO Software free bundle 31 8.7 ASRock - ASRock Vision 3D 137D | User Manual - Page 6
Event Monitoring Screen 47 9.6 Boot Screen 47 9.6.1 Boot Settings Configuration 48 9.7 Security Screen 49 9.8 Exit Screen 50 10 Software Support 51 10.1 Install Operating System 51 10.2 Support CD Information 51 10.2.1 Running Support CD 51 10.2.2 Drivers Menu 51 10.2.3 Utilities Menu 51 - ASRock Vision 3D 137D | User Manual - Page 7
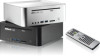
information about the model you are using. www.asrock.com/support/index.asp 1.1 Package Contents ASRock Vision 3D Series ASRock Support CD ASRock Quick Start Guide One AC Power Cord One AC/DC Adapter One DVI to D-Sub Adapter Remote Controller SATA and Power Cables 3D Red/Cyan Anaglyph Glasses 7 - ASRock Vision 3D 137D | User Manual - Page 8
® CoreTM i3/i5/i7 Mobile Processor Chipset Mobile Intel® HM55 Express chipset*1 Memory Display HDD ODD Front I/O Rear I/O Audio Support DDR3 1066MHz, 2 x SO-DIMM slots, maximun up to 8GB NVIDIA® GeForce GT425M Graphics, NVIDIA® 3D Vision capable Support 2.5" SATA HDD BD Combo or DVD Super Multi - ASRock Vision 3D 137D | User Manual - Page 9
slim ODD & 2.5" HDD 4. SATA connector: For ODD SATA data cable 5. SATA power cable connector (+5V/+12V) for second HDD 6. Fan connector 7. HM55 PCH chipset 8. Memory socket 9. Infrared module header 10. CPU 11. Clear CMOS jumper 12. Mini-PCI Express expansion slot: For WiFi module 13. MXM 3.0 slot 9 - ASRock Vision 3D 137D | User Manual - Page 10
NOTE. 1. SATA and Power Connections SATA & Power Connections HDD ODD Connect to ODD Connect to HDD Connect to SATA Connector (4) Connect to ATX5V Power Connector (3) Connect to SATA Connector (1) 2. Fan Connection Fan connector Rotation +12V Ground 10 - ASRock Vision 3D 137D | User Manual - Page 11
1.4 Rear Panel Connectinos 14. HDMI connector 15. eSATAII connector 16. DVI-I port (Dual-Link) 17. USB3.0 ports: USB devices 18. Mic In (Pink): Microphone 19. Optical S/PDIF Out port 20. DC-In jack 21. Side port for side speakers 22. Center/LFE (Orange): Center / subwoofer speakers 23. Front L/R Out - ASRock Vision 3D 137D | User Manual - Page 12
1.5 System Chassis 27. Headphone 28. Microphone 29. USB3.0 ports: USB devices 30. 4-in-1 Card reader (MMC/SD/MS/MS Pro) 31. Power ON/OFF button with status indicator 32. Slot-in Optical Disc Drive 12 - ASRock Vision 3D 137D | User Manual - Page 13
1.6 Remote Controller Some remote controller functions listed above are only available with the relative hardware equipments. If the hardware equipments you adopt are not compatible with the system, you are not allowed to use these functions. This product is designed to meet MCE standards. 13 - ASRock Vision 3D 137D | User Manual - Page 14
Chapter 2 Opening the chassis 1. Press the button on the rear I/O to open the top side of the chassis. 2. After the chassis is opened, you will see the top shield inside the chassis. 3. Unscrew the screws on the corner of the top shield. 4. Carefully take the top shield out. 14 - ASRock Vision 3D 137D | User Manual - Page 15
ODD/HDD 1. After you remove the top shield, you will see the ODD/HDD bracket. 2. Disconnect the ODD/HDD SATA power cable, and take out the ODD/HDD bracket. 3. Disconnect all the ODD/HDD SATA power cables inside the chassis. 4. Then you can change the new ODD/HDD to upgrade your system. 15 - ASRock Vision 3D 137D | User Manual - Page 16
Chapter 4 Reinstalling the DIMMs 1. Unlock the DIMM slot by pressing the retaining clips outward to change the DIMM. 16 - ASRock Vision 3D 137D | User Manual - Page 17
Chapter 5 Reinstalling the CPU 1. Unscrew the screws of the CPU fan. 2. Unscrew the screws on the corner of the CPU socket. 3. Now you can reinstall a new CPU to the system. 17 - ASRock Vision 3D 137D | User Manual - Page 18
Chapter 6 Reinstalling the MXM card 1. Unscrew the screws of the heatpipe on the MXM card. 2. Use your fingers to pull the outer side of the heatpipe upward. 3. Finally you can take out the heatpipe and change a new MXM card. 18 - ASRock Vision 3D 137D | User Manual - Page 19
system, please insert the support CD to your optical drive first. Then, the drivers compatible to your system can be auto-detected and listed on the support CD driver page. Please follow the order from up to bottom side to install those required drivers. Therefore, the drivers you install can work - ASRock Vision 3D 137D | User Manual - Page 20
Chapter 8 Utility Menu The utilities meu shows the applications and other software that this product supports. 8.1 Instant Boot 8.1.1 Introduction Instant Boot, a user-friendly tool that allows you to turn on your PC in just a few seconds, provides a much more efficient way to save energy, time, - ASRock Vision 3D 137D | User Manual - Page 21
Boot. A. Install Instant Boot driver from ASRock support CD, or you may click following link to get the latest utility and BIOS: http://www.asrock.com/feature/InstantBoot/download.asp B. Execute the Instant Boot installation program under Windows®. Please follow the instructions on Instant Boot - ASRock Vision 3D 137D | User Manual - Page 22
" to begin installing Instant Boot driver. e. Click "Finish" to complete and exit the setup. C. After the installation is completed, you will find an ASRock Instant Boot icon on the Windows® desktop. D. Double click ASRock Instant Boot icon on the desktop, then Instant Boot main menu will pop up - ASRock Vision 3D 137D | User Manual - Page 23
ASRock OC Tuner. A. Install ASRock OC Tuner driver from ASRock support CD, or you may click following link to get the latest utility: http://www.asrock.com/feature/OCTuner/download.asp B. Execute the ASRock OC Tuner installation program under Windows®. Please follow the instructions on Instant Boot - ASRock Vision 3D 137D | User Manual - Page 24
need, and click "Next". c. Select the start menu folder. You may choose a different folder if you need, and click "Next". d. Click "Install" to begin installing ASRock OC Tuner driver. e. Click "Finish" to complete and exit the setup. 24 - ASRock Vision 3D 137D | User Manual - Page 25
AC power cord again before you power on your system. WiFi Radio If you click this button, the system will automatically start WiFi Radio function. If you click this button again, and the button shows "OFF WiFi Radio", WiFi Radio function will be turned off. E. There are three sections in ASRock OC - ASRock Vision 3D 137D | User Manual - Page 26
and GPU Temperature. You may find out if there's any abnormal situation occurs to your system's temperature. Under the CPU Quiet Fan chapter, the Chassis Fan Speed will show the default settings of your system. You are able to adjust the setting too by clicking the "Up/Down" arrows and confirm - ASRock Vision 3D 137D | User Manual - Page 27
CyberLink DVD Suite includes five softwares: PowerDVD, PowerBackup, PowerDirector, supports DVD playback with DTS function. To play back other media such as Blu-ray or Dolby disc, please download PowerDVD 9 trial version from CyberLink website: www.cyberlink.com PowerBackup PowerBackup is a powerful - ASRock Vision 3D 137D | User Manual - Page 28
to utilities for tasks such as ripping files and erasing discs. MediaShow MediaShow is an advanced software that lets you create, present and share multimedia slide shows. It allows you to incorporate images, videos, audio clips and even PowerPoint slides and add loads of transition effects, titling - ASRock Vision 3D 137D | User Manual - Page 29
PowerDVD 10 Blu-ray 3D OEM version PowerDVD 10 The No. 1 Movie Experience on PCs Upgrade Your Media Experience to HD & 3D Upgrade your Blu-ray experience to whole new level with Blu-ray 3D and bring the 3D cinema experience back home with PowerDVD 10. With support for the latest 3D hardware - ASRock Vision 3D 137D | User Manual - Page 30
Norton AntiVirus Software free bundle (Trial version) Protect your PC with Norton Internet Security, the fastest virus, spyware, Internet protection. Norton Internet Security can stop online identity theft, viruses, spyware, bots and more, stop attacks before they get on your PC, deliver clear - ASRock Vision 3D 137D | User Manual - Page 31
will be auto-removed. You will find the THX icon on the Windows® task bar. Click the THX icon on the Windows® task bar, you will see THX TruStudio PRO software application as below, which provides Surround /Crystalizer/Speaker/ Smart volume/Dialog plus functions for you. Therefore, you can adjust - ASRock Vision 3D 137D | User Manual - Page 32
to do is just to install the ASRock AIWI utility either from ASRock official website or ASRock software support CD to your motherboard, and also download the free AIWI Lite from App store to your iPhone/ iPod touch. Connecting your PC and apple devices via Bluetooth or WiFi networks, then you can - ASRock Vision 3D 137D | User Manual - Page 33
% faster than before*. ASRock App Charger allows you to quickly charge many Apple devices simultaneously and even supports continuous charging when your PC enters into Standby mode (S1), Suspend to RAM(S3), hibernation mode (S4) or power off (S5)**. With App Charger driver installed, you can easily - ASRock Vision 3D 137D | User Manual - Page 34
Power-On-Self-Test (POST) to enter the BIOS SETUP UTILITY, otherwise, POST will continue with its test routines. If you wish to enter the BIOS the BIOS software is constantly being updated, the following BIOS setup BIOS features H/W Monitor To display current CPU/MB temperature & Vcore voltage Boot - ASRock Vision 3D 137D | User Manual - Page 35
Monitor Boot Security Exit System Overview System Time System Date [14:00:09] [Fri 09/03/2010] BIOS Version : HM55-MXM P1.00 Processor Type : Intel (R) Core (TM) i5 CPU M 520 @ 2.40GHz (64bit) Processor Speed : 3004MHz Microcode Update : 20655/2 Cache Size : 3072KB Total Memory DDR3_1 - ASRock Vision 3D 137D | User Manual - Page 36
setting. Please note that overclocing may cause damage to your memory module and motherboard. It should be done at your own risk and expense. Overclock Mode Use this to select Overclock Mode. Configuration options: [Auto], [Manual] and [Optimized]. The default value is [Auto]. BCLK Frequency (MHz - ASRock Vision 3D 137D | User Manual - Page 37
motherboard will detect the memory module(s) inserted and assigns appropriate frequency automatically. You may select [Auto], [400MHz DDR3_800)] or [533MHz DDR3_1066)]. DRAM Timing Control Use this item to control DRAM Timing. BIOS clocks for TWTR. Configuration options: [Auto], [2] to [10]. 37 - ASRock Vision 3D 137D | User Manual - Page 38
DRAM tRRD This controls the number of DRAM clocks for TRRD. Configuration options: Configuration options: [Auto], [4] to [7]. DRAM tRTP This controls the number of DRAM clocks for TRTP. Configuration options: [Auto], [2] to [13]. DRAM tFAW This controls the number of DRAM clocks for TFAW. - ASRock Vision 3D 137D | User Manual - Page 39
system. If you execute ASRock Instant Flash utility, the utility will show the BIOS files and their respective information. Select the proper BIOS file to update your BIOS, and reboot your system after BIOS update process completes. Good Night LED Enable this option to turn off Power LED and Lan LED - ASRock Vision 3D 137D | User Manual - Page 40
changing the ratio value of this motherboard. Enhance Halt State (C1E) All processors support the Halt State (C1). The C1 state is supported through the native processor instructions HLT and MWAIT and requires no hardware support from the chipset. In the C1 power state, the processor maintains the - ASRock Vision 3D 137D | User Manual - Page 41
compatibility issue with some power supplies. Please set this item to [Disable] if above issue occurs. Intel (R) TurboMode tech. Turbo mode allows to the chipset power management hardware and flows. Thus, software can manage each core independently, while the actual power management adheres to - ASRock Vision 3D 137D | User Manual - Page 42
C1 Audio Demotion When this item is enabled, CPU will conditionally demote C3/C6/C7 requests to C1 based on uncore auto-demote information. C3 Audio Demotion When this item is enabled, CPU will conditionally demote C6/C7 requests to C3 based on uncore auto-demote information. 42 - ASRock Vision 3D 137D | User Manual - Page 43
Configuration BIOS SETUP UTILITY Advanced Chipset Settings Share Memory Onboard HD Audio OnBoard Lan Dr. LAN Link speed : 0 Mbps Energy Efficient Ethernet Onboard Card Reader Legacy Support [Auto] [Enabled] [Enabled] [Disabled] [Enabled] [Disabled] Intel VT-d Configuration MXM Thermal Support - ASRock Vision 3D 137D | User Manual - Page 44
this feature if the system supports it. Check Ready Bit Use power on the system. ACPI HPET Table Use this item to enable or disable ACPI HPET Table. The default value is [Disabled]. Please set this option to [Enabled] if you plan to use this motherboard to submit Windows® VistaTM certification. Deep - ASRock Vision 3D 137D | User Manual - Page 45
Storage Configuration SATA Operation Mode SATAII_1 SATAII_2 SATAII_3 eSATA1 BIOS SETUP UTILITY [IDE] [Not Detected] [Not Detected Please noted that AHCI mode is not supported under Windows® XP / XP 64-bit OS. AHCI (Advanced Host Controller Interface) supports NCQ and other new features that will - ASRock Vision 3D 137D | User Manual - Page 46
Configuration BIOS SETUP UTILITY Advanced USB Configuration Legacy USB Support USB 2.0 Rate Matching hub [Enabled] [Enabled] Front Onboard USB3 Back Onboard USB3 [Enabled] [Enabled] USB Keyboard/Remote Power On [Disabled] USB Mouse Power On [Disabled] To enable or disable the onboard USB - ASRock Vision 3D 137D | User Manual - Page 47
set the CPU fan speed. Configuration options: [Full On], [Automatic mode] and [Manual Mode]. The default is value [Automatic mode]. 9.6 Boot Screen In this section, it will display the available devices on your system for you to configure the boot settings and the boot priority. BIOS SETUP UTILITY - ASRock Vision 3D 137D | User Manual - Page 48
9.6.1 Boot Settings Configuration BIOS SETUP UTILITY Boot Boot Settings Configuration Full Screen Logo Boot Logo Boot From Onboard LAN Bootup Num-Lock item to enable or disable OEM Logo. The default value is [Enabled]. Boot Logo Use this option to select logo in POST screen. This option only - ASRock Vision 3D 137D | User Manual - Page 49
or change the supervisor/user password for the system. For the user password, you may also clear it. BIOS SETUP UTILITY Main OC Tweaker Advanced H/W Monitor Boot Security Exit Security Settings Supervisor Password : Not Installed User Password : Not Installed Change Supervisor Password Change - ASRock Vision 3D 137D | User Manual - Page 50
SETUP UTILITY Main OC Tweaker Advanced H/W Monitor Boot Security Exit Exit Options Save Changes and Exit Discard Changes and Exit Discard Changes Load BIOS Defaults Load Performance Setup Default (IDE/SATA) Load Performance Setup AHCI Mode Load Power Saving Setup Default Exit system setup after - ASRock Vision 3D 137D | User Manual - Page 51
Menu shows the applications software that the system supports. Click on a specific item then follow the installation wizard to install it. 10.2.4Contact Information If you need to contact ASRock or want to know more about ASRock, welcome to visit ASRock's website at http://www.asrock.com; or
-
 1
1 -
 2
2 -
 3
3 -
 4
4 -
 5
5 -
 6
6 -
 7
7 -
8
-
9
-
10
-
11
-
12
-
13
-
14
-
15
-
16
-
17
-
18
-
19
-
20
-
21
-
22
-
23
-
24
-
25
-
26
-
27
-
28
-
29
-
30
-
31
-
32
-
33
-
34
-
35
-
36
-
37
-
38
-
39
-
40
-
41
-
42
-
43
-
44
-
45
-
46
-
47
-
48
-
49
-
50
-
51
 |
 |

1
Vision 3D Series
User Manual
Version 1.0
Published September 2010
Copyright©2010 ASRock INC. All rights reserved.