Aastra 5370 User Manual Aastra 5370/5370ip for Aastra 400 - Page 98
Wall mounting, C-2.
 |
View all Aastra 5370 manuals
Add to My Manuals
Save this manual to your list of manuals |
Page 98 highlights
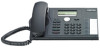
Installation and first-time operation Wall mounting You can also mount the phone on the wall. To do so, screw the stand rest onto the wall as a bracket and hook the phone onto the stand rest. Notes: • As there is only a limited amount of space between the sockets on the back of the phone and the wall on which it is mounted, you need to use a ribbon cable with a short connector for the cord. Ask your dealer for a list of suppliers for a suitable ribbon cable (only Aastra 5370ip). • You can only connect one Aastra M535 and one Aastra M530 (option) if the phone is wall-mounted. • Fit the screws for securing the stand rest and mount the stand rest (Figure A). • Connect the handset and phone cord to the phone (Figure B). For the correct con- nection assignment refer to Chapter "Connect Aastra 5370", page 100 and "Connect Aastra 5370ip", page 101. • Insert the phone into the stand rest horizontally (Figure C-1) and slide downwards (Figure C-2). • Unscrew the cams for holding the handset (Figures D-1 to D-3). • Insert the handset. 98 eud-1281/1.0 - R1.0 - 12.2010
-
 1
1 -
2
-
3
-
4
-
5
-
6
-
7
-
8
-
9
-
10
-
11
-
12
-
13
-
14
-
15
-
16
-
17
-
18
-
19
-
20
-
21
-
22
-
23
-
24
-
25
-
26
-
27
-
28
-
29
-
30
-
31
-
32
-
33
-
34
-
35
-
36
-
37
-
38
-
39
-
40
-
41
-
42
-
43
-
44
-
45
-
46
-
47
-
48
-
49
-
50
-
51
-
52
-
53
-
54
-
55
-
56
-
57
-
58
-
59
-
60
-
61
-
62
-
63
-
64
-
65
-
66
-
67
-
68
-
69
-
70
-
71
-
72
-
73
-
74
-
75
-
76
-
77
-
78
-
79
-
80
-
81
-
82
-
83
-
84
-
85
-
86
-
87
-
88
-
89
-
90
-
91
-
92
-
 93
93 -
 94
94 -
 95
95 -
 96
96 -
 97
97 -
 98
98 -
 99
99 -
 100
100 -
 101
101 -
 102
102 -
 103
103 -
104
-
105
-
106
-
107
-
108
-
109
-
110
-
111
-
112
-
113
 |
 |
