Aastra 9116LP 9116LP User Guide - Page 8
Memory keys
 |
View all Aastra 9116LP manuals
Add to My Manuals
Save this manual to your list of manuals |
Page 8 highlights
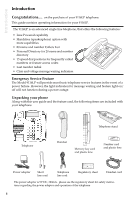
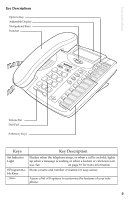
Basic Installation 4. Attach the cords to the telephone stand 5. Mount the telephone on the wall Route the cords along the groove on the telephone stand as shown in the illustration. It is recommended that you use a wall-mounting plate which is available through your telephone company or a local retailer. You will find it easier to wall-mount the telephone if you purchase one short 20 cm (8") telephone cord and use it in place of the long telephone cord. Coil the telephone cord(s) into the space provided on the back of the telephone. Line up the keys on the wall mounting plate with the key holes on the back of the telephone. Place the telephone onto the wall mounting plate, and then push down to secure the telephone into place. 6. Insert the number card on your 7. Insert the Memory key card on your telephone telephone Write your telephone number on the number card. Place the number card into the slot underneath the handset cradle on the on the telephone. Gently bend the clear plastic lens and place it on top of the number card in the slot. This card contains the feature names for the dedicated keys and label identification spaces for the eight programmable memory keys. Place the card into the memory key card slot on the telephone. Gently bend the clear plastic lens and place it on top of the memory key card in the slot. For more information on programming memory keys, refer to Memory keys on page 15. Options Directory Save Delete Shift 5
-
 1
1 -
2
-
 3
3 -
 4
4 -
 5
5 -
 6
6 -
 7
7 -
 8
8 -
 9
9 -
 10
10 -
 11
11 -
 12
12 -
 13
13 -
14
-
15
-
16
-
17
-
18
-
19
-
20
-
21
-
22
-
23
-
24
-
25
-
26
-
27
-
28
 |
 |
