Acer AL1714 AL1714 User Guide - Page 3
Usage - power supply
 |
View all Acer AL1714 manuals
Add to My Manuals
Save this manual to your list of manuals |
Page 3 highlights
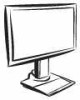
Usage Installation Guide Attention Quick Installation Note: Read the [Safety Rules] section carefully before starting the installation Before installing your LCD display, consider the following with reference to the space where the display is to be installed: To minimize the reflection of the display, protect your eyes and ensure premium quality, don't install your LCD display near windows or with backlight. Keep the display away from your eyes at least by 30 cm. The upper edge of the display should be a little higher than your sight. Adjust the front and back dip angles of the display based on your visual angle so that you can view the display comfortably. Complete the following steps for quick installation: (See the figure) Assemble the seat of the display Take the seat out of the box and place it on a flat table. Take your LCD display out of the carton and assemble the display and seat along the rail. You will hear a click sound when the display and seat are engaged correctly. Connection to PC Make sure that the power supply of your PC is turned off and the power plug is removed. Connect and fasten both ends of the signal cable to your PC host and LCD display respectively. If your LCD display has built-in speakers, connect the audio cable attached to the display from the sound card output of your PC to the audio input on the back of your LCD display. Connect the attached power cable to your LCD display. Plug the power cable to the receptacle. Turn on the power supplies of your PC and LCD display. Signal Cable Audio Cable Transformer DC end 2
-
 1
1 -
 2
2 -
 3
3 -
 4
4 -
 5
5 -
 6
6 -
 7
7 -
 8
8 -
 9
9
 |
 |
