Acer AL1917W AL1917C User's Guide - Page 5
Operation for Analog
 |
View all Acer AL1917W manuals
Add to My Manuals
Save this manual to your list of manuals |
Page 5 highlights
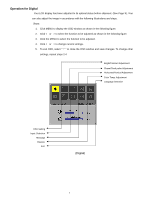
Operation for Analog Your LCD display has been adjusted to its optimal status before shipment. (See Page 9). Your can also adjust the image in accordance with the following illustrations and steps. Steps: 1. Click MENU to display the OSD window as shown in the following figure. 2. Click < or > to select the function to be adjusted as shown in the following figure. 3. Click the MENU to select the function to be adjusted. 4. Click < or > to change current settings. 5. To exit OSD, select " " to close the OSD window and save changes. To change other settings, repeat steps 2-4. Bright/Contract Adjustment Phase/Clock pulse Adjustment Horizontal/Vertical Adjustment Color Temp. Adjustment Language Selection OSD Setting Auto Adjustment Message Restore Exit (Analog) 4
-
 1
1 -
 2
2 -
 3
3 -
 4
4 -
 5
5 -
 6
6 -
 7
7 -
 8
8 -
 9
9 -
 10
10
 |
 |
