Acer AR180 F1 User Manual - Page 48
Removing and installing a 3.5” hard disk drive, Removing a 3.5 hard disk drive with carrier
 |
View all Acer AR180 F1 manuals
Add to My Manuals
Save this manual to your list of manuals |
Page 48 highlights
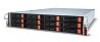
30 3 System upgrades Removing and installing a 3.5" hard disk drive Removing a 3.5" hard disk drive with carrier 1 Observe the ESD precautions described on page 24. 2 Remove the carrier with failed HDD. 3 Remove the HDD carrier. (1) Unlock the HDD carrier latch. (2) Slide the HDD carrier latch to release the lever. (3) Pull the lever and slide the carrier from the chassis. 4 Observe the post-installation instructions described on page 25. Installing a 3.5" hard disk drive with carrier 1 Slide the HDD carrier all the way into the drive bay. 2 Use the lever to push the HDD carrier until it locks into place, then close the HDD carrier lever.
-
 1
1 -
2
-
3
-
4
-
5
-
6
-
7
-
8
-
9
-
10
-
11
-
12
-
13
-
14
-
15
-
16
-
17
-
18
-
19
-
20
-
21
-
22
-
23
-
24
-
25
-
26
-
27
-
28
-
29
-
30
-
31
-
32
-
33
-
34
-
35
-
36
-
37
-
38
-
39
-
40
-
41
-
42
-
 43
43 -
 44
44 -
 45
45 -
 46
46 -
 47
47 -
 48
48 -
 49
49 -
 50
50 -
 51
51 -
 52
52 -
 53
53 -
54
-
55
-
56
-
57
-
58
-
59
-
60
-
61
-
62
-
63
-
64
-
65
-
66
-
67
-
68
-
69
-
70
-
71
-
72
-
73
-
74
-
75
-
76
-
77
-
78
-
79
-
80
-
81
-
82
-
83
-
84
-
85
-
86
-
87
-
88
-
89
-
90
-
91
-
92
-
93
-
94
-
95
-
96
-
97
-
98
-
99
-
100
-
101
-
102
-
103
-
104
-
105
-
106
-
107
-
108
-
109
-
110
-
111
-
112
-
113
-
114
-
115
-
116
-
117
-
118
-
119
-
120
-
121
-
122
-
123
-
124
-
125
-
126
-
127
-
128
-
129
-
130
-
131
-
132
-
133
-
134
-
135
-
136
-
137
-
138
-
139
-
140
-
141
-
142
-
143
-
144
-
145
-
146
-
147
-
148
-
149
-
150
-
151
-
152
-
153
-
154
-
155
-
156
-
157
-
158
-
159
-
160
-
161
-
162
-
163
-
164
-
165
-
166
-
167
-
168
-
169
-
170
-
171
-
172
-
173
-
174
-
175
-
176
-
177
-
178
 |
 |

3 System upgrades
30
Removing and installing a 3.5” hard disk
drive
Removing a 3.5” hard disk drive with carrier
1
Observe the ESD precautions described on page 24.
2
Remove the carrier with failed HDD.
3
Remove the HDD carrier.
(1)
Unlock the HDD carrier latch.
(2)
Slide the HDD carrier latch to release the lever.
(3)
Pull the lever and slide the carrier from the chassis.
4
Observe the post-installation instructions described on page 25.
Installing a 3.5” hard disk drive with carrier
1
Slide the HDD carrier all the way into the drive bay.
2
Use the lever to push the HDD carrier until it locks into place, then
close the HDD carrier lever.