Acer Aspire L320 Aspire L Series User's Guide EN - Page 24
Turning on your computer
 |
View all Acer Aspire L320 manuals
Add to My Manuals
Save this manual to your list of manuals |
Page 24 highlights
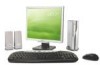
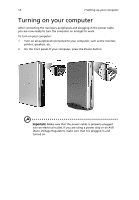
14 2 Setting up your computer Turning on your computer After connecting the necessary peripherals and plugging in the power cable, you are now ready to turn the computer on and get to work. To turn on your computer: 1 Turn on all peripherals connected to your computer, such as the monitor, printer, speakers, etc. 2 On the front panel of your computer, press the Power button. Important: Make sure that the power cable is properly plugged into an electrical outlet. If you are using a power strip or an AVR (Auto-Voltage Regulator), make sure that it is plugged in and turned on.
-
 1
1 -
2
-
3
-
4
-
5
-
6
-
7
-
8
-
9
-
10
-
11
-
12
-
13
-
14
-
15
-
16
-
17
-
18
-
 19
19 -
 20
20 -
 21
21 -
 22
22 -
 23
23 -
 24
24 -
 25
25 -
 26
26 -
 27
27 -
 28
28 -
 29
29 -
30
-
31
-
32
-
33
-
34
-
35
-
36
-
37
-
38
-
39
-
40
-
41
 |
 |

2 Setting up your computer
14
Turning on your computer
After connecting the necessary peripherals and plugging in the power cable,
you are now ready to turn the computer on and get to work.
To turn on your computer:
1
Turn on all peripherals connected to your computer, such as the monitor,
printer, speakers, etc.
2
On the front panel of your computer, press the Power button.
Important:
Make sure that the power cable
is properly plugged
into an electrical outlet. If you are using a power strip or an AVR
(Auto-Voltage Regulator), make sure that it is plugged in and
turned on.