Acer C101i User Manual - Page 7
Charging LED Indicator, Adjusting the Focus, Power On / Off / Standby, Adjusting the brightness
 |
View all Acer C101i manuals
Add to My Manuals
Save this manual to your list of manuals |
Page 7 highlights
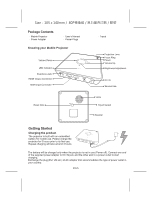
Size:105 x 140mm / 80P Charging LED Indicator During charging, the LED indicator lights will flash as marquee. While the battery is fully charged, the LED indicator lights turns to solid blue. LED Status Indication 3 blue LEDs stay on Power capacity is between 80% to 100% 2 blue LEDs stay on Power capacity is between 45% to 80% 1 blue LED stays on Power capacity is between 10% to 45% 1 blue LED blinks Power capacity is below 10% LED Marquee Projector is being charged Power On / Off / Standby Push the Power button for 2 seconds to turn on the projector. Push the Power button again for 3 seconds to turn off the projector. Standby mode: Push the Power button for 1 second to turn on / off the projector lamp to save the battery and system reboot time. (The LEDs are still on when the projector is in standby mode.) Adjusting the Focus Place the projector on a flat surface and toward a wall or a projection screen. Adjust the focus by turning the focus ring to get a sharp and clear picture. Note: Use a tripod to increase the height of the projectional image when necessary. The tripod socket is located under the projector. Adjusting the brightness of projector There is a brightness adjustment button on the top of the projector. It allows you to change the brightness. Mode Normal Eco Brightness High Low Battery Power (HDMI mode) 70 mins 120 mins Main Screen Power on the projector, the following screen appears after the projector boots up. EN-6
-
 1
1 -
 2
2 -
 3
3 -
 4
4 -
 5
5 -
 6
6 -
 7
7 -
 8
8 -
 9
9 -
 10
10 -
 11
11 -
 12
12 -
13
 |
 |
