Acer E2000HQ User Manual - Page 22
OSD Menu
 |
View all Acer E2000HQ manuals
Add to My Manuals
Save this manual to your list of manuals |
Page 22 highlights
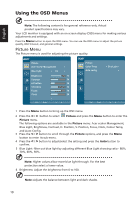
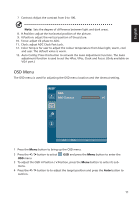
English 7 Contrast: Adjust the contrast from 0 to 100. Note: Sets the degree of difference between light and dark areas. 8. H.Position: adjust the horizontal position of the picture. 9. V.Position: adjust the vertical position of the picture. 10. Focus: adjust clk phase to ADC. 11. Clock: adjust ADC Clock Fast Lock. 12. Color Temp is for user to adjust the colour temperature from blue light, warm, cool and user. The default value is warm. 13. Auto Config: Press this button to activate the Auto Adjustment function. The Auto adjustment function is used to set the HPos, VPos, Clock and Focus. (Only available on VGA port.) OSD Menu The OSD menu is used for adjusting the OSD menu location and the timeout setting. OSD OSD Timeout 10 Exit Enter 1 Press the Menu button to bring up the OSD menu. 2 Press the < / > button to select OSD and press the Menu button to enter the OSD menu. 3 To adjust the OSD H.Position / V.Position, press the Menu button to enter its submenu. 4 Press the < / > button to to adjust the target position and press the Auto button to confirm. 11
-
 1
1 -
2
-
3
-
4
-
5
-
6
-
7
-
8
-
9
-
10
-
11
-
12
-
13
-
14
-
15
-
16
-
 17
17 -
 18
18 -
 19
19 -
 20
20 -
 21
21 -
 22
22 -
 23
23 -
 24
24 -
 25
25
 |
 |
