Acer Iconia B3-A20B User Manual - Page 6
Turning on for the first time, Charging your tablet
 |
View all Acer Iconia B3-A20B manuals
Add to My Manuals
Save this manual to your list of manuals |
Page 6 highlights
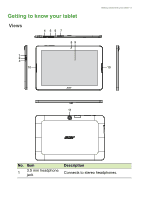
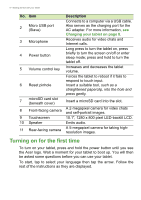
6 - Getting started with your tablet No. Item 2 Micro USB port (Slave) 3 Microphone 4 Power button 5 Volume control key 6 Reset pinhole 7 microSD card slot (beneath cover) 8 Front-facing camera 9 Touchscreen 10 Speaker 11 Rear-facing camera Description Connects to a computer via a USB cable. Also serves as the charging port for the AC adapter. For more information, see Charging your tablet on page 8. Receives audio for video chats and Internet calls. Long press to turn the tablet on, press briefly to turn the screen on/off or enter sleep mode; press and hold to turn the tablet off. Increases and decreases the tablet volume. Forces the tablet to reboot if it fails to respond to touch input. Insert a suitable tool, such as a straightened paperclip, into the hole and press gently. Insert a microSD card into the slot. A 2-megapixel camera for video chats and self-portrait images. 10.1", 1280 x 800 pixel LED-backlit LCD. Emits audio. A 5-megapixel camera for taking highresolution images. Turning on for the first time To turn on your tablet, press and hold the power button until you see the Acer logo. Wait a moment for your tablet to boot up. You will then be asked some questions before you can use your tablet. To start, tap to select your language then tap the arrow. Follow the rest of the instructions as they are displayed.
-
 1
1 -
 2
2 -
 3
3 -
 4
4 -
 5
5 -
 6
6 -
 7
7 -
 8
8 -
 9
9 -
 10
10 -
 11
11 -
 12
12 -
13
-
14
-
15
-
16
-
17
-
18
-
19
-
20
-
21
-
22
-
23
-
24
-
25
-
26
-
27
-
28
-
29
-
30
-
31
-
32
-
33
-
34
-
35
-
36
-
37
-
38
-
39
-
40
-
41
-
42
-
43
-
44
-
45
-
46
-
47
-
48
-
49
-
50
-
51
-
52
 |
 |
