Acer Iconia B3-A32 User Manual - Page 6
Micro USB port, 1 LED-backlit LCD.
 |
View all Acer Iconia B3-A32 manuals
Add to My Manuals
Save this manual to your list of manuals |
Page 6 highlights
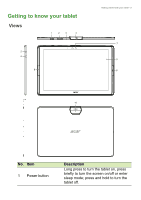
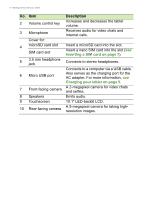
6 - Getting started with your tablet No. Item 2 Volume control key 3 Microphone Cover for: 4 microSD card slot SIM card slot 5 3.5 mm headphone jack 6 Micro USB port 7 Front-facing camera 8 Speakers 9 Touchscreen 10 Rear-facing camera Description Increases and decreases the tablet volume. Receives audio for video chats and Internet calls. Insert a microSD card into the slot. Insert a nano SIM card into the slot (see Inserting a SIM card on page 7). Connects to stereo headphones. Connects to a computer via a USB cable. Also serves as the charging port for the AC adapter. For more information, see Charging your tablet on page 9. A 2-megapixel camera for video chats and selfies. Emits audio. 10.1" LED-backlit LCD. A 5-megapixel camera for taking highresolution images.
-
 1
1 -
 2
2 -
 3
3 -
 4
4 -
 5
5 -
 6
6 -
 7
7 -
 8
8 -
 9
9 -
 10
10 -
 11
11 -
 12
12 -
13
-
14
-
15
-
16
-
17
-
18
-
19
-
20
-
21
-
22
-
23
-
24
-
25
-
26
-
27
-
28
-
29
-
30
-
31
-
32
-
33
-
34
-
35
-
36
-
37
-
38
-
39
-
40
-
41
-
42
-
43
-
44
-
45
-
46
-
47
-
48
-
49
-
50
-
51
-
52
-
53
-
54
-
55
 |
 |
