Acer KG251QS User Manual - Page 26
Adjusting the Picture
 |
View all Acer KG251QS manuals
Add to My Manuals
Save this manual to your list of manuals |
Page 26 highlights
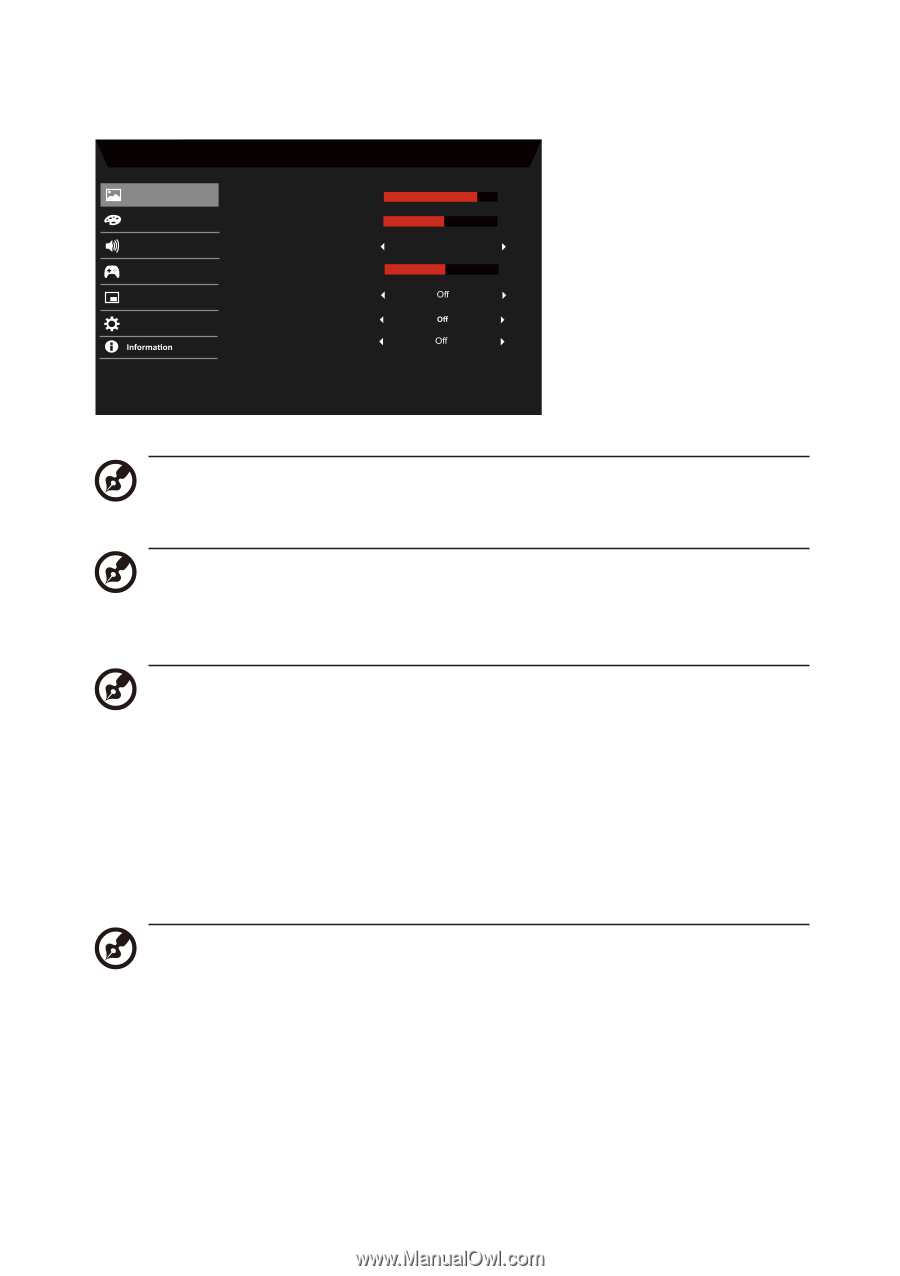
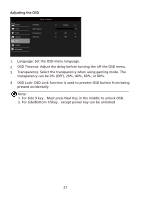
Adjusting the Picture Picture Color Audio Gaming OSD System Mode - Standard Brightness Contrast Low Blue Light Black Boost ACM HDR Super Sharpness 80 50 Standard 5 1. Brightness: Adjust the brightness from 0 to 100. Note: Adjusts the balance between light and dark shades. 2. Contrast: adjust the contrast from 0 to 100. Note: Sets the degree of difference between light and dark areas. 3. Low Blue Light: Filter out blue light to protect your eyes by adjusting how much blue light is shown --Level 1, 2, 3, 4. Note: A lower level allows more blue light to pass through, so in order to achieve the best protection, please select a higher level, of which Level 4 is in the best state. 4. Black Boost: This boosts the amplitude of the dark color levels of the display- blacks will be less black. The higher the level, the higher the boost. 5. ACM: Turn ACM on or off. The default is off. 6. HDR: Turn HDR Off, Auto or HDR. The default is Off. Select Auto enables this function to automatically detect and process HDR signal. Note: 1. If HDR is "Auto", then Modes is set to "HDR" automatically. 2. If HDR is "Auto", certain parameters (ACM, Gamma, Contrast, Low Blue Light, Color Temperature, Black Boost, Grayscale Mode, 6-axis Hue, 6-axis Saturate, and VRB/TVR) are grayed out and disabled. 3. HDR function is only available for HDMI 2.0. or DP. 7. Super Sharpness technology can simulate high-resolution images by boosting the pixel density of the original source. It can make images sharper and clear. 16
-
 1
1 -
2
-
3
-
4
-
5
-
6
-
7
-
8
-
9
-
10
-
11
-
12
-
13
-
14
-
15
-
16
-
17
-
18
-
19
-
20
-
 21
21 -
 22
22 -
 23
23 -
 24
24 -
 25
25 -
 26
26 -
 27
27 -
 28
28 -
 29
29 -
 30
30 -
 31
31 -
32
-
33
-
34
-
35
-
36
-
37
-
38
 |
 |