Acer P5530i User Manual - Page 38
Setting
 |
View all Acer P5530i manuals
Add to My Manuals
Save this manual to your list of manuals |
Page 38 highlights
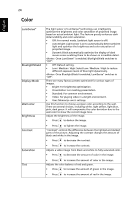
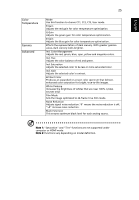
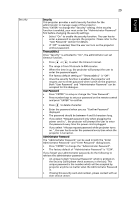
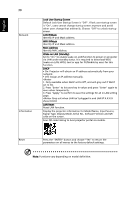
28 English Setting Startup Screen Screen Capture Source Selection USB 5V (Standby) HDMI CEC VGA OUT (Standby) Use this function to select your desired startup screen. If you change the setting, the changes will take effect when you exit the OSD menu. • Acer: The default startup screen of your Acer projector. • User: Use memorize picture from "Screen Capture" function. Use this function to customize the startup screen. To capture the image that you want to use as the startup screen, follow the instructions below. Notice: Before proceeding with the following steps, make sure that the "Keystone" is set to the default value 0. • Press "Screen Capture" to customize the startup screen. • Pop message to suggest user to input native source. The "resolution" shown in the text is based on native timing. Press "Start" to go next UI; press "Back" to previous UI . • A dialog box appears to confirm the action. Show a message: Adjust the picture size to fit in the red frame and system will capture your image after pressing "ENTER". Choose "ENTER" to use the current image as your customized startup screen. Choose "Back" to cancel the screen capture and exit the onscreen display (OSD). • A message appears, stating that the screen capture is in progress. • When the screen capture is finished, the message disappears and the original display is shown. • The customized startup screen takes effect when there is a new input signal or when you restart the projector. Manual by source menu, Auto by Smart Detection. Default is "Off". Choose "On" to supply 5V/2A pwoer while in standby mode. Support one of MHL, outer USB 5V, and wireless dongle (inner USB 5V). If two or above mentioned are occupied, the power supply priority is: wireless dongle (inner USB 5V) > MHL > outer USB 5V. Default is Off, Select "On" to enable HDMI CEC function. Default is "Off". Choose "On" to enable VGA OUT connection.
-
 1
1 -
2
-
3
-
4
-
5
-
6
-
7
-
8
-
9
-
10
-
11
-
12
-
13
-
14
-
15
-
16
-
17
-
18
-
19
-
20
-
21
-
22
-
23
-
24
-
25
-
26
-
27
-
28
-
29
-
30
-
31
-
32
-
 33
33 -
 34
34 -
 35
35 -
 36
36 -
 37
37 -
 38
38 -
 39
39 -
 40
40 -
 41
41 -
 42
42 -
 43
43 -
44
-
45
-
46
-
47
-
48
-
49
-
50
-
51
-
52
-
53
-
54
-
55
-
56
-
57
-
58
-
59
-
60
-
61
-
62
-
63
-
64
-
65
-
66
-
67
-
68
-
69
 |
 |
