Acer P7305W User Manual - Page 17
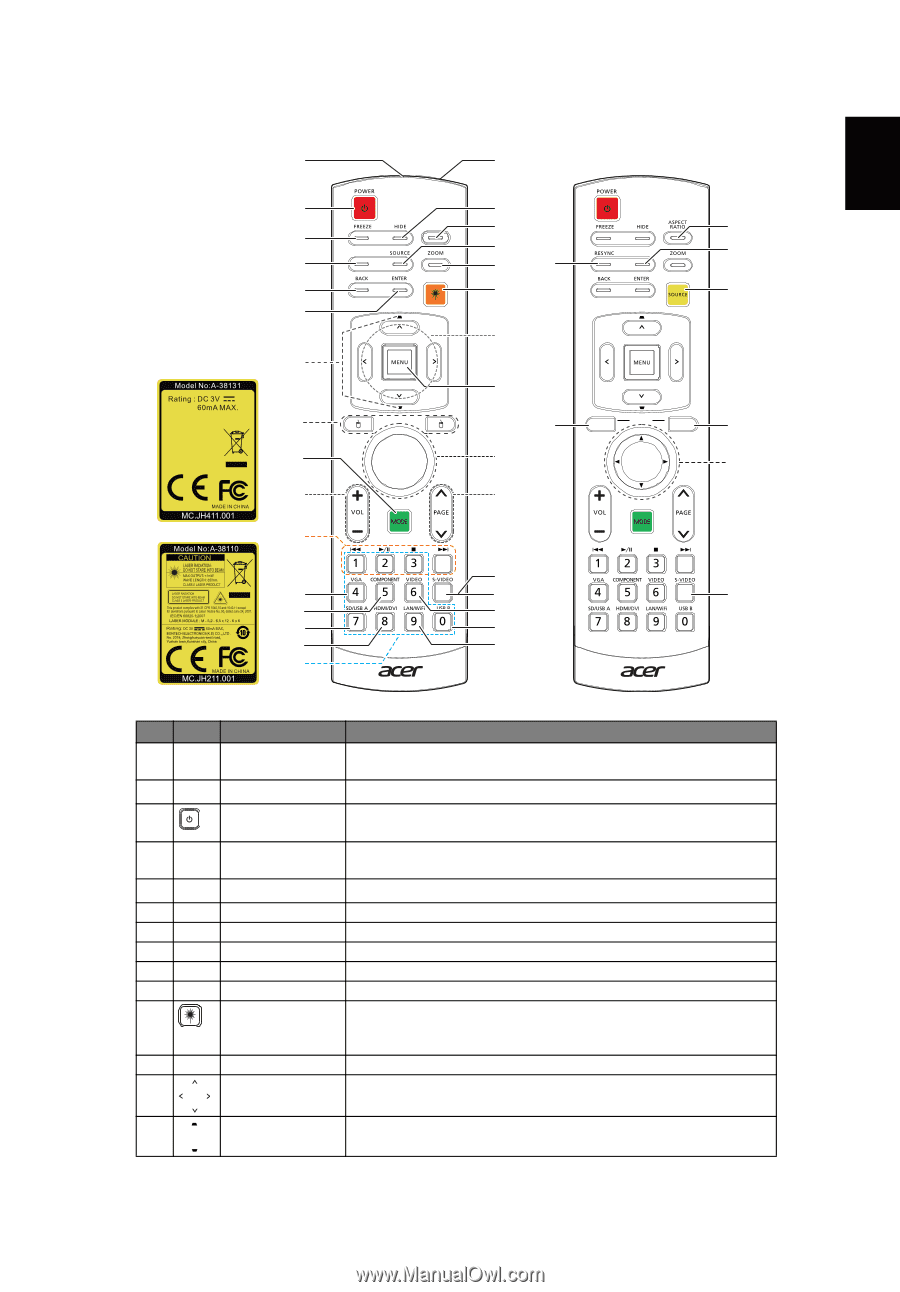
Remote Control Layout
 |
View all Acer P7305W manuals
Add to My Manuals
Save this manual to your list of manuals |
Page 17 highlights
English Remote Control Layout 1 3 5 3D 8 10 12 MEDIA SETUP 14 16 18 19 21 22 INFO 25 27 29 31 7 2 4 6 32 7 3D 8 9 33 11 7 13 15 34 HOME MEDIA SETUP 6 17 17 20 23 24 23 26 28 30 # Icon Function 1 Infrared transmitter 2 Laser pointer 3 POWER Description Sends signals to the projector. Aim the remote at the viewing screen. Please see "Turning the Projector On/Off" section. 4 HIDE Temporarily turns off the video. Press "HIDE" to hide the image, press again to display the image. 5 FREEZE Pause the screen image. 6 MEDIA_SETUP Press "MEDIA SETUP"/"SETUP" to enter media OSD setting. 7 SOURCE Changes the active source. 8 3D Press "3D" to select 3D models. 9 ZOOM Zooms the projector display in or out. 10 Back Press "BACK" to go back one menu step. 11 Laser button Aim the remote at the viewing screen, press and hold this button to activate the laser pointer. This function is not supported in Japanese market. 12 Enter Press "ENTER" to play media file. 13 Four directional Use up, down, left, right buttons to select items or make select keys adjustments to your selection. 14 KEYSTONE Adjusts the image to compensate for distortion caused by tilting the projector (± 40 degrees).
-
 1
1 -
2
-
3
-
4
-
5
-
6
-
7
-
8
-
9
-
10
-
11
-
 12
12 -
 13
13 -
 14
14 -
 15
15 -
 16
16 -
 17
17 -
 18
18 -
 19
19 -
 20
20 -
 21
21 -
 22
22 -
23
-
24
-
25
-
26
-
27
-
28
-
29
-
30
-
31
-
32
-
33
-
34
-
35
-
36
-
37
-
38
-
39
-
40
-
41
-
42
-
43
-
44
-
45
-
46
-
47
-
48
-
49
-
50
-
51
-
52
-
53
-
54
-
55
-
56
-
57
-
58
-
59
-
60
-
61
-
62
-
63
-
64
-
65
-
66
-
67
 |
 |