Acer PM161Q User Manual - Page 19
Adjusting the OSD settings
 |
View all Acer PM161Q manuals
Add to My Manuals
Save this manual to your list of manuals |
Page 19 highlights
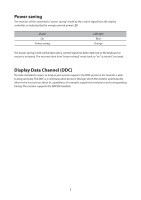
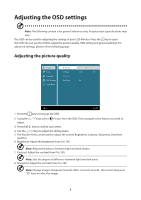
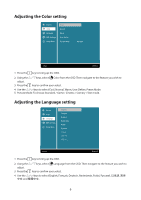
Adjusting the OSD settings Note: The following content is for general reference only. Actual product specifications may vary. The OSD can be used for adjusting the settings of your LCD Monitor. Press the key to open the OSD. You can use the OSD to adjust the picture quality, OSD setting and general settings. For advanced settings, please refer to following page: Adjusting the picture quality Picture Color Language OSD Settings Setup Menu Brightness Contrast Sharpness Over Drive IIIIIIIIII 80 IIIII 50 On 1:Exit Select:2 1. Press the key to bring up the OSD. 2. Using the / keys, select Picture from the OSD. Then navigate to the feature you wish to adjust. 3. Press the key to confirm your select. 4. Use the / keys to adjust the sliding scales. 5. The Picture menu can be used to adjust the current Brightness, Contrast, Sharpness, Overdrive qualities. 6. Brightness: Adjust the brightness from 0 to 100. Note: Adjusts the balance between light and dark shades. 7. Contrast: Adjust the contrast from 0 to 100 Note: Sets the degree of difference between light and dark areas. 8. Sharpness: Adjust the contrast from 0 to 100 Note: Change Image's sharpness/Smooth effect. 0 is most smooth, 100 is most sharpness. "50" have no effect for image. 8
-
 1
1 -
2
-
3
-
4
-
5
-
6
-
7
-
8
-
9
-
10
-
11
-
12
-
13
-
 14
14 -
 15
15 -
 16
16 -
 17
17 -
 18
18 -
 19
19 -
 20
20 -
 21
21 -
 22
22
 |
 |