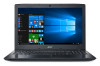
Acer TravelMate P259-G2-MG User Manual W10 - Page 13
Base view, Description
 |
View all Acer TravelMate P259-G2-MG manuals
Add to My Manuals
Save this manual to your list of manuals |
Page 13 highlights
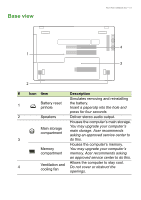
Base view Your Acer notebook tour - 13 4 1 3 2 # Icon Item Description Simulates removing and reinstalling 1 Battery reset pinhole the battery. Insert a paperclip into the hole and press for four seconds. 2 Speakers Deliver stereo audio output. Houses the computer's main storage. Main storage compartment You may upgrade your computer's main storage. Acer recommends asking an approved service center to 3 do this. Memory compartment Houses the computer's memory. You may upgrade your computer's memory. Acer recommends asking an approved service center to do this. 4 Ventilation and cooling fan Allows the computer to stay cool. Do not cover or obstruct the openings.
-
 1
1 -
2
-
3
-
4
-
5
-
6
-
7
-
 8
8 -
 9
9 -
 10
10 -
 11
11 -
 12
12 -
 13
13 -
 14
14 -
 15
15 -
 16
16 -
 17
17 -
 18
18 -
19
-
20
-
21
-
22
-
23
-
24
-
25
-
26
-
27
-
28
-
29
-
30
-
31
-
32
-
33
-
34
-
35
-
36
-
37
-
38
-
39
-
40
-
41
-
42
-
43
-
44
-
45
-
46
-
47
-
48
-
49
-
50
-
51
-
52
-
53
-
54
-
55
-
56
-
57
-
58
-
59
-
60
-
61
-
62
-
63
-
64
-
65
-
66
-
67
-
68
-
69
-
70
-
71
-
72
-
73
-
74
-
75
-
76
-
77
-
78
-
79
-
80
-
81
-
82
 |
 |

Your Acer notebook tour - 13
Base view
1
2
3
4
#
Icon
Item
Description
1
Battery reset
pinhole
Simulates removing and reinstalling
the battery.
Insert a paperclip into the hole and
press for four seconds.
2
Speakers
Deliver stereo audio output.
3
Main storage
compartment
Houses the computer’s main storage.
You may upgrade your computer’s
main storage. Acer recommends
asking an approved service center to
do this.
Memory
compartment
Houses the computer’s memory.
You may upgrade your computer’s
memory. Acer recommends asking
an approved service center to do this.
4
Ventilation and
cooling fan
Allows the computer to stay cool.
Do not cover or obstruct the
openings.