Acer X1126AH User Manual (3D) - Page 4
Using DLP 3D / NVIDIA 3DTV Play technology, Setting up a 3D environment
 |
View all Acer X1126AH manuals
Add to My Manuals
Save this manual to your list of manuals |
Page 4 highlights
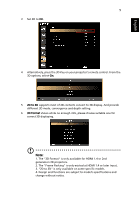
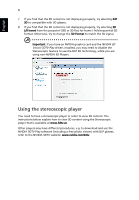
English 4 Using DLP 3D / NVIDIA 3DTV Play technology Requires DLP 3D glasses. Before you can enjoy the benefits of the DLP 3D technology, you will need to do the following. 1 Ensure your graphics card supports 3D playback. Note: Please refer to your graphics card's documentation. 2 Download and install the latest drivers for your graphics card. Note: Please refer to your graphics card vendor's website for the latest driver version. 3 You should also download a suitable 3D player such as the one available from www.3dtv.at. To download software and use an NVIDIA 3DTV Play ready projector with DLP glasses, refer to the NVIDIA 3DTV Play website: www.nvidia.com/3dtv. Note: You may need to purchase additional software. 4 Ensure you have the correct DLP-compatible 3D glasses. Setting up a 3D environment Once you have installed the drivers, you will need to set up the environment. 1 Set the refresh rate to 100/120 Hz on your graphics card for frame/field sequential 3D formats. Others, please set refresh rate which the 3D content requires. If you are viewing Blu-ray 3D content over an HDMI 1.4a or later connection, this will be set automatically. 2 Press the menu button on the projector remote control to open the OSD. Select the 3D section (the sixth menu option) on the left-hand side of the window. Note: Blu-ray 3D content over an HDMI 1.4a or later connection is not supported on most of LED projectors.
-
 1
1 -
 2
2 -
 3
3 -
 4
4 -
 5
5 -
 6
6 -
 7
7
 |
 |