Adaptec 1430SA User Guide - Page 24
Connecting Disk Drives to SATA HostRAID Controllers, Checking Your Controller and Devices - bios not installed
 |
UPC - 760884154328
View all Adaptec 1430SA manuals
Add to My Manuals
Save this manual to your list of manuals |
Page 24 highlights
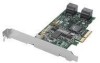
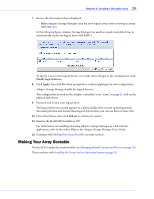
Chapter 5: Installing the HostRAID Controller and Disk Drives ● 24 Connecting Disk Drives to SATA HostRAID Controllers You can connect SATA disk drives to your HostRAID controller. There are no jumpers or switches to set before installation. The cable ends are identical, so you don't need to worry about which end to attach to the controller and which end to attach to the drive. The interface cable connectors, controller connectors, and disk drive connectors are all keyed so that you can insert them in only one direction. If you plan to build a bootable array using internal disk drives, ensure you install at least the minimum number disk drives required to support the RAID level you want. See page 47 for more information. Checking Your Controller and Devices Now that you have installed your controller and connected your Serial ATA disk drives, you are ready to use the ARC utility to check your controller and devices, as described below: 1 Turn on your computer. 2 When the Adaptec banner appears, enter the ARC utility by pressing Ctrl+A. 3 If your drives have already been used in another system (even if not part of an array), select Disk Utilities and format the drive. Otherwise, skip to Step 4. Note: If a drive appears to be missing, power down the computer and check the connections. 4 Select SATASelect to verify the hardware configuration of the controller and the drives. Verify that all drives and controllers are shown. If anything appears to be missing, power down the computer and check the connections. Determining the Boot Controller Your Adaptec Serial ATA II RAID 1430SA, 1420SA, and 1220SA are bootable controllers. If your computer already contains a bootable disk drive with an installed operating system, you can set up your computer to boot a second operating system from the new controller. To add a second bootable controller, you may need to enter Setup and change the hard disk boot sequence so that the Adaptec Serial ATA II RAID controller heads the list. If Setup does not allow this change, your system BIOS may not be configurable to allow the Adaptec Serial ATA II RAID controller to act as a second boot device. Next Steps If you are installing the driver and an operating system onto a bootable array, continue with Creating a Bootable Array on page 25. If you are completing a standard installation onto an existing operating system, continue with Installing the Driver on an Existing Operating System on page 33.
-
 1
1 -
2
-
3
-
4
-
5
-
6
-
7
-
8
-
9
-
10
-
11
-
12
-
13
-
14
-
15
-
16
-
17
-
18
-
 19
19 -
 20
20 -
 21
21 -
 22
22 -
 23
23 -
 24
24 -
 25
25 -
 26
26 -
 27
27 -
 28
28 -
 29
29 -
30
-
31
-
32
-
33
-
34
-
35
-
36
-
37
-
38
-
39
-
40
-
41
-
42
-
43
-
44
-
45
-
46
-
47
-
48
-
49
-
50
-
51
-
52
-
53
-
54
-
55
-
56
-
57
-
58
-
59
-
60
-
61
-
62
-
63
-
64
-
65
-
66
-
67
-
68
-
69
-
70
-
71
-
72
-
73
-
74
-
75
-
76
-
77
-
78
 |
 |